
You are here:
Request a Payment with an Enhanced Bot
Use the payment messaging component to request and process payments from customers in enhanced Apple Messages for Business channels.
Required Editions
| View supported editions for Einstein Bots. |
| View supported editions for Messaging. |
| User Permissions Needed | |
|---|---|
| To build and manage Einstein Bots: | Customize Application OR Modify Metadata OR Manage Bots |
This component is asynchronous. When the bot sends the component, the customer can continue the conversation and respond to the component later. Bots that use asynchronous components require careful configuration to ensure a natural conversational experience. Before adding this component to a bot, learn more about best practices for asynchronous components.
This component is available only for enhanced Apple Messages for Business channels.
In enhanced bots, payment components time out after five minutes.
Before you begin:
- Add Apple Pay to your channel and create a payment
messaging component.
When you set up a payment component, you specify a prompt that asks customers to make a payment and a confirmation message. The prompt and confirmation message aren’t visible in the Bot Builder, but you don’t need to add a separate dialog step to send them. In the bot conversation, the prompt is sent to the customer when they reach the dialog step that references your component. After the customer completes the payment, the confirmation message appears as a message from the customer.
- If you haven’t already, create one or more Apex classes to dynamically generate session-specific payment details each time the component is sent. Payment details include line items, a payment total, and optionally, shipping methods. For examples, see Apex Reference Guide: RichMessaging Namespace.
-
To generate payment details each time the component is sent, add an Apex class to your
dialog.
- Go to the Bot Builder. Click Dialogs, and then select the dialog that you want to add the payment request to.
- From the Dialog Component Library, drag the Apex or Flow action dialog step onto the canvas.
- In the Step Properties panel, select the Apex class or flow associated with the payment component.
- For each output, create or select a bot variable to store the output of the Apex class or flow. You reference these variables again in the Payment dialog step to customize the payment request.
- Repeat for each Apex class or flow you created to populate the parameters.
-
Add the payment component to your bot.
- From the Dialog Component Library, drag the Payment dialog step onto the canvas.
- In the Step Properties panel, search for and select the payment component associated with your Apex class or flow. If you don’t see your component, refresh the builder and try again.
-
The payment messaging component is asynchronous, so tell the bot what to do after sending
the form. The bot can wait for customer input or move on to the next dialog step. See Conversation Design for Asynchronous
Components.
 Note When exact matching or intent recognition are enabled, the customer can enter text that redirects the bot conversation to another dialog (for example, “Main Menu”), regardless of the option you select.
 -
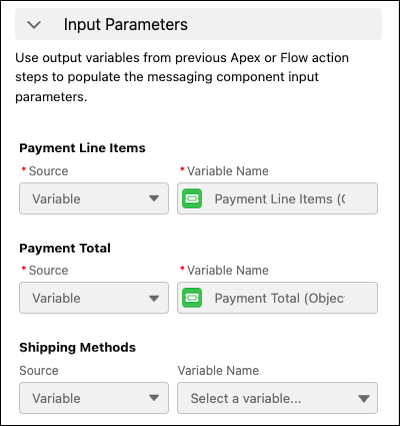
To customize the payment component, for each input parameter, specify a bot variable. In
most cases, specify the same output variables you created in the previous Apex or Flow action
steps in the corresponding input parameter fields.
For example, in an Apex action step, you store the outputs of the PaymentLineItems class in the Payment Total object variable and the Payment Line Items object list bot variable. In the associated Payment dialog step, for the Payment Line Items and Payment Total input parameters, you specify the same variables.
Apex dialog step Payment dialog step 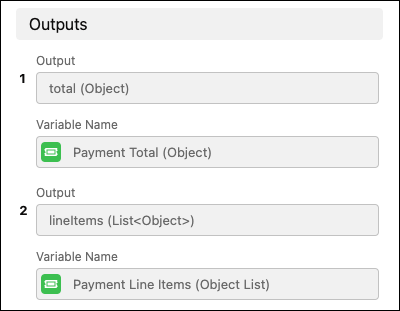
- Specify a backup rule action for the bot to use if the required input parameters don’t return details for the payment. Select Call Dialog or Redirect to Dialog, and then select the appropriate dialog.
- In the output section, select or create a text variable to store the result of the payment.
- Tell the bot what to do if the variable already contains a value. The bot can keep the original value and skip the payment request, or the bot can request a payment and override the original value.
- Optionally, select or create an object list variable to store the list of error codes if the customer response results in an error. You can use Rule conditions and actions to customize the behavior of the Error Handler dialog based on the error variable. See Error Handling for Asynchronous Components.
- Save your changes.
To specify the bot’s behavior when a customer responds to the component, add a Rule action step after the component. The Rule action step ensures that whenever your customer responds to the component, their response is confirmed and the conversation is redirected appropriately. See Conversation Design for Asynchronous Components.