
You are here:
Create a Send Email Quick Action for Cases
Create a Send Email quick action to let support reps send emails from the case feed in Lightning Experience and the Salesforce mobile app.
Required Editions
| View supported editions. |
| User Permissions Needed | |
|---|---|
| To create and modify the Send Email quick action: | Manage Cases AND Customize Application |
| To edit a page layout: | Customize Application |
You must have Email-to-Case enabled to use the Send Email quick action on the Cases object.
The Send Email quick action is created by default when you enable Email-to-Case on new orgs. If your org was created before Spring ’17, or if you enabled Email-to-Case before Spring ’17, create a Send Email quick action.
-
Create the Send Email quick action.
- From Setup, click the Object Manager tab. Select Cases, and open the Buttons, Links, and Actions setup page.
- Click New Action.
- For Action Type, select Send Email.
- For Standard Label Type field, select a label for this action. When you add the action to the case page layout, this label is displayed in the actions bar.
- The Name field is auto-filled. This name is used in the API and managed packages. It must begin with a letter and use only alphanumeric characters and underscores, and it can’t end with an underscore or have two consecutive underscores. Unless you’re familiar with working with the API, we suggest not editing this field.
- In the Description field, describe what this quick action does. The
description appears on the detail page for the action and in the list on the Buttons, Links,
and Actions page. The description isn’t visible to your users. If you’re creating several
actions on the same object, we recommend using a detailed description.
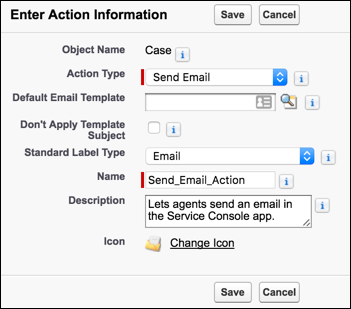
- Click Save.
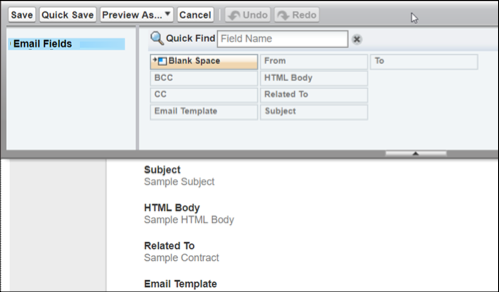
 Note The email layout page opens, where you can specify the fields shown in the email action.
- Arrange the email fields in the order that you want. When a support rep selects the
quick action, the email fields are displayed in this order.
- From the Email Message Fields menu, drag fields into the email layout. To remove
fields, drag them from the email layout to the Email Message Fields section. Note The To Address, From picklist, Subject, and HTML Body fields are added by default.
- To make a field read-only or required, hover over the field and then click
 and specify the field properties.
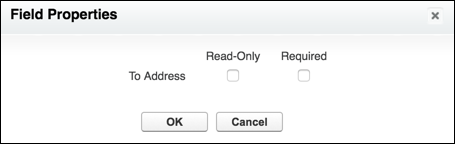
- To save the field properties, click OK.
- Click Save.
- From the Email Message Fields menu, drag fields into the email layout. To remove
fields, drag them from the email layout to the Email Message Fields section.
- To ensure that
emails are associated with Salesforce records, create predefined field values for the To
Recipients, CC Recipients, and BCC Recipients fields.
 Important In new orgs, when you enable Email-to-Case, we automatically configure the To Recipients predefined field value for you, so you can skip this step.
However, if your org was created before Winter ’18, or if you enabled Email-to-Case before Winter ’18, complete the following steps to create predefined field values. We recommend that you define a value for the To Recipients field.
The case email action provides a predefined field value (the case contact’s email address) for the To field. Emails aren’t associated with the Salesforce case contact record because this predefined field type is Text (a plain email address with no link to the case contact). To change the default experience and associate emails with Salesforce records, you must create predefined field values.
The predefined field values for the To Recipients, CC Recipients, and BCC Recipients fields are filled only for the initial email. The fields aren’t pre-filled for reply emails or forwarded emails.
- In the Predefined Field Values section, click New.
- For Field Name, select one of these fields.
- To Recipients
- CC Recipients
- BCC Recipients
- Use the formula editor to associate your selected field with a Salesforce record using
the JUNCTIONIDLIST function.
Note For values with only one ID, you don’t have to use the JUNCTIONIDLIST function. For example:
- To associate the To Recipients field with the case’s contact record,
enter:
JUNCTIONIDLIST(Case.ContactId) OR Case.ContactId
- To associate the BCC Recipients field with the case’s owner and the owner’s manager,
enter:
JUNCTIONIDLIST(Case.OwnerId, Case.Owner:User.ManagerId)
- To associate the To Recipients field with the case’s contact record,
enter:
- Click Save.
After you define the quick action, add it to the case page layout so it’s available for service reps to use.
To automatically save emails your service reps are working on, enable email drafts.
- Apply a Default Email Template Using the Send Email Quick Action
Help support reps incorporate branding and ensure consistency when writing emails to customers in Lightning Experience and the Salesforce mobile app by using default email templates. Email templates help ensure that support reps include common information, such as greetings, announcements, disclaimers, and company contact information, in customer emails. - Fields Available on the Send Email Quick Action for Cases
After you create an Email quick action for cases, you can customize the fields displayed for the action. Drag fields from the Email Message Fields palette to the email layout. - Send Email Action Considerations for Cases
Before working with the Send Email action for cases, be aware of these limitations. - Understand How Default Values for Case Emails Work
There are lots of ways to control the default values your support reps see when responding to customer cases using email. Depending on your business needs, you can set up different types of default field values using various methods.