
You are here:
Email Customers in Lightning Experience
Use the email publisher in case feed to answer customer questions and resolve customer issues in Lightning Experience.
Required Editions
| View supported editions. |
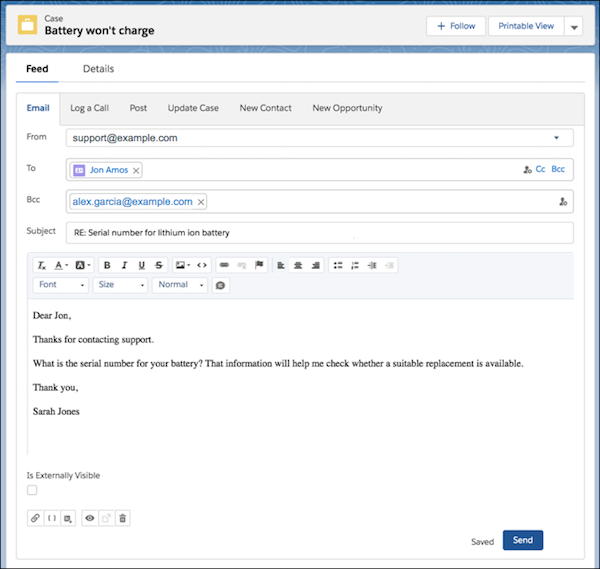
To get started, open a case in the console. In the case feed publisher section, click Email. You can insert merge fields, look up contacts, preview emails, clear emails, and more from the email publisher. You can also insert Salesforce Classic and Lightning Experience email templates, attach files, and remove attachments if you change your mind.
Here are some things to keep in mind when working with emails in Lightning Experience.
- Look up contacts
- To look up contact email addresses, click the lookup icon in the To, CC, or BCC field. In the email composer, you can filter contacts by account contacts and by your colleagues (internal users). To add contacts as email recipients, select the contacts and click Add. Don't see who you're looking for? You can search by name.
- Note that you can select email address pills by clicking on them, unless you are using Safari.
- Attachments
- To attach multiple files from your computer, drag the files to the body of the email. You can drag as many files as you want, but the files can’t be more than 2 GB. To attach files uploaded in Salesforce, use the attachment icon.
- Merge fields
- Merge fields resolve only on send and preview. The field appears as plain text when
inserted into the publisher.
 Tip You can insert merge fields that aren't listed in the dialog box, such as merge fields for accounts or contacts. Enter them as plain text and use the preview button to review before sending.
 - Email templates
- You can insert Lightning Experience and Salesforce Classic templates. When you insert a template, the subject is replaced with the template’s subject.
- If you insert a responsive email template that includes an HTML
<head>,<meta>,<title>, or<style>tag, the template overwrites the content in the email body. Don't worry – we display a confirmation message, so you know before anything is overwritten. - Email drafts
- A working draft of your email is saved every few seconds when you compose, reply, or
forward an email. You can leave it and return to it at any time.
 Note Email drafts are private and can’t be shared.
 - Email status
- The email history shows replies sent by the Salesforce user, starting with the most recent
reply. The message details include an email status.
Email Status Description New An inbound email that hasn’t been read. Read An inbound email that has been read but not replied to. Sent An outbound email. Replied Any email that has been replied to. Replying to a sent email gives it a Replied status. The status of an email is Replied when it’s replied to directly. For example, if you send an outbound reply to an inbound email, its status is Replied. If you then send a subsequent outbound reply to the same inbound email but don’t reply directly to the first outbound reply, then the status of the first outbound reply is set to Sent.
- Preview emails
- Use preview to review an email and its merge fields before sending.
- Delete and clear emails
- The trash icon deletes the working draft and resets the fields to the original state. The
behavior differs depending on whether email drafts are enabled.
- When email drafts aren’t enabled, this action clears the body, subject, and added recipients, reverting the email to its original state.
- When email drafts are enabled, it deletes the draft and then reverts.
- Pop-to-docked email composer
Open the docked email composer, which appears on the side of the console, so that it's easier to view the case feed while replying to an email. You also can maximize the email composer from the docked composer to help you focus on writing.
To open the docked composer, click the popout-to-docked view icon in the email composer toolbar.
If your admin enabled email drafts, then the popout-to-docked view button is disabled.
- Docked email composer
When you send an email using the docked email composer, only a partial page refresh occurs.
- Images
- Embed images into messages by copy and pasting, providing an image URL, and browsing for or
uploading Salesforce Files. The behavior for each method is slightly different.
- Copy and paste—Supports all image file types. The image is added as an attachment and inline, and the inline image can be resized. Images in case emails have a maximum size of 1 MB. In other emails, the maximum is 5 MB. Microsoft Edge isn’t supported. Internet Explorer 11 or earlier doesn’t allow resizing images.
- Web URL—No maximum file size. The image is added inline and can be resized. The image isn’t added as an attachment, and it isn’t converted to a Salesforce File. The default description text for an image is set to “User uploaded image.”
- Browse or upload Salesforce File—Creates a Salesforce File from an uploaded file, or inserts an existing Salesforce File. The file size limit is based on the limits for Salesforce Files. The image can’t be resized from the message itself. The image is added as an attachment and inline. If a content version for a Salesforce File changes, messages that used an older version of the Salesforce File aren’t updated.
Note When using the case email publisher in Lightning Experience, email attachments are included only when you forward messages, but not when you reply to messages. - Tables
- To add a table to an email, click the table icon in the email composer’s actions menu and
fill out the table settings. Then, add your content to the table. Use the email composer
actions menu to style the contents or insert images in the table. To edit the table’s cell
spacing, padding, and alignment, double left-click on a table border.Note
- The table action isn’t available in the Lightning email template editor.
- Tables can be copied and pasted into the email composer from other applications, but the styling can be affected.
- Depending on where you’re viewing a table in Salesforce, table borders can appear as a double or single line.
- Code Samples
- Insert a code snippet that retains the code formatting by clicking the code sample icon and pasting the code into the code window.
Keep in mind that your Salesforce admin can customize the email experience for cases. See Create a Send Email Quick Action for Cases.