
You are here:
Create Channel Menu Code Settings
Add optional JavaScript code as a static resource to your channel menu to change the customer experience. Collect extra information in pre-chat or change the branding for your Enhanced Web Chat channel.
Required Editions
Channel Menu code snippets created before August 8, 2025 use legacy infrastructure that’s in maintenance mode and scheduled for retirement on July 1, 2026. If you’re using a code snippet generated before August 8, 2025, we recommend updating it to avoid future disruptions. Generate a new snippet from the Get Code section under the deployment settings for your existing Channel Menu deployment and update your webpage. Learn more in help.
| View supported editions. |
| User Permissions Needed | |
|---|---|
| To set up a channel menu: | Customize Application AND Modify Metadata |
| To set up Code Settings: | Author Apex |
Code settings, configured in your channel menu settings, are a useful way to modify menu items with static resource files. To change an image or pass routine information to pre-chat fields or to populate a hidden field, create static resource files and then upload them to Salesforce.
Settings are applied first to your website or Experience Builder site from the Channel Menu component settings in the code snippet or Experience Builder. Next, they're applied from your uploaded JavaScript file and then from Setup.
When a code setting is applied to your web or Experience Builder site, the related JavaScript file is loaded. You can associate multiple JavaScript static resources to different code settings, and load the configuration to a website or Experience Builder site.
Step 1: Create a Snippet Settings File with JavaScript
You can use your JavaScript static resource files, including strings, arrays, JSON, and JavaScript functions for the channel menu. To get started, follow this code example to modify a menu item for channel menu static resource files. Use these supported settings.
| Settings to Modify | Setting Name |
|---|---|
| (Enhanced Web Chat) Turn on Enhanced Web Chat developer mode to load unminified versions of static files and allow more logging to the developer console for troubleshooting. You can also access other Enhanced Web Chat APIs. | Enhanced Web Chat channel settings:
|
| (Chat) Pre-chat and entity creations: Add extra pre-chat information or populate form fields to prepare service reps for the customer conversation. | Chat channel settings:
|
| (Chat) Branding: Customize your menu branding to maintain consistency and update changes easily. | Chat channel settings:
|
| (Chat) Routing: Add routing to direct customer conversations to the right service rep. | Chat channel settings:
|
Step 2: Upload Your Static Resource Files
With your code ready, upload a file as a static resource in Setup.
For steps, see Create Embedded Static Resources.
- When you upload your file, select Public for the cache control.
- Choose a static resource name that’s easy to remember. Use this name and not the file name in your channel menu settings.
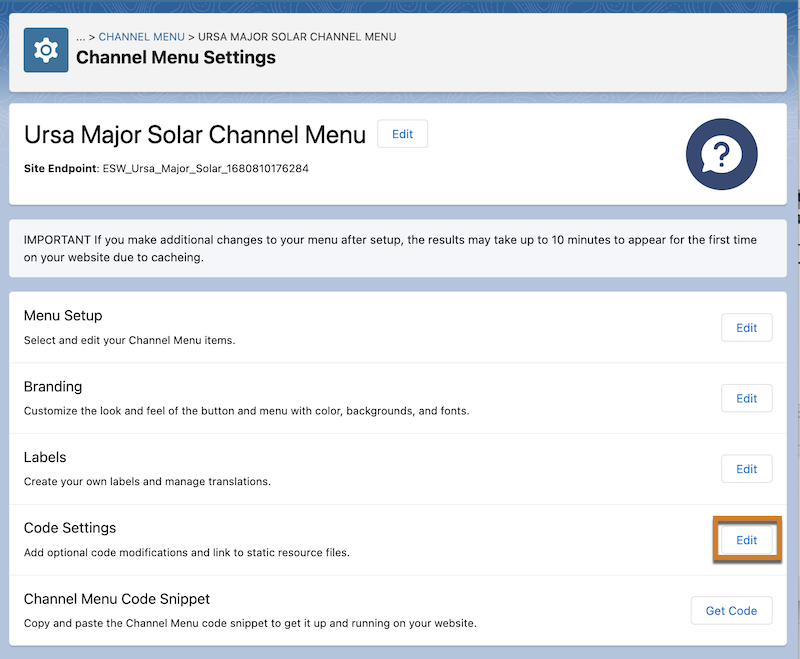
Step 3: Add Resources to Code Settings
Edit your code settings to link to your static resource file.
- From Setup, enter Channel Menu in the Quick Find box and select Channel Menu.
- Click the name of the channel menu you want to edit.
- In the Code Settings section, click Edit.
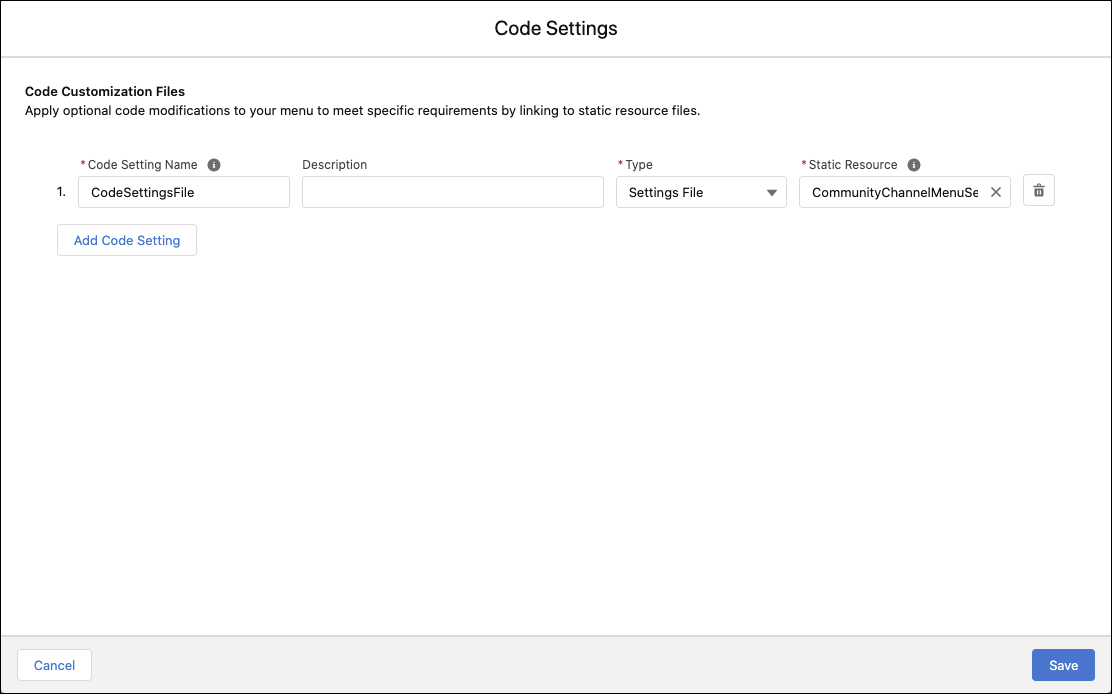
- Select Add Code Setting.
- Enter a unique Code Setting Name for your customization.
- Add a description and select a resource type.
- Select your uploaded resource name in the Static Resource field.
- Select Add Code Setting to add more.
- Save your changes.
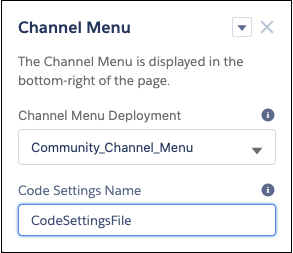
Step 4: Implement Your Code Settings (Experience Builder Sites)
Add your code setting name in the property editor and load the Code Setting Name for your site on a specific page.
Step 5: Implement Your Code Settings (Websites)
Add your code setting name to your channel menu code snippet.
- Apply a channel menu code snippet if you haven't done so yet.
- Open the code snippet that you added to your website.
-
Add the new parameter as an object to the
embedded_svc.menu.init()call in the snippet. See the end of this section for an example. -
Check that the object is the last parameter passed into
embedded_svc.menu.init(). - Verify that your code snippet changes in your web page markup.
- After 10 minutes, refresh your web page and confirm that the Channel Menu button appears. Check that the static resource is loaded and the item is working on the web page.