
Set Up Automatic Bundling
Use automatic bundling to create and update bundles instead of managing them manually. Automatic bundling includes two modes: Automated Bundling and Live Bundling. The automatic bundling process looks for service appointments in a particular service territory and then looks at the priority of the bundle policy. After the bundles are created, they appear in the work list and can be scheduled.
Required Editions
| Available in: both Salesforce Classic (not available in all orgs) and Lightning Experience |
| The Agentforce Field Service and Operations core features, managed package, and mobile app are available in Enterprise, Unlimited, and Developer Editions. |
| User Permissions Needed | |
|---|---|
| To set up automatic bundling: | Customize Application |
The automatic bundling process creates bundles:
- If at least two service appointments can be bundled
- Split by service territories that are part of the bundle policy
- Without service appointments that are part of a complex work chain
- For Automated Bundling, if the time between the Earliest Start Permitted and the Due Date of
the service appointments overlaps with a 7-day period that starts at the time of the scheduled
automatic bundling process. For example, if the Earliest Start Permitted of a service
appointment is before the start of the 7-day period and the Due Date is after the end of the
7-day period, it can still be added to the bundle.
For Live Bundling, if the time between the Earliest Start Permitted and the Due Date of the service appointments overlaps with a 2-day period that starts at the time of the scheduled automatic bundling process. For example, if the Earliest Start Permitted of a service appointment is before the start of the 2-day period and the Due Date is after the end of the 2-day period, it can still be added to the bundle.
- In the service appointment details of the created bundle, the Manually Bundled field is deselected. If you manually update the service territory of the bundle or of one of the bundle members after the bundle was automatically created, the Manually Bundled field is selected and the bundle isn’t considered for automatic bundling processes.
It’s recommended to configure restriction policies for the Earliest Start Permitted and Due Date fields. That way, the automatic bundling process doesn’t fail because of service appointments that have an earlier due date than the earliest start permitted.
- Restriction policy with Restrict in Automatic Mode selected
- Service territory policy
- Bundle policy with Automatic Bundling selected
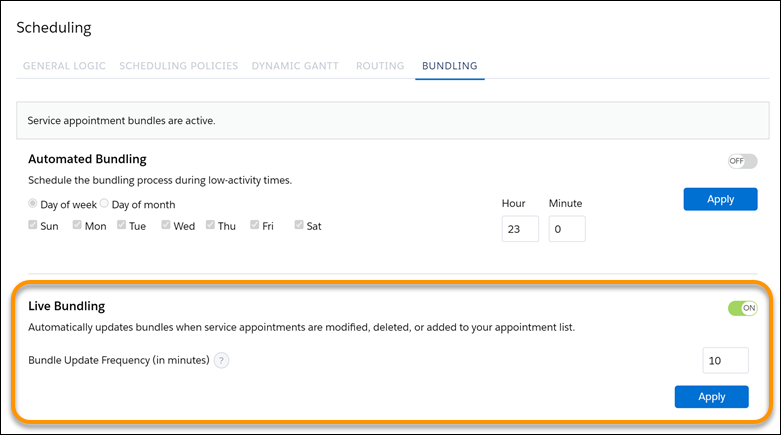
Configure the Settings
- From the App Launcher, find and select Field Service Settings.
- Click Scheduling, and then click Bundling.
-
Set up Automated Bundling to schedule the bundling process during low-activity
times.
- Turn on Automated Bundling.
- Schedule the process.
-
Click Apply. In this example, the automated bundling process is
scheduled to run daily at 11 PM.

-
Set up Live Bundling to update or create bundles when service appointments are modified or
added to your appointment list.
Live bundling adds bundle members only to bundles that were created with automatic bundling. It doesn’t add bundle members to bundles that were created manually. If a bundle member is manually removed from a bundle, live bundling doesn’t add it to the same bundle again.
- Turn on Live Bundling.
- Define the frequency of the updates, from 5 to 15 minutes.
-
Click Apply.
Service appointments are reconsidered for Live Bundling when you update any of these fields.
- Service Territory
- Due Date
- Early Start
- Status
- Pinned
- Any other field defined in a bundle restriction policy
- Any other field defined in a recordset filter criteria
Monitor the Automatic Bundling Requests
-
You can receive an email when the automated bundling process fails. To activate the flow
that sends the email, take these steps.
- From Setup, in the Quick Find box, enter Process Automation, and then select Flows.
- Open the Send Email for Automated Bundling Failures flow.
- To use the flow as is, click Activate.
-
To modify the flow, click Save As.
A warning is shown, but if you’ve verified that the Automated Process user has an email address entered in the settings, you can ignore this warning. To check whether it’s entered, from Setup, in the Quick Find box, enter Process Automation, and then select Process Automation Settings. Make sure that Automated Process User Email Address is populated.
- To check the start time of the flow, edit the Start element and change it as needed. The time is set according to the Automated Process user’s time zone.
- The email is sent to the first admin user, according to alphabetical order. To change the recipient of the email, edit the Send Email element, and in the Recipient Address List, enter one or more email addresses.
- Activate your version of the flow.
-
Dispatchers can see the status of automatic bundling requests by clicking the light bulb
in the Classic Dispatch Console. Automatic bundling requests can also be monitored in the
Optimization Requests tab. Automated bundling requests that didn’t manage to run aren’t
monitored. If the automatic bundling optimization requests don’t appear, take these
steps.
- From the object management setting for Optimization Requests, go to Fields & Relationships.
- Search for and open the Type field.
- If you’re using a new Salesforce org, activate the Automated Bundling and Live Bundling picklist values. If you’re using an upgraded Salesforce org, create the Automated Bundling and Live Bundling picklist values.