
You are here:
Create Macros in Lightning Experience
To create a macro in Lightning Experience, use the Macro Builder—an easy-to-use point-and-click builder.
Required Editions
| View supported editions. |
| User Permissions Needed | |
|---|---|
| To view macros: | Read on macros |
| To create and edit macros: | Create AND Edit on macros |
| To create and run irreversible macros: | Manage Macros That Users Can’t Undo |
Important Before you create a macro, make sure that your org meets the
prerequisites. To create macros, your admin must add the Macro utility to your Lightning
app.
In Lightning Experience, macros are supported on all standard objects except Campaign, and on custom objects that allow quick actions and have a customizable page layout.
- In your Lightning app, open a record.
-
In the utility bar, click Macros.
 Note If you see the message “This page doesn't support macros,” check that you’re on the record page for a supported object. You can’t run macros on list views.
 - Click + or Create Macro.
- Enter a name, description, folder, and select the object that the macro applies to.
-
Click Save.
Macro Name Use a name that makes it easy to understand what this macro does. For example, for a macro that replaces the email subject with a critical update, enter “Replace Email Subject with Critical Update.” Description Explain the purpose for this macro. This optional field helps other support reps understand what this macro does and distinguishes it from similar macros. Apply To The Apply To value defaults to the object you were viewing before. Change this default to create a macro for a different object. Folder Folders help you organize and share macros. You can create up to four levels of folders: one root folder and up to three subfolders. This field is visible only when Share and organize macros in folders is enabled. In some orgs, the Folder field must be added to the page layout. -
Click Edit Instructions.
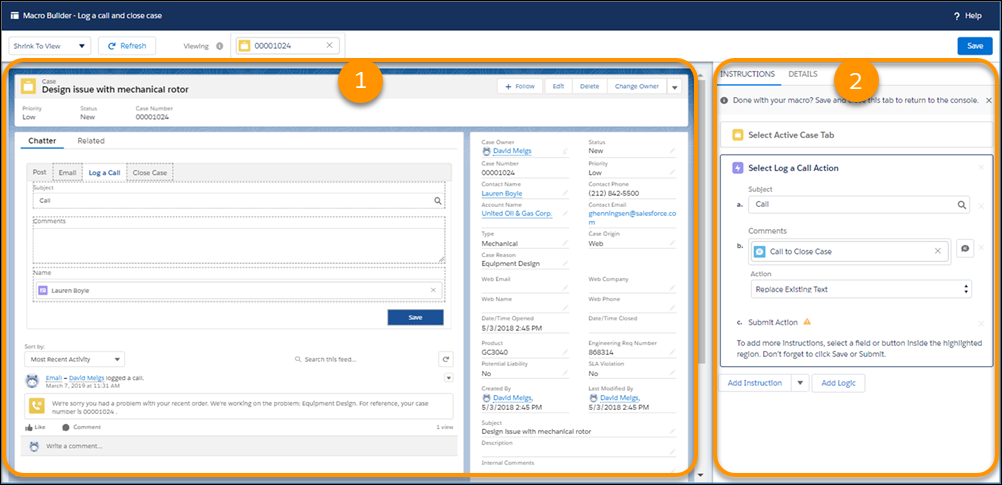
The first instruction is added based on the object you selected from the Apply To field.The Macro Builder page opens. The left side of the page displays a canvas with a sample record page for the object you selected (1). Keep in mind that all fields for the object are available, even if the sample record doesn’t include them. The right side of the page includes an Instructions tab and Details tab for your macro (2).
- Click Add Logic. Create logical expressions that evaluate a condition or a group of conditions. Then add the instructions that execute when the expression is true. For more information, see Add Logic to Macros in Lightning Experience.
-
To add instructions that execute without evaluating any conditions, on the bottom of the
Instructions tab, click Add Instruction.
-
On the canvas, select a quick action.
Selectable items are highlighted on the canvas.For example, on a case record, you can click Log A Call in the publisher.
- On the canvas, click a field to add instructions. In the Instructions tab, enter your field updates. You can insert quick text, use email templates, add email attachments, create events with relative dates, and more.
-
Optionally, on the canvas, select a submit action to tell the macro to execute these
instructions.
For example, to have your macro submit your Log a Call comments, click Save in the publisher.
-
Optionally, if your macro is only for records in console apps, you can add an instruction
to close the record tab when the macro completes.
To add the close tab instruction, click the dropdown menu next to Add Instruction, and select Add Close Tab Instruction.
-
On the canvas, select a quick action.
- When you’re done with your macro, click Save. To return to the app, close the Macro Builder tab.
After you create a macro, run it to make sure that it works the way you want. Open the Macro utility to execute your new macro.
- Add Logic to Macros in Lightning Experience
To control the execution of macro instructions in Lightning Experience, add logic with the Macro Builder. Create expressions with one or more conditions, and add instructions that execute when the expression is true.
Did this article solve your issue?
Let us know so we can improve!