
You are here:
Create an Apple Messages for Business Channel
Create a Messaging channel where your support team helps customers using Apple Messages for Business. Customers message your business from the Apple Messages app, and service reps reply from the Service Console.
Required Editions
| View supported editions. | |
 This article applies to:
|
Enhanced Apple Messages for Business channels |
 This article doesn’t apply to:
|
Enhanced In-App Chat, Enhanced Web Chat v1, Enhanced Web Chat v2, Enhanced WhatsApp, Standard and Enhanced Facebook Messenger, Standard and Enhanced SMS, Enhanced LINE, and Bring Your Own Channel |
| User Permissions Needed | |
|---|---|
| To set up Messaging: | Configure Messaging |
| To authorize Apple Messages for Business: | Customize Application AND Manage Auth. Providers |
| To view Apple Messages for Business channels: | View Setup and Configuration |
| To create Apple Messages for Business channels: | System Administrator AND Configure Messaging OR Configure Messaging AND Customize Application AND Manage Auth. Providers AND View Setup and Configuration AND Modify All Data |

Stage 1: Plan the Customer Journey
Plan your messaging strategy by answering key questions about your goals for the channel.
Stage 2: Create a Channel with a Test Account
Create a channel in Setup that’s linked to a test Apple Messages for Business account. With a test account, you can perfect the end user and service rep experience before going live. You’ll use the test channel to record a video of the user experience for Apple to review.
- In Setup in a sandbox or production org, enter Messaging Settings in the Quick Find box and select Messaging Settings.
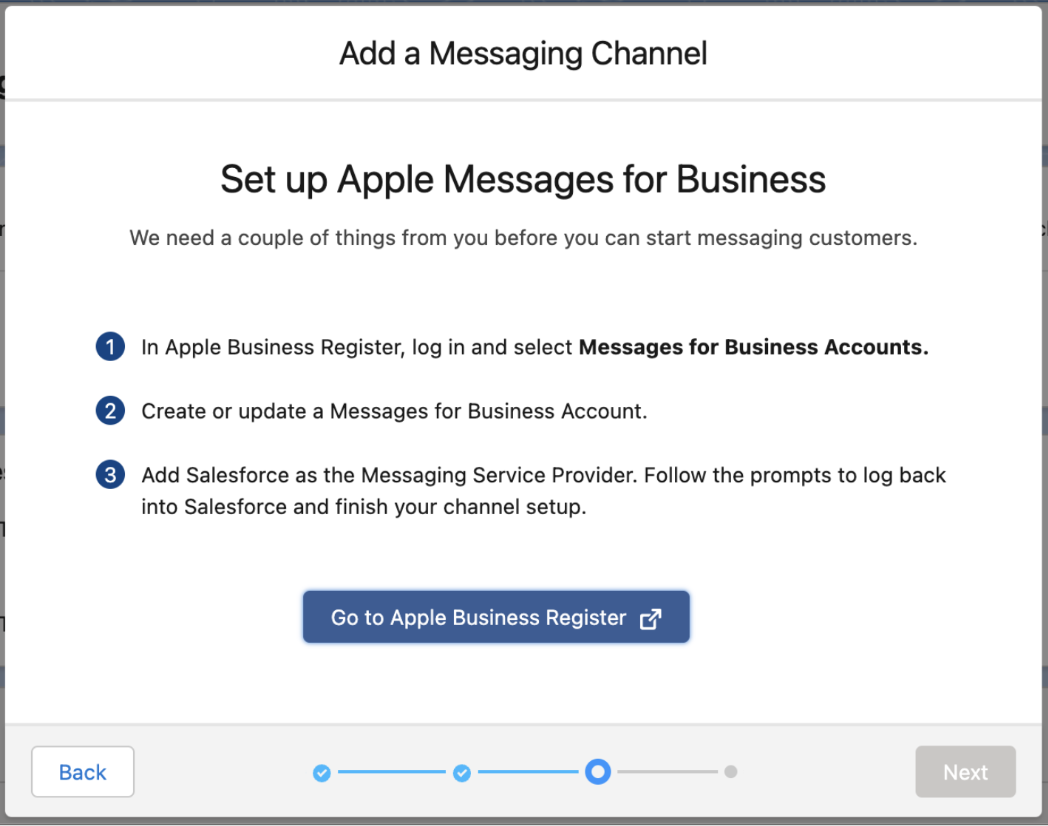
- In the Channels section, click New Channel, click Start, and then select Apple Messages for Business.
- Click Go to Apple Business Register.
- In Apple Business Register, log in and select Messages for Business Accounts.
-
Create an Apple Messages for Business account.
- When prompted for an account type, expand the advanced options and select Internal test account instead of Commercial account.
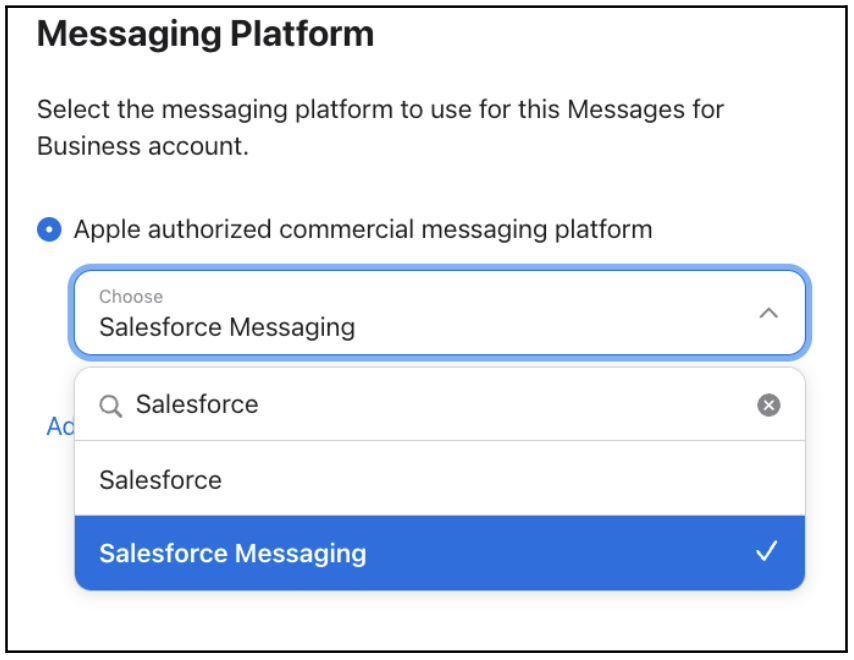
- In the Messaging Platform section, select Salesforce Messaging. If a different service provider is listed, remove it and add Salesforce Messaging.
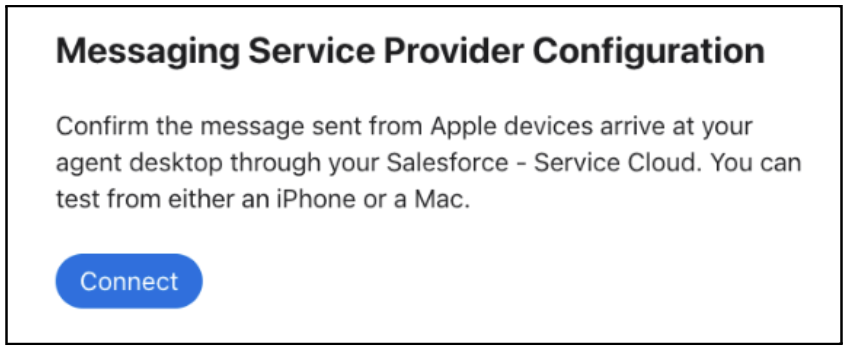
- Wait for Apple to approve your account changes, which can take up to a day. When you see a Test your messaging service provider connection link in your account settings in Apple Business Register, your changes are approved.
- Click Test your messaging service provider connection.
- To finish creating your channel in Salesforce, click Connect.
- Click Install channel and log in to Salesforce.
- In the channel setup flow that opens, verify your channel name and Messages for Business Account ID. We recommend adding “Test” to the channel name, which is visible only in Setup.
- To use an Omni-Channel flow to control how messages are routed (recommended), select Set up routing later.
- Complete the flow. You can now find your test channel in the list on the Messaging Settings page.
Stage 3: Implement the Customer Journey
Configure your channel’s auto-responses and select your routing preferences according to your plan. Then add customizations to make the messaging experience unique.
- In Setup, enter Messaging Settings in the Quick Find box and select Messaging Settings.
- Click the down arrow to open your channel’s action menu and select Edit.
-
In the Routing section, connect your channel to an Omni-Channel flow or queue.
- If you created an Omni-Channel flow, select a routing type of Omni-Flow and select your flow and fallback queue.
- If you created a routing configuration, select a routing type of Omni-Queue and select your queue.
- In the Automated Responses section, add language-specific consent keywords and responses and save your changes.
- Create a library of messaging components that service reps can send to customers. To meet Apple standards, your channel must include some interactive content via messaging components. For help with this and other customizations, such as sensitive data rules and auto-responses, see Increase Messaging Productivity.
Stage 4: Activate Your Test Channel
Activate your channel for testing. Because you’re using an internal test account, customers can’t contact you in this channel.
- In Setup, enter Messaging Settings in the Quick Find box and select Messaging Settings.
- Click the name of your Apple Messages for Business test channel.
- Click Activate Channel at the top of the channel page.
- Review the activation checklist and verify that you completed it, and then click Activate.
Stage 5: Complete the Apple Experience Review
After you customize your channel, it’s time to complete the Apple experience review process, in which Apple reviews a recorded video of your channel’s end user experience. The experience review typically takes 1 to 2 weeks.
- For steps to record the video, see Experience Quality Assurance in the Apple documentation.
- Submit your video to your Salesforce account team, who then share it with Apple for review.
- If you receive feedback, address it and send an updated video to your Salesforce account team.
Stage 6: Create a Channel with a Commercial Account
After you address all feedback from the experience review, create your production channel.
- In Setup, enter Messaging Settings in the Quick Find box and select Messaging Settings.
- In the Channels section, click New Channel, click Start, and then select Apple Messages for Business.
- Click Go to Apple Business Register.
- In Apple Business Register, log in and select Messages for Business Accounts.
- Create a Messages for Business account, or select one to update. When prompted for an account type, leave Commercial account selected.
-
Complete or update your account details.
- Click Get started, and review and accept the Messages for Business policies.
- Enter your details in the Account Applicant section, and select the commercial account.
- Provide your business’s contact information and location details.
- Enter a response time, which is an estimate of your response time to customer messages.
- Set the response hours, which define the hours during which your business actively responds to messages.
- Review and verify the compliance requirements.
- Upload your brand logo as a 1,024-pixel square.
- Upload a wide logo and select your colors, and review your wide logo.
- In the Messaging Platform section, select Salesforce Messaging.
- Wait for Apple to approve your account changes, which can take up to a day. When you see a Test your messaging service provider connection link in your account settings in Apple Business Register, your changes are approved.
- Click Test your messaging service provider connection.
- To finish creating your channel in Salesforce, click Connect.
- Click Install channel and log in to Salesforce.
- In the channel setup flow that opens, verify your channel name and Messages for Business Account ID. Customize the channel name, using a different name than your test channel. The name is visible only in Setup.
-
To use an Omni-Channel flow to control how messages are routed (recommended), select
Set up routing later and complete the flow.
You can now find your test channel in the list on the Messaging Settings page.
- Complete the steps in Stage 3: Implement the Customer Journey to configure routing and auto-responses and customize your channel.
After creating your channel, train your support team on helping customers in the Apple Messages for Business channel. Share this resource with them, which explains how to send different types of messages in enhanced Messaging channels: Message with Customers in the Service Console.
Stage 7: Go Live
After the experience review is complete, activate your channel in Setup and then activate your entry points. During this phase, you can request help from Apple with any final account adjustments.
- In Setup, enter Messaging Settings in the Quick Find box and select Messaging Settings.
- Click the name of your Apple Messages for Business channel.
- Click Activate Channel at the top of the channel page.
- Review the activation checklist and verify that you completed it, and then click Activate.
- Activate any entry points that you planned to use. For example, implement Message Suggest or add an Apple Messages link to your website or mobile app. For help, see Ready to Launch in the Apple documentation.
You’ve done it! After your channel and entry points are activated, inquiries sent to your business in Apple Messages are routed to your support team.