
You are here:
Route Service Cloud Messaging Sessions with Omni-Channel Flows
Dynamically route customer messages sent over a Messaging channel to the right service rep, queue, or bot. Build a template-based flow in Flow Builder and assign it to one or more Messaging channels.
Required Editions
| View supported editions. | |
 This article applies to:
|
Enhanced WhatsApp, Standard and Enhanced Facebook Messenger, Standard and Enhanced SMS, Enhanced Apple Messages for Business, Enhanced LINE, and Bring Your Own Channel |
 This article doesn’t apply to:
|
Enhanced In-App Chat or Enhanced Web Chat channels |
| User Permissions Needed | |
|---|---|
| To open, edit, or create a flow in Flow Builder: | Manage Flow |
| To set up and edit Messaging channels: | Configure Messaging |
| To view channels: | View Setup and Configuration |
For help configuring Omni-Channel flows for Enhanced Chat, see the Enhanced Chat setup documentation.
Step 1: Configure Omni-Channel
To get started, enable Omni-Channel and update its settings.
- In Setup, navigate to the Omni-Channel Settings page.
- Select Enable Omni-Channel.
- To let service reps transfer messaging sessions to other reps in enhanced Messaging channels, select Enable Skills-Based and Direct-to-Agent Routing.
- Configure the other options according to your preferences, and save your changes.
-
Create a service channel for your Messaging channels. The service channel links
your routing logic to the Messaging Session object.
- In Setup, go to the Service Channels page.
- Click New.
- Enter a name for your service channel, such as All Messaging.
- Select Messaging Session as the Salesforce object.
- Configure the other options, and save your service channel.
- Create presence statuses for Messaging. If you’re not sure which statuses to create, start with these three: Available - Messaging, On Break, Busy.
Step 2: Create an Omni-Channel Flow
With the help of a Messaging flow template, create an Omni-Channel flow to route customer messages to your support team. You can create one flow to provide routing for all your Messaging channels or designate a separate flow for each channel. It’s fine to use one flow for both standard and enhanced channels.
You can create one flow to provide routing for all your Messaging channels, or designate a separate flow for each channel. It’s fine to use one flow for both standard and enhanced channels, but if you plan to use bots, know that a flow can’t route to both standard and enhanced bots. The flow is linked to each Messaging channel in the channel settings.
- Create an Omni-Channel queue to serve as your fallback routing strategy, and add Messaging Session as a supported object.
- In Setup, enter Flows in the Quick Find box, and then select Flows under Process Automation.
- Click New Flow.
- Select Use a Template, then click Next.
-
Select Omni-Channel Flow in the left pane, and click the template
named Messages Routed to Agents and Queues.
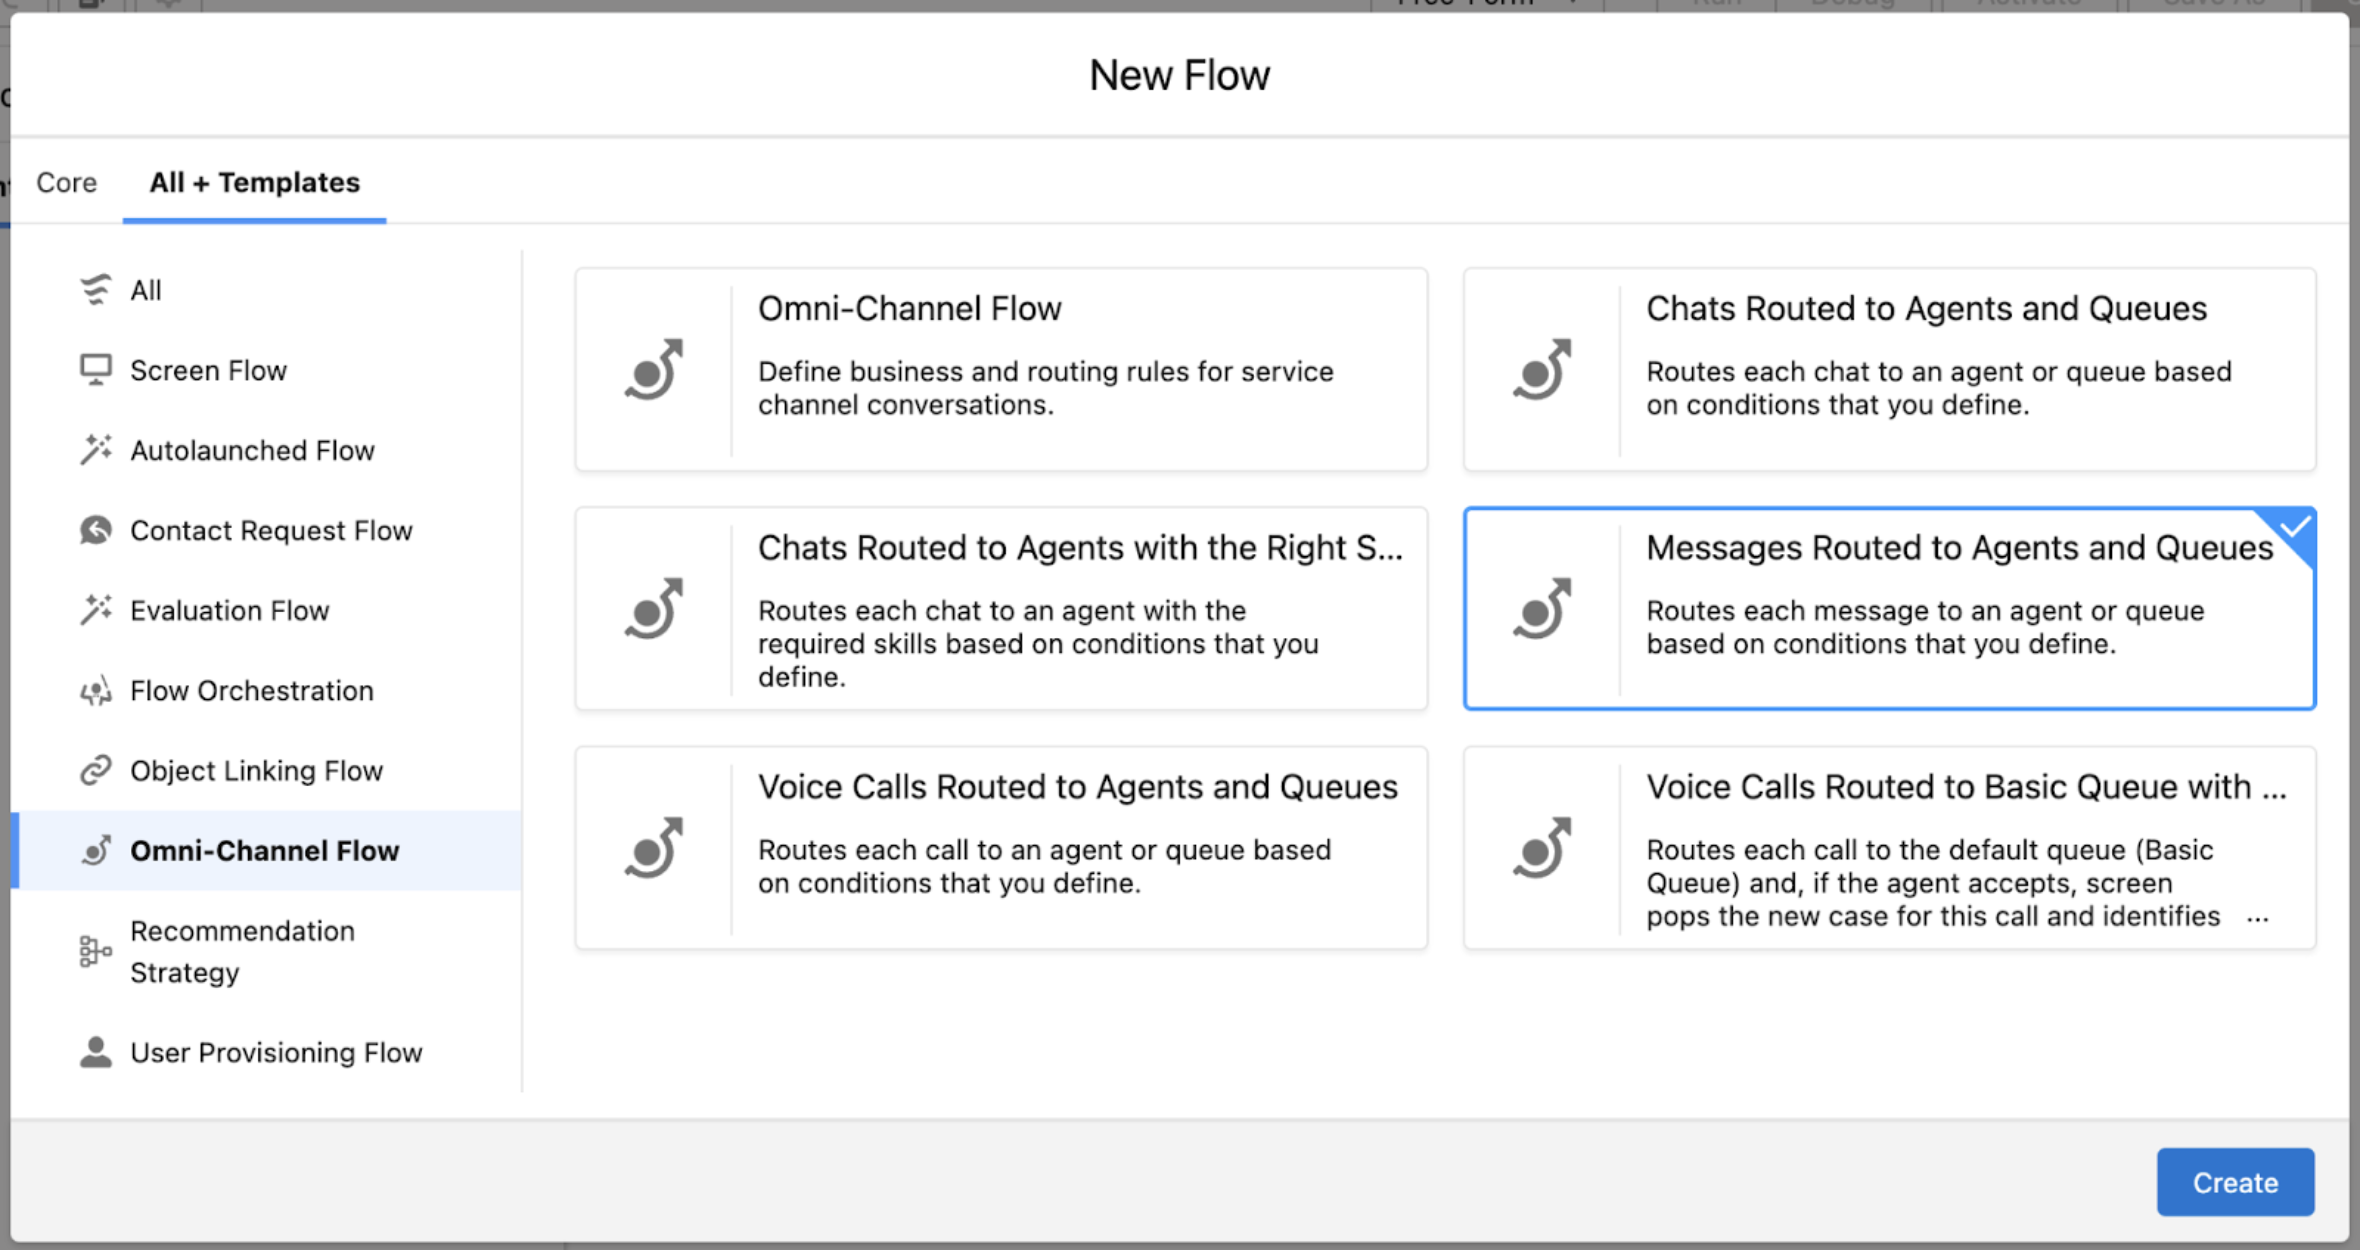
- To open the template, click Create.
- Edit the template to reflect your routing preferences, and save your changes.
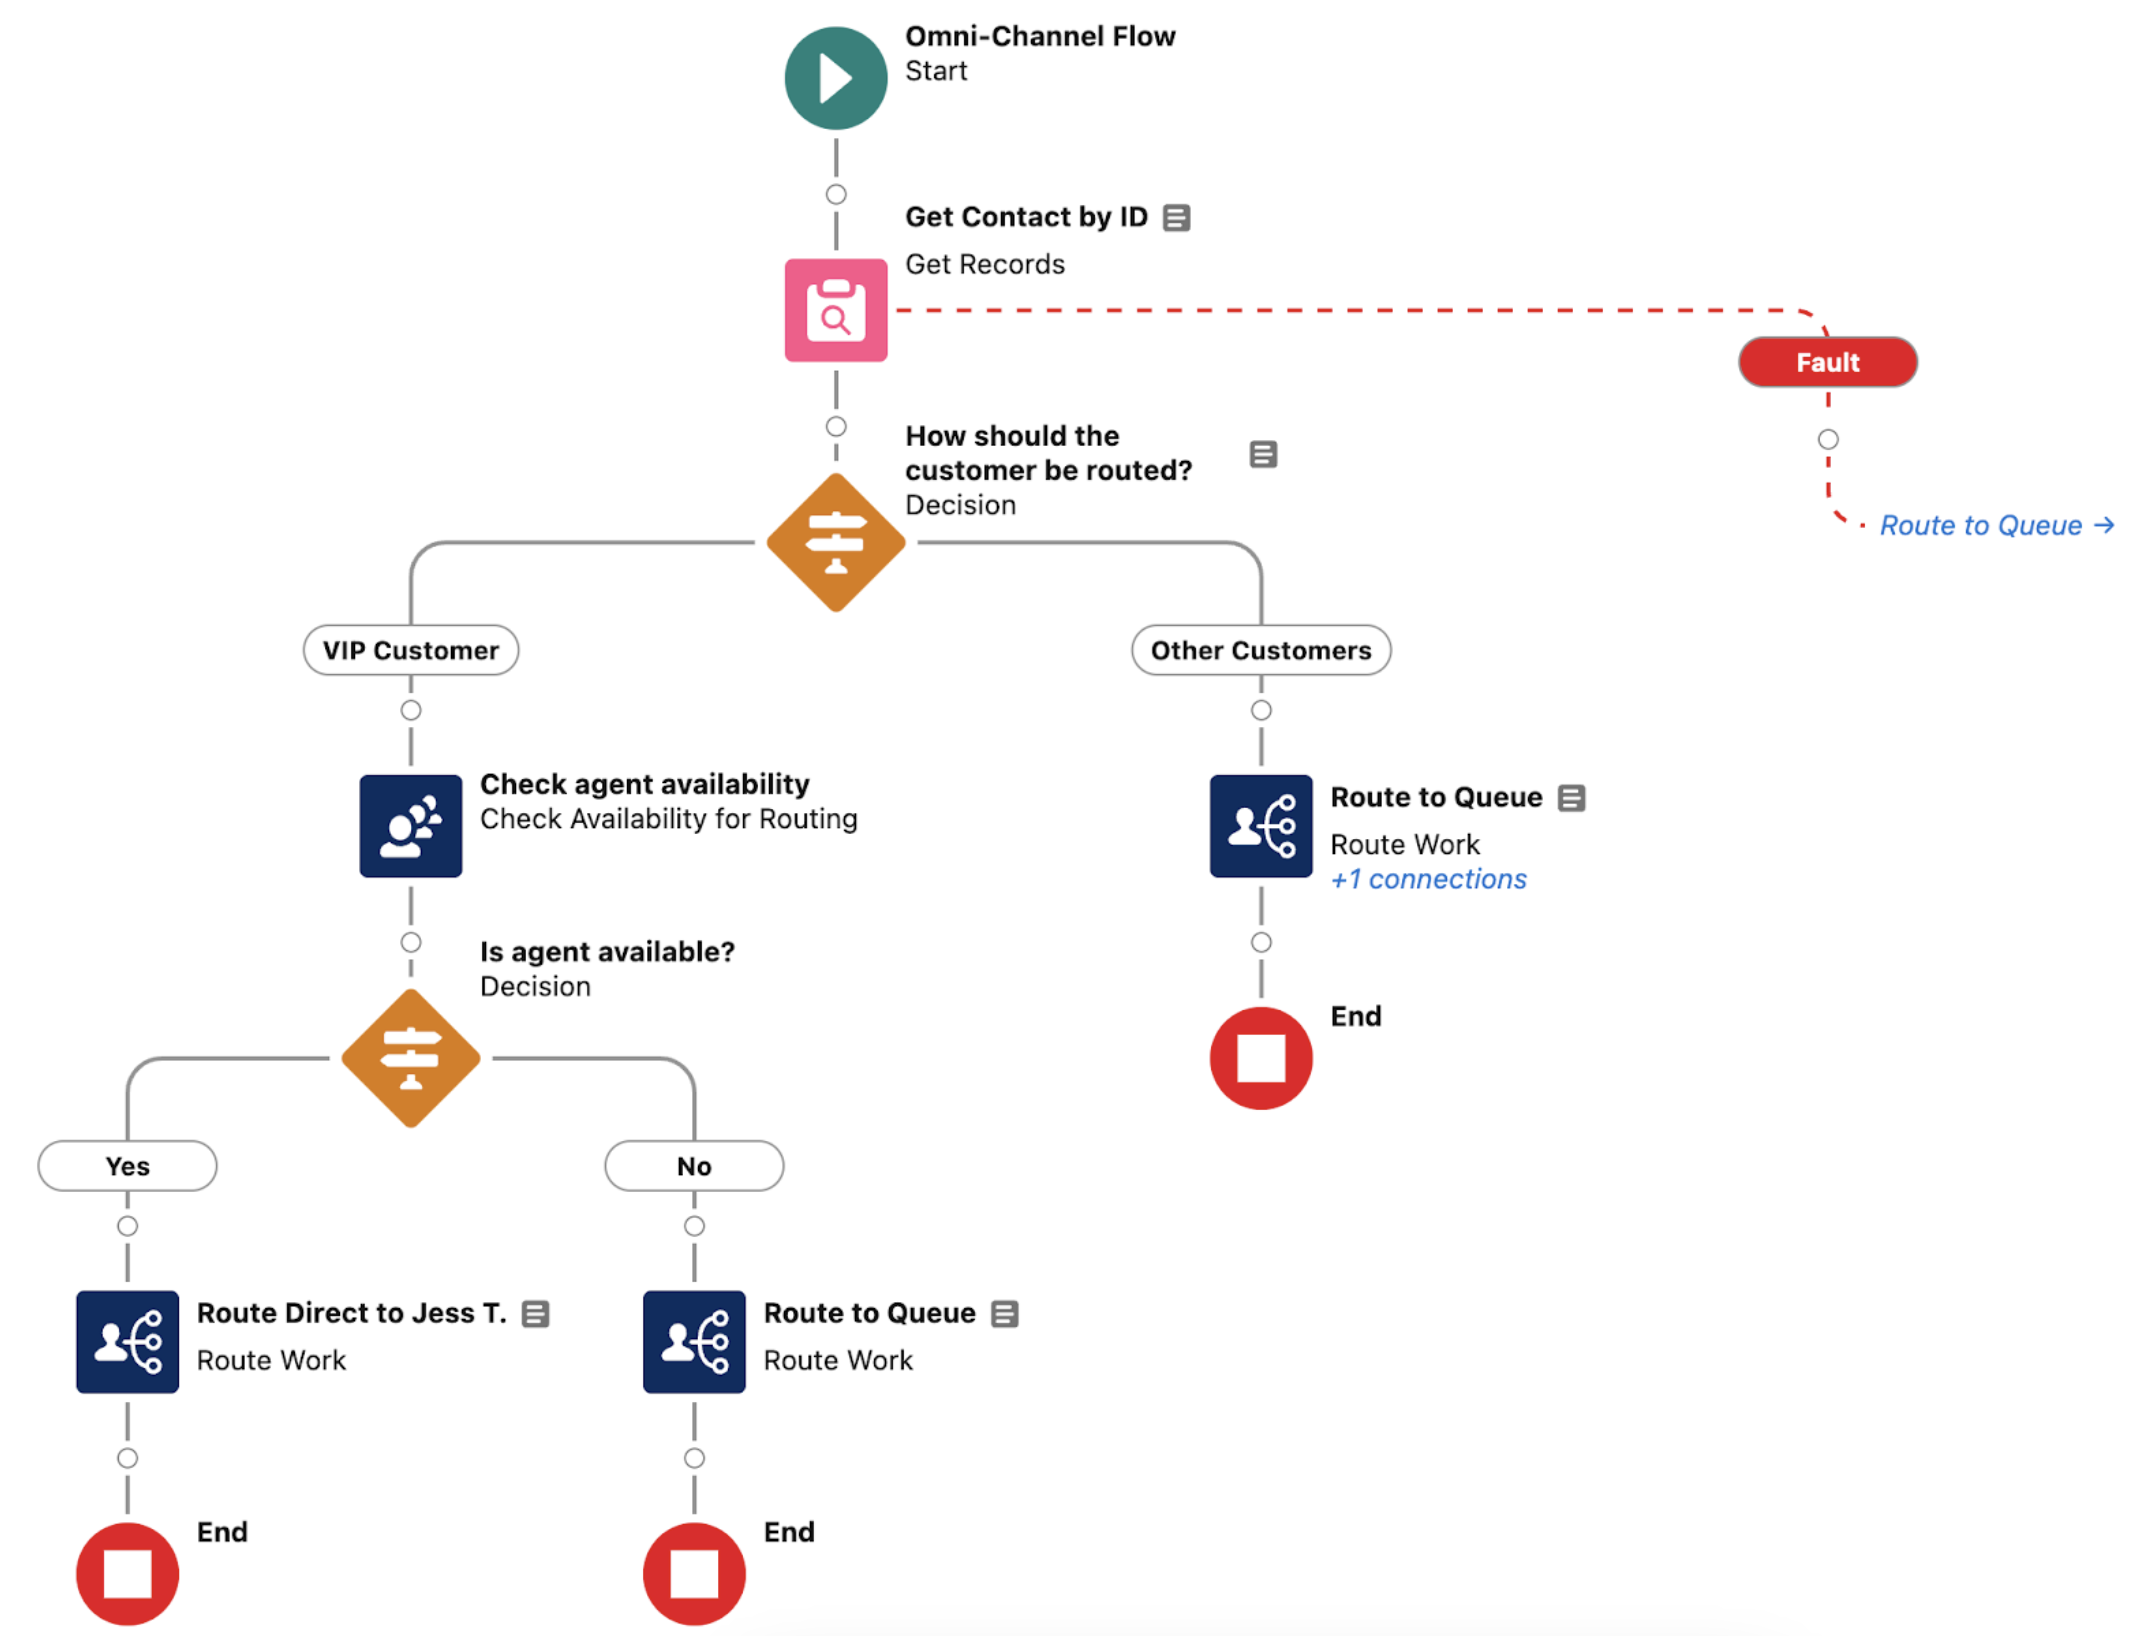
Maria, the Salesforce admin at Ursa Major Solar, wants all VIP customers routed directly to Jessica, her most experienced service rep. All other customers will be routed to a queue of Ursa Major’s service reps. Here’s what she does.
- Simplify the template so it has just two routing decision outcomes: VIP Customer and Other Customers. The VIP Customer outcome checks the account name of the messaging user’s contact record. If it’s one of Ursa Major’s three biggest accounts, the customer is considered a VIP.
- Add a Check Availability for Routing element at the beginning of the first routing path. Choose the option to route to a service rep and select Jessica. Then, add a variable to show the number of reps online, and add a decision element with Yes and No outcomes. If the customer is a VIP and Jessica is available, their session is routed to her. If Jessica is offline, the customer is routed to the queue.
- Edit the remaining flow elements and replace any placeholders with real values. For example, update all service channel placeholders to list your Messaging service channel.
Step 3: Connect Your Flow to Your Messaging Channel
After creating your Omni-Channel flow, link it to one or more Messaging channels.
- Create your SMS short code, SMS long code, WhatsApp, or Facebook Messenger, LINE, or Apple Messages for Business channel.
- On the Messaging Settings page in Setup, find your channel in the list. In the channel’s action menu, select Edit.
-
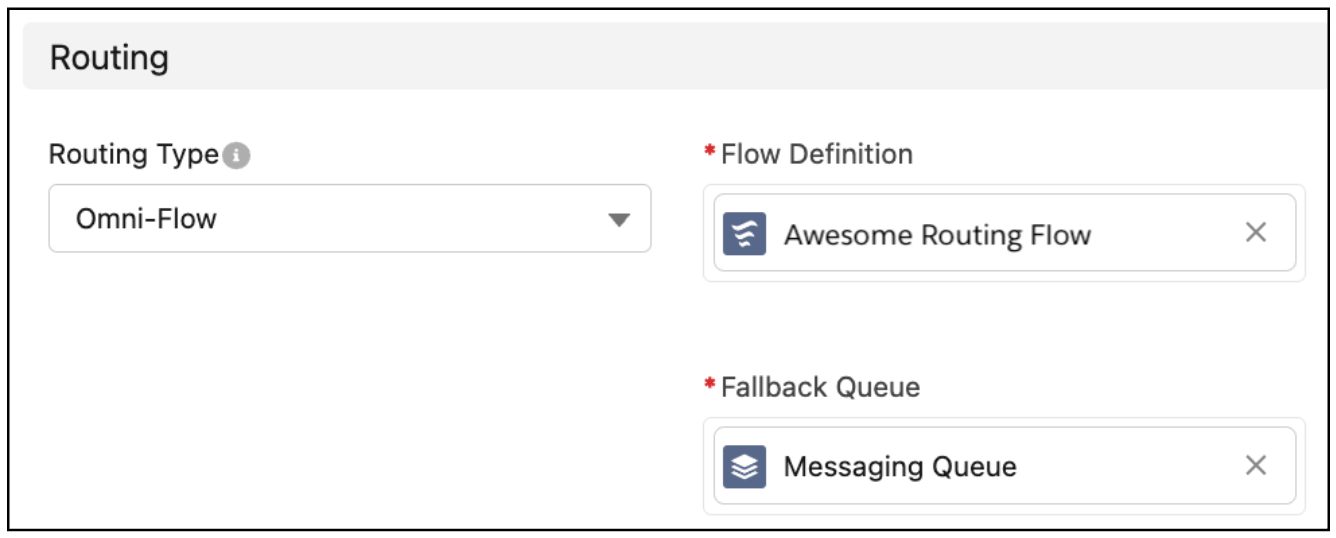
Edit the properties in the Routing section.
-
(Standard channels only) Select Enable Advanced Routing.
This option lets you use an Omni-Channel flow to route your channels’ messages. Enabling advanced routing doesn’t enable enhanced Omni-Channel routing, which is a separate feature that can’t be used with standard Messaging channels.
- (Enhanced channels only) For Routing Type, select Omni-Flow.
- For Flow Definition, select your Omni-Channel flow.
-
For Fallback Queue, select the queue that you created earlier.
-
(Standard channels only) Select Enable Advanced Routing.
- Save your changes.