
You are here:
Create or Upgrade to an Enhanced WhatsApp Channel in Service Cloud
Set up an enhanced WhatsApp channel to let your support team help customers over WhatsApp. This article also explains how to upgrade to an enhanced WhatsApp channel from a standard channel or move a number from an external business service provider.
Required Editions
| View supported editions. | |
 This article applies to:
|
Enhanced WhatsApp channels |
 This article doesn’t apply to:
|
Enhanced In-App Chat, Enhanced Web Chat v1, Enhanced Web Chat v2, Standard and Enhanced Facebook Messenger, Standard and Enhanced SMS, Enhanced Apple Messages for Business, Enhanced LINE, and Bring Your Own Channel |
| User Permissions Needed | |
|---|---|
| To set up WhatsApp channels: | Configure Messaging AND View Setup and Configuration |
| To create WhatsApp channels: | System Administrator AND Configure Messaging OR Configure Messaging AND Customize Application AND Manage Auth. Providers AND View Setup and Configuration AND Modify All Data |
- Step 1: Prepare to Create Your Channel
- Step 2: Create Your Channel in Setup
- Step 3: Activate Your Channel
Each enhanced WhatsApp channel in Salesforce is linked to a WhatsApp Business account (WABA). When you set up your channel, we walk you through creating a WABA that's associated with your phone number. If your WABA is created in Meta Business Manager outside of the channel setup flow in Salesforce, you can't use it with a Salesforce channel.
To minimize downtime that can occur during an upgrade or migration to an enhanced WhatsApp channel, use a test or low-traffic phone number at first. After you set up and test your routing configuration, channel settings, message templates, and customer experience, you can then create your enhanced channel with your desired number and apply your already-tested customizations.
Step 1: Prepare to Create Your Channel
To get started, review key considerations and configure the Service Console, user access, and routing. For channel upgrades and migrations, turn off two-step verification to make your number available.
- Review our WhatsApp phone number criteria, account criteria, channel limitations, and migration considerations. See the resources linked at the end of this article.
- If you’re upgrading from a standard WhatsApp channel, submit a request to whatsappenablement@salesforce.com to turn off two-step verification for your number. Standard WhatsApp channels were retired on Oct. 22, 2025.
-
If you’re migrating your number from another business service provider (BSP) and can’t
access your original WhatsApp Business account, ask the BSP to turn off two-step verification
for your number. Contact WhatsApp if you’re not sure who your previous BSP was. If you do have
access to your original account, do it yourself:
- Log into Meta Business Manager as an admin.
- Select your WABA and enter WhatsApp Business Manager.
- In the settings of the phone number that you’re migrating, turn off two-step verification.
- Click the link in the email verification sent by WhatsApp.
- Complete the steps in Get Started with Messaging in Service Cloud.
Step 2: Create Your Channel in Setup
These steps apply whether you’re using a new number, a number that’s in use in a standard channel, or a number that’s in use with an external BSP.
- In Setup, enter Messaging in the Quick Find box, and then select Messaging Settings.
- Click New Channel, and then click Start.
- Click WhatsApp, select Enhanced, and then click Next.
- Review and accept the terms and conditions, and then click Next.
-
Disable any pop-up blockers. Then, click Connect to WhatsApp.
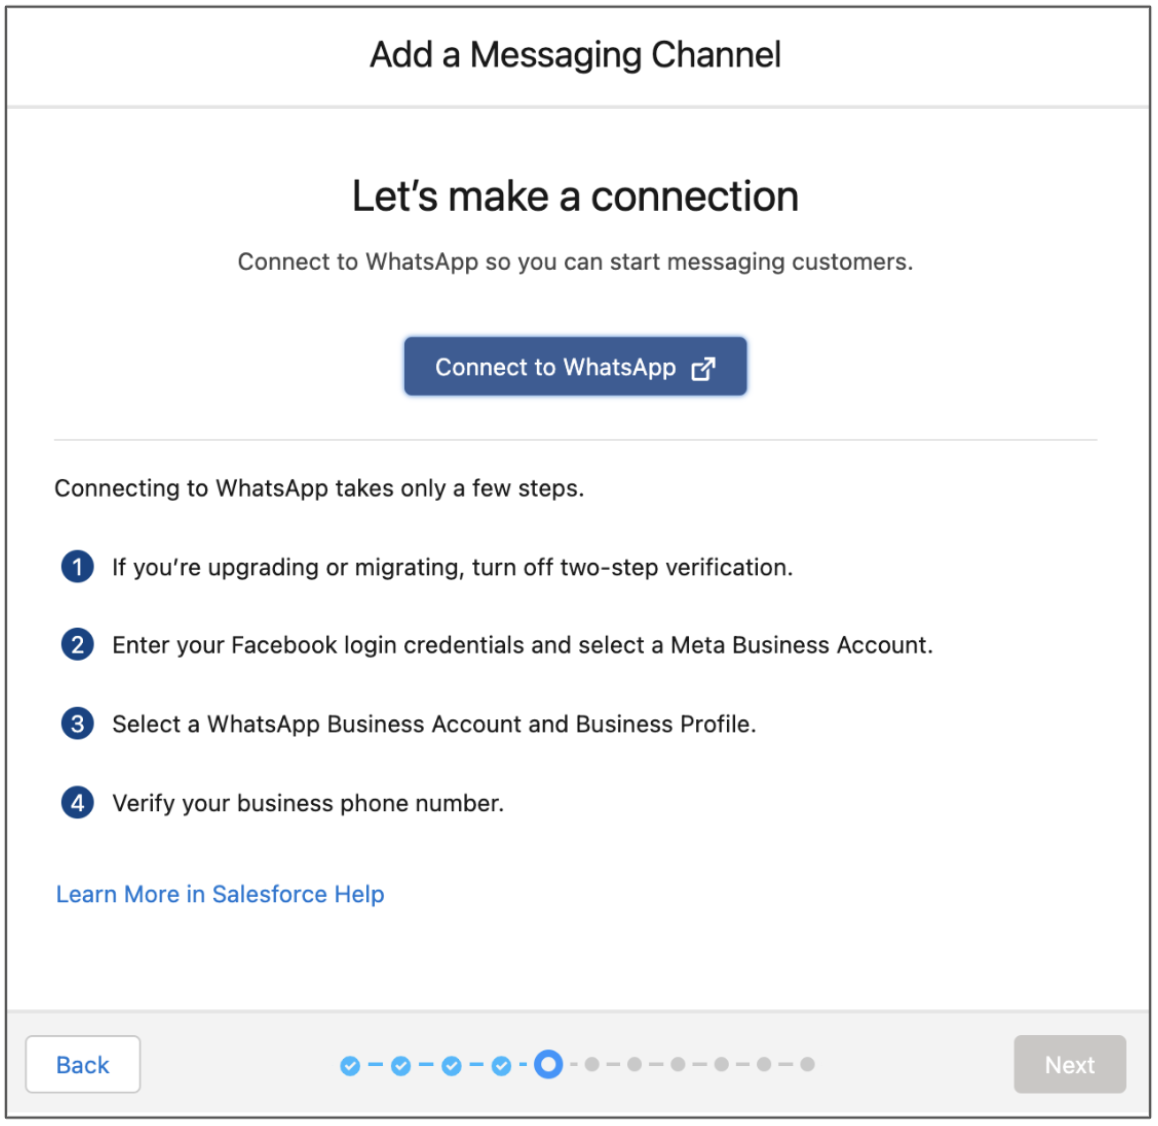
- In the window that appears, enter your Facebook login credentials.
-
Follow the prompts to:
- Create or select a Meta Business Account.
- Create a WhatsApp Business account (WABA). If you created a WABA in Meta Business Manager, it can't be used with Salesforce. If you’re upgrading or migrating, make sure the account name exactly matches the name of your original account.
- Create or select a WhatsApp Business profile. If you’re upgrading or migrating, create a new one whose profile name exactly matches the name of your original profile.
- Select your WhatsApp Business phone number or register a new one, and verify it by text or voice call.
- When a message notifies you that you’re almost ready to chat, click Finish.
- In Salesforce Setup, the channel setup flow shows that your WhatsApp account is connected. Click Next. If you selected a WhatsApp Business account that can’t be used, we let you know here.
- Select your WhatsApp number and click Next.
- Enter your chat acknowledgment message and click Next. If needed, you can edit this auto-response and others later in your channel settings.
-
Choose how to route incoming messages to service reps.
- To set up a basic routing solution from scratch, select Create a new queue. The flow walks you through creating a queue and routing configuration and adjusting service rep messaging workload.
- To use an existing queue or an Omni-Channel flow, which supports more complex routing logic and lets you route to bots, select Set up routing later.
- Complete and exit the flow.
-
If you selected Set up routing later, finish configuring your
routing.
- On the Messaging Settings page, find your new channel and click Edit in its action menu.
- If you want to route to an Omni-Channel flow: In the Routing section, select the Omni-Flow routing type. Select your Omni-Channel flow in the Flow Definition field, and select a fallback queue to receive any messaging sessions that the selected flow can’t route.
- If you want to route to a queue: In the Routing section, select the Omni-Queue routing type, and select a queue to receive this channel’s incoming messages.
- Save your changes.
Step 3: Activate Your Channel
Within 14 days of creating your enhanced WhatsApp channel, activate your channel to start the flow of messaging traffic. If you’re migrating or upgrading, we recommend activating during a low-traffic time to avoid interruption to ongoing messaging sessions.
- Review the steps in the Enhanced Messaging Channel Activation Checklist to make sure that your channel is ready for business.
- In Setup, go to the Messaging Settings page and click your channel’s name.
- At the top of the page, click Activate Channel.
After a channel is activated, it shows as active in the channel list. You can deactivate it at any time to pause messaging traffic. If you upgraded from a standard channel, the standard channel still appears in the channel list but is no longer active.
If you don’t activate your channel within 14 days of creating it, you must reverify your number with WhatsApp in one of two ways:
- Log into Meta Business Manager, go to your number’s settings, and reverify it.
- Repeat the New Channel setup flow on the Messaging Settings page using the same phone number.
Then, try activating the channel again.
Need help with WhatsApp? Review WhatsApp Business Platform Support Considerations.