
You are here:
Set Up Appointment Assistant Self-Service Scheduling for New Appointments
Let your customers book their own appointments.
Required Editions
| Available in: both Salesforce Classic (not available in all orgs) and Lightning Experience |
| The Field Service core features, managed package, and mobile app are available in Enterprise, Unlimited, and Developer Editions. |
| The Field Service Appointment Assistant managed package and permission set license are required. |
| User Permissions Needed | |
|---|---|
| To create a message template: | Configure Messaging |
| To open, edit, or create a flow in Flow Builder: | Manage Flow |
| To create sharing rules: | Customize Application |
Step 1: Create a Message Template for the Self-Service Scheduling Flow for New Appointments
Create a template for the message sent to customers with the verification code.
- From Setup, in the Quick Find box, enter Messaging, and then select Messaging Templates.
- Click New.
- In the Information area, enter the template name, developer name, and an optional description.
-
In Insert Merge Field, create a custom field on the contact object or use an existing
field.
- For Related To, select Contact.
- For Field, select a text custom field or an existing field to update with a random 6-digit code.
- Click Insert.
-
Enter your message. Make sure to include the placeholder for the verification code. For
example:
Your access code is: {!Contact.CustomField__c}. To book your appointment, we must confirm that this is you. Enter the code to continue.
- In the Channels area, select one or more channels.
- Save your changes.
Step 2: Set Up the Self-Service Scheduling Authentication Flow
Determine the details of the authentication flow that is connected to the main flow that lets your customers book new appointments.
Watch the video to see how to determine the details of the authentication flow that is connected to the main flow that lets your customers book new appointments.
- From Setup, in the Quick Find box, enter Process Automation, and then select Flows.
- Open the Self-Service Scheduling Authentication template.
- Click Save As and create your own version of the flow based on the template.
-
To use the email channel for authentication:
- To modify the default text of the email, open the EmailSubject and EmailBody variables and modify the text as needed.
-
In the Get Records element, enter your organization-wide email address as the value of
the DisplayName field.
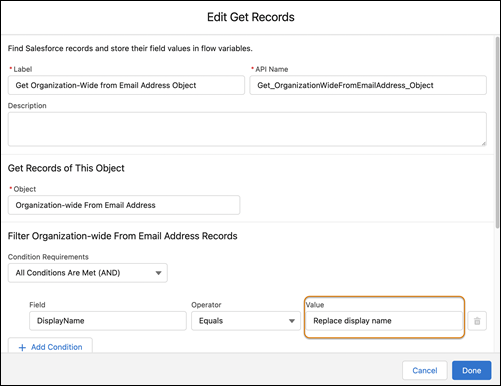
 Note To find the required email address, from Setup, in the Quick Find box, enter Email, and then select Organization-Wide Addresses. If the address isn’t set up, see Organization-Wide Email Addresses.
-
To use the SMS channel for authentication, add the Update Records component.
-
To add an element to the flow, click
 .
.
- Under Data, select Update Records.
- Enter a name for the label. API Name is populated based on the label name.
- Under How to Find Records to Update and Set Their Values, select Specify conditions to identify records, and set fields individually.
- Under Update Records of This Object Type, for Object, select Contact.
-
To check if the user is new or an existing contact based on the mobile phone number that
they entered, under Filter Contact Records, enter the match criteria.
- For Condition Requirements, select All Conditions Are Met (AND).
- For Field, enter MobilePhone.
- For Operator, select Equals.
- For Value, select MobilePhoneNumber.
-
Under Set Field Values for the Contact Records:
- For Field, select the same field that you used in the messaging template to hold the 6-digit code.
- For Value, select AccessCode.
- Click Done.
-
To add an element to the flow, click
-
To enable sending an SMS, add the Messaging Notification action.
-
To add an element to the flow, click .
- Under Interaction, select Action.
- For Action, select Messaging Notification.
- Enter a name for the label. API Name is populated based on the label name.
- For Messaging Channel Unique Name, enter the messaging channel’s developer name.
- For Messaging Template Unique Name, enter the messaging template’s developer name.
- Include the Context Record ID, and then select SMScontactID {!$SMScontactID}.
- To send the code to the phone number that the user entered, include the Recipient Phone Number, and then select MobilePhoneNumber {!$MobilePhoneNumber}.
- Include the Recipient Record ID, and then select SMScontactID {!$SMScontactID}.
- Click Done. We recommend not making any other changes to this flow.
-
To add an element to the flow, click
- Save and activate the flow.
-
Control the access to the flow.
- From Flows, click the arrow next to your flow, and select Edit Access.
- Select Override default behavior and restrict access to enabled profiles or permission sets.
- Add the required profiles.
- Save your changes.
-
From the guest user profile, enable access to the flows.
- Go to Enabled Flow Access, and click Edit.
- Add your Self-Service Scheduling flows to the enabled flows.
Step 3: Set Up the Self-Service Scheduling Flow
Configure the details of the main flow that lets your customers book new appointments.
Watch the video to see how to configure the details of the main flow that lets your customers book new appointments.
- From Setup, in the Quick Find box, enter Process Automation, and then select Flows.
- Open the Self-Service Scheduling template.
- To create your own version of the flow based on the template, click Save As, and add the required details.
-
Use the flow as is, or modify your version according to your needs. You can modify these
settings.
Note Don’t modify fields marked as Locked.
- Authentication Channel component
- Authenticate by Email and Authenticate by Mobile Phone: If you want to provide only one authentication method, set one of these settings to false.
- Authentication Flow: Enter the developer name of the Self-Service Scheduling Authentication flow that you created.
- Authentication component
- Minutes Until Resend is Available: Specify the number of minutes after customers open the web page when they can request another access code.
- Get Work Types component: Filter the work types presented to your customers.
- Get Operating Hours component: Enter the name of the required Operating Hours record.
- Get Scheduling Policy component: Enter the name of the Scheduling Policy record that defines the length of the appointment slots.
- Work Types component
- Work Type Details: Enter the API name of the field that stores the work type details. The default is Description.
- Work Type Title: Enter the API name of the field that stores the work type title. The default is Name.
- Location componentNote You can manage service appointment assignments to territories with polygons or by adding another screen to the flow that includes the territory record.
- Show Current Location Button: Let customers set their geolocation when they tap Use My Current Location.
- Appointment Selection component
- Scheduling Horizon Units and Number of Scheduling Horizon Units: Shows customers a scheduling calendar based on your specification of the number of days, weeks, or months. The slots available for selection range from the earliest start permitted to the earliest end date. The end date is either the due date or the end of the scheduling horizon, whichever one is earlier.
- Show Exact Appointment Times: To show exact appointment times, enter true. To show arrival windows, enter false. Make sure to enter the same value in the Summary component.
- Service Territory ID: Leave blank if you use polygons or other automatic flows to assign service territories. If your Self-Service Scheduling flow includes service territory selection, enter a service territory ID.
- Summary component
- Show Exact Appointment Times: To show exact appointment times, enter true. To show arrival windows, enter false. Make sure to enter the same value in the Appointment Selection component.
- Work Order ID: The record ID that’s updated and scheduled. If the Auto-Create Service Appointment setting is selected, a service appointment is created. If the setting is deselected, to create a service appointment for the work order, add a Create Record action to the flow.
Note A default page title is provided with the package for each Lightning web component. If you want to replace the default with your own text, enter it in the Page Title field in each component. - Authentication Channel component
- Save and activate the flow.
-
Control the access to the flow.
- From Flows, click the arrow next to your flow and select Edit Access.
- Select Override default behavior and restrict access to enabled profiles or permission sets.
- Add the required profiles.
- Save your changes.
-
Add the flow to your Experience Builder site.
- From Setup, in the Quick Find box, enter Digital Experiences, and then select All Sites.
- In the row for your site, click Builder.
-
In Experience Builder, click Components
 .
.
- From Process Automation, drag the Flow component onto the site.
- To open the settings panel, click anywhere in the component.
-
In Flow, select your Self-Service Scheduling flow.
Note To eliminate the border that appears around the flow, in Theme, click the arrow in the top right and select Edit CSS. In the Override CSS window, click Use Overrides. Then, in the Edit CSS window, enter this code:
.slds-p-horizontal—medium{ margin: 0; padding: 0; } .comm-layout-column{ margin: 0 !important; padding: 4px !important; } .forceCommunityFlowCommunity{ border: none !important; } - Publish the site.
-
From the guest user profile, enable access to the flows.
- Go to Enabled Flow Access, and click Edit.
- Add your Self-Service Scheduling flows to the enabled flows.
Step 4: Enable Complex Work for New Appointments
If you’re using Enhanced Scheduling and Optimization, you can let users create appointments with scheduling dependencies with Appointment Assistant Self-Service Scheduling. Appointment Assistant Self-Service Scheduling supports complex work only if you’re using Enhanced Scheduling and Optimization.
-
Create a sharing rule to give guest users access to the required service appointments.
To minimize what guest users can access, only share service appointments used for Appointment Assistant.
- From Setup, in the Quick Find box, enter Security, and then select Sharing Settings.
- For manage sharing settings, select Service Appointments.
- Under Sharing Rules, click New.
- For Rule Type, select Guest user access, based on criteria.
-
Enter the sharing criteria. For example, enter this criteria.
Field: StatusOperator: not equal toValue: Completed
- Select to include records owned by high-volume users.
- Share the rule with <Your Site Name> Site Guest User.
- Save the rule.
- Create two Apex or flow triggers, one to create the dependent service appointment and the other to create the dependency junction object.
For the dependent service appointment, enter this body text.
trigger aaCreateNewSA on ServiceAppointment (after insert) {
    List<ServiceAppointment> newServiceAppointments = new List<ServiceAppointment>();

    for (ServiceAppointment sa : Trigger.New) {
        if (sa.WorkTypeId == '08qB0000000Ho3bIAC' && sa.ServiceNote != 'temporary for complex work') {
            // Clone the ServiceAppointment
            ServiceAppointment clonedSA = sa.clone(false, true, false, false);
            clonedSA.Id = null; // Ensure Id is null for the insert
            clonedSA.ServiceNote = 'temporary for complex work';
            clonedSA.FSL__GanttIcon__c = sa.Id;
            newServiceAppointments.add(clonedSA);
        }
    }

    if (newServiceAppointments.size() > 0) {
        // Insert cloned ServiceAppointments
        insert newServiceAppointments;
    }
}trigger aaCreateNewDependency on ServiceAppointment (after update) {
List<FSL__Time_Dependency__c> newTimeDependencies = new List<FSL__Time_Dependency__c>();
for (ServiceAppointment sa : Trigger.New) {
FSL__Time_Dependency__c existingDependency = null;
try {
existingDependency = [SELECT Id
FROM FSL__Time_Dependency__c
WHERE FSL__Service_Appointment_1__c =: sa.Id
AND FSL__Service_Appointment_2__c =: sa.FSL__GanttIcon__c];
} catch (Exception e) {
if (sa.WorkTypeId == '08q1Q000000koPqQAI' && sa.ServiceNote == 'temporary for complex work') {
// Create FSL__Time_Dependency__c records to connect the original and cloned ServiceAppointments
FSL__Time_Dependency__c timeDependency = new FSL__Time_Dependency__c(
FSL__Service_Appointment_1__c = sa.Id,
FSL__Service_Appointment_2__c = sa.FSL__GanttIcon__c,
FSL__Dependency__c = 'Start After Finish'
);
newTimeDependencies.add(timeDependency);
}
}
}
if (newTimeDependencies.size() > 0) {
// Insert FSL__Time_Dependency__c
insert newTimeDependencies;
}
}Keep these considerations in mind when creating the triggers.
- To create the dependent service appointment, the first trigger must be triggered after the service appointment is created.
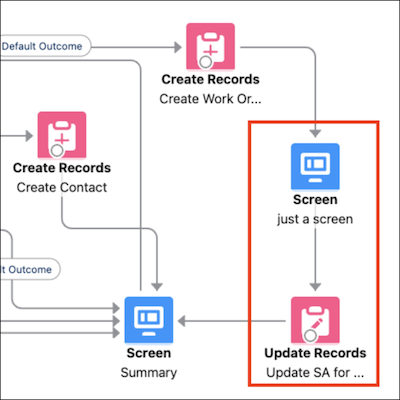
- The second trigger must be triggered after the first one using a separate trigger. That can
be done, for example, by triggering after the service appointment is updated. When retrieving
slots from the Appointment Selection LWC, the preexisting update event triggers the Apex
trigger. However, to trigger the Apex trigger before scheduling with the Summery LWC, an
Update Record must be added after the work order is created. You must also add a screen
between the service appointment creation and the update. This breaks up the transactions and
enables implementing the sharing rule.
- To verify that the trigger creates only the dependent service appointment and the dependency when a user initiates the process in Appointment Assistant, point the trigger at a specific value. For example, point the trigger at a specific work type or a value in a dedicated field on the service appointment.