
Set Up Surveys for Field Service Appointment Assistant
Send Salesforce Surveys to customers to get their feedback after an appointment. Salesforce Surveys requires a license that isn’t integrated with the Appointment Assistant license. You can also choose to integrate with GetFeedback.
Required Editions
| Available in: both Salesforce Classic (not available in all orgs) and Lightning Experience |
| The Field Service core features, managed package, and mobile app are available in Enterprise, Unlimited, and Developer Editions. |
| Available only if Digital Engagement is enabled. |
| User Permissions Needed | |
|---|---|
| To set up surveys: | System Administrator profile |
Before you set up the flow for Salesforce Surveys, you must:
- Enable Salesforce Surveys.
- Grant permissions that allow your customers to access the survey. See Give Guest Users Permission to Respond.
- Create a Salesforce Survey that you can send to your customers. See Create a Survey.
- Add a custom field to the Service Appointment object as a placeholder for the link to the survey.
To set up the flow to send Salesforce Surveys, complete these steps.
- From Setup, in the Quick Find box, enter Process Automation, and then select Flows.
- Click New Flow.
- Select Record-Triggered Flow, and click Create.
-
In the Configure Start window:
- In Object, enter Service Appointment.
- In Trigger the Flow When, select A record is updated.
- In Condition Requirements, select All Conditions Are Met (AND).
- For Field, enter Status.
- For Operator, select Equals.
- For Value, enter Completed.
- In When to Run the Flow for Updated Records, select Only when a record is updated to meet the condition requirements.
- Click Done.
-
Create a resource for the Experience Site name.
- From the Toolbox, click New Resource.
- For Resource Type, select Variable.
- For API name, enter SiteName.
- For Data Type, select Text.
- In Default Value, enter your Experience Site name.
- Click Done.
-
Create a resource for the survey ID.
- From the Toolbox, click New Resource.
- For Resource Type, select Variable.
- For API name, enter SurveyID.
- For Data Type, select Text.
-
In Default Value, enter your survey record ID.
 Note To find your survey record ID, from the App Launcher, find and select Surveys, and click the name of your survey. Then, copy the ID from the URL.
 - Click Done.
-
Get the Experience Site ID.
-
To add an element to the flow, click
 .
.
- Under Data, select Get Records.
- Enter a name for the label. API Name is populated based on the label name.
- For Object, select Network.
- In Condition Requirements, select All Conditions Are Met (AND).
- For Field, enter Name.
- For Operator, select Equals.
- For Value, enter the resource that you created for the Experience Site name.
- For How to Store Record Data, select Choose fields and assign variables (advanced).
- For Where to Store Values, select In separate variables.
- For Field, select Id.
-
For Variable, click in the field and select New Resource.
- For Resource Type, select Variable.
- For API name, enter SiteID.
- For Data Type, select Text.
- Click Done.
- Click Done.
-
To add an element to the flow, click
-
Create and save the Survey Invitation object.
-
To add an element to the flow, click .
- Under Data, select Create Records.
- Enter a name for the label. API Name is populated based on the label name.
- For How to Set the Record Fields, select Use separate resources, and literal values.
- For Object, select Survey Invitation.
-
Set the field values.
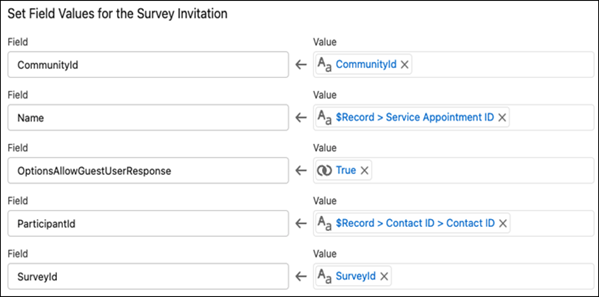
- Select Manually assign variables.
-
For Variable, click in the field and select New Resource.
- For Resource Type, select Variable.
- For API name, enter SurveyInvitationID.
- For Data Type, select Text.
- Click Done.
- Click Done.
-
To add an element to the flow, click
-
Create and save the Survey Subject to link the survey to the service appointment
record.
-
To add an element to the flow, click .
- Under Data, select Create Records.
- Enter a name for the label. API Name is populated based on the label name.
- For How to Set the Record Fields, select Use separate resources, and literal values.
- For Object, select Survey Object.
-
Set the field values.
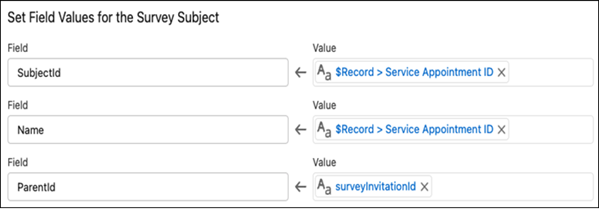
- Click Done.
-
To add an element to the flow, click
-
Get the Survey Invitation, and save the survey link.
-
To add an element to the flow, click .
- Under Data, select Get Records.
- Enter a name for the label. API Name is populated based on the label name.
- For Object, select Survey Invitation.
- In Condition Requirements, select All Conditions Are Met (AND).
- For Field, enter Id.
- For Operator, select Equals.
- For Value, enter SurveyInvitationId.
- For How to Store Record Data, select Choose fields and assign variables (advanced).
- For Where to Store Values, select In separate variables.
- For Field, select InvitationLink.
- For Variable, select SurveyInvitationLink.
- Click Done.
-
To add an element to the flow, click
-
Update the Service Appointment custom field that you created to hold the survey invitation
link.
-
To add an element to the flow, click .
- Under Data, select Update Records.
- Enter a name for the label. API Name is populated based on the label name.
- For Field, select the custom field that you created on the Service Appointment object.
-
For Value, select SurveyInvitationLink.

- Click Done.
-
To add an element to the flow, click
-
Create a messaging template.
- From Setup, in the Quick Find box, enter Messaging, and then select Messaging Templates.
- To create the confirmation template, click New.
- In the Information area, enter the template name, developer name, and the message that the customer receives.
-
Add the URL placeholder to your message. The URL enables customers to navigate to the
Experience Site that you configured.
- For Related To, select Service Appointment.
- For Field, select a placeholder for the survey link.
- Click Insert. The URL placeholder is added to the message.
- In the Channels area, select one or more channels.
- Save your changes.
-
Send an SMS with a link to the survey.
- Open the survey flow.
-
To add an element to the flow, click .
- Under Interaction, select Action.
- For Action, select Messaging Notification.
- Enter a name for the label. API Name is populated based on the label name.
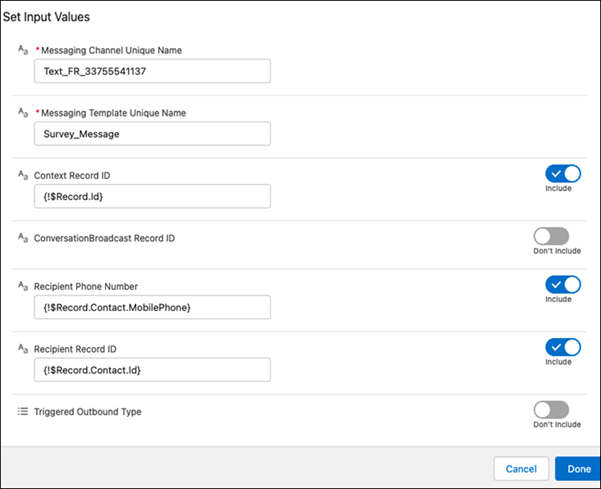
- For Messaging Channel Unique Name, enter the messaging channel’s developer name.
- For Messaging Template Unique Name, enter the messaging template’s developer name.
- Include the Context Record ID, and then select Record.Id.
- Include the Recipient Phone Number, and then select Record.Contact.MobilePhone.
- Include the Recipient Record ID, and then select Record.Contact.Id.
-
Click Done.
- Save and activate the flow.
Did this article solve your issue?
Let us know so we can improve!
