
Set Up Multiple Inventory Locations
By default, all products consumed for a work order or work order line item come from the same location. However, you can let mobile workers log product consumption from multiple locations. You might want to do this when, for example, workers provide services to multiple vendors or want separate inventories for different types of work.
Required Editions
| Available in: both Salesforce Classic (not available in all orgs) and Lightning Experience |
| The Field Service core features, managed package, and mobile app are available in Enterprise, Unlimited, and Developer Editions. |
| To access the Field Service mobile app, users need the Field Service Mobile user license. |
| User Permissions Needed | |
|---|---|
| To update page layouts: | Customize Application |
| To update connected apps: | Customize Application AND either Modify All Data OR Manage Connected Apps |
-
Enable multiple inventory locations in the connected app.
- From Setup, enter Connected Apps in the Quick Find box, then select Connected Apps.
- Click Salesforce Field Service for iOS or Salesforce Field Service for Android.
- Scroll to the custom attribute list, and click New.
- Enter the attribute key ENABLE_MULTIPLE_LOCATIONS.
-
To enable consuming parts from multiple locations, enter the attribute value
TRUE.
When this setting is enabled, users see the following locations for product items in their search results.
- Locations that belong to the same hierarchy as the user’s own location
- Locations that are associated with a work order on the user’s schedule
- Locations that are associated with the user’s service territory
-
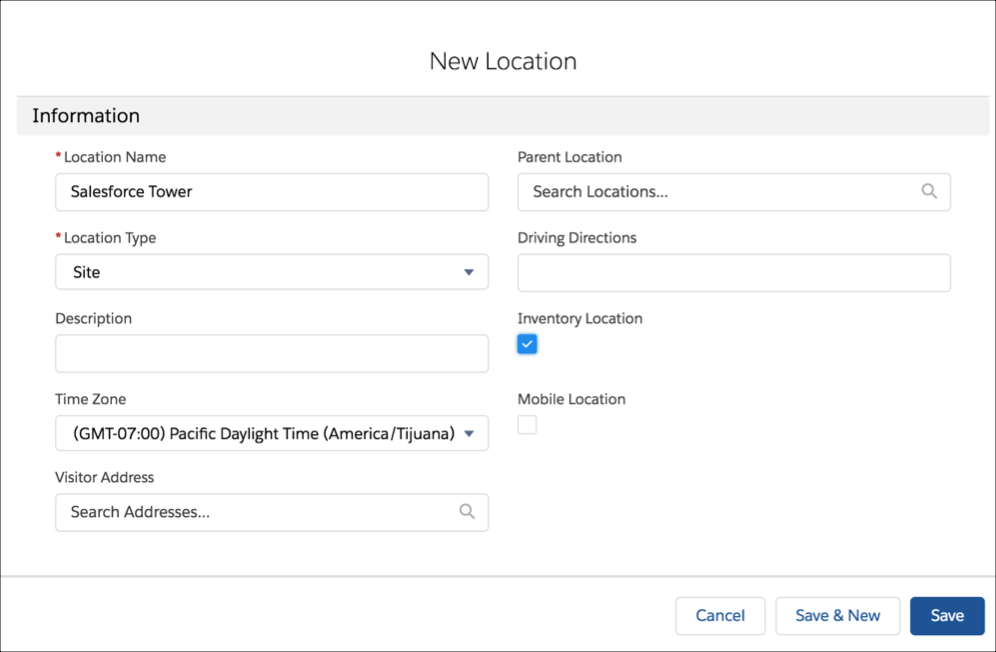
Create a parent location.
- From the App Launcher, find and open Locations.
- Click New.
-
Enter the details for your new location.
- For Location Name, enter a name for your location.
- For Location Type, select which type of location it is.
- For Time Zone, select the time zone that the location is in.
- Select Inventory Location and Mobile Location.
- Optionally, enter a description and driving directions for the location.
- Click Save.
-
Create child locations.
- From the App Launcher, find and open Locations.
- Click New.
- Enter the details for each new location. For Parent Location, select the location that you created.
-
Click Save.

-
Create consignment locations. A consignment location represents an inventory location at
the site of a work order or work order line item. For example, you can use a consignment
location for parts shipped directly to a work site.
- From the App Launcher, find and open Locations.
- Click New.
-
Enter the details for your new location. Select Inventory Location
so that parts can be stored there.
- Click Save.
-
Create product items for the consignment location.
- From the App Launcher, find and open Product Items.
- Click New.
-
Enter the details for your new product item.
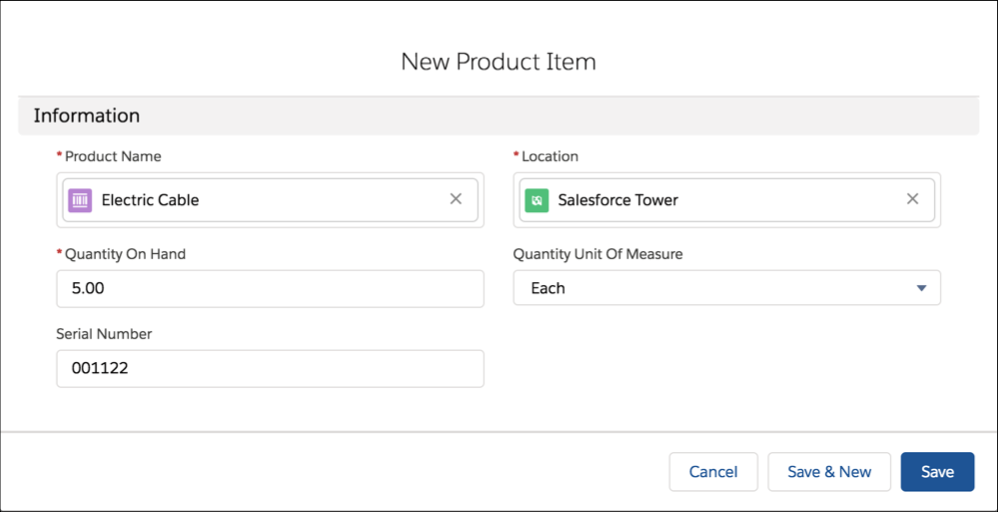
- For Product Name, select a product.
- For Location, select the consignment location that you created.
- For Quantity on Hand, select the number of products available at that location.
- Optionally, select a Quantity Unit of Measure and enter the product's serial number.
- Click Save.
-
Create cross-border locations. A cross-border location represents an inventory location
that belongs to a specific service territory.
-
Add the Service Territory Locations related list to the Service Territory layout.
- From the Object Manager, enter Service Territory in the Quick Find box, and select Service Territory.
- Select Page Layouts.
- Select Service Territory Layout.
- Drag Service Territory Locations under Related Lists.
- Click Save.
-
Add a location to a service territory.
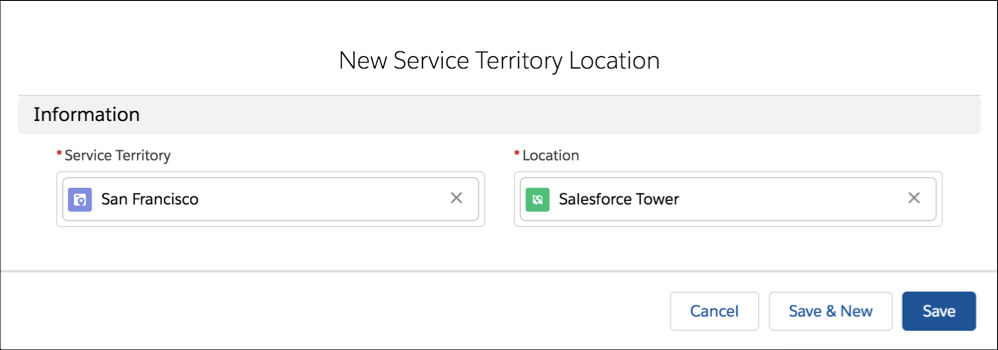
- From the App Launcher, find and open Service Territory.
- Select the service territory that you want to add a location to.
- Click Related.
- Next to Service Territory Locations, click New.
- Select a location.
- Click Save.
-
Add the Service Territory Locations related list to the Service Territory layout.
- For the setup to take effect, have each user log out and log back.
- Consuming product items from multiple locations is a beta feature. Up to 10 hierarchical locations or cross-border locations are supported, with a maximum of 1,000 product items for each location.
- When a location is associated with a service resource, only direct parent-child locations are supported. Grandchild locations are not supported.
- When a location is associated with a work order or a service territory location, parent-child relationships aren't used.
- Child locations of consignment locations and cross-border locations aren’t available in the app.
- To make a location available in the inventory tab in the app, select Mobile Location.
- For cross-border locations, don't select the Mobile Location field. When the Mobile Location field is selected, the location isn’t available in the app.
Did this article solve your issue?
Let us know so we can improve!