
You are here:
Customize Pre-Chat for Enhanced Chat
Ask customers to fill out visible pre-chat fields before starting a messaging session, or auto-fill hidden pre-chat fields when the conversation begins. Add standard and custom fields to your pre-chat form.
Required Editions
| View supported editions. | |
 This article applies to:
|
Messaging for In-App and Messaging for Web channels |
 This article doesn’t apply to:
|
Standard and enhanced WhatsApp, standard and enhanced Facebook Messenger, standard and enhanced SMS, enhanced Apple Messages for Business, enhanced LINE, and Bring Your Own Channel |
| User Permissions | |
|---|---|
| To set up this feature: | Customize Application AND Modify Metadata Through Metadata API Functions |
| To modify permission sets and profiles: | Manage Profiles and Permission Sets |
In this stage of Enhanced Chat setup, you:
- Create custom parameters, which help map your pre-chat form to your flow.
- Add visible fields to your pre-chat form.
- Add hidden fields to your pre-chat form.
See Also
Create Custom Parameters for Pre-Chat
- From Setup, in the Quick Find box, enter Messaging Settings, and then select Messaging Settings.
- Click the name of your messaging channel.
- Under Custom Parameters, click New.
-
Fill in the details of your parameter. To make mapping easy and transparent, match the
parameter name and channel variable name. Channel Variable Name appears as a selection when
adding custom fields to your pre-chat form. Think of each custom parameter as the link between
your pre-chat form’s custom fields (both hidden and visible) and your flow.
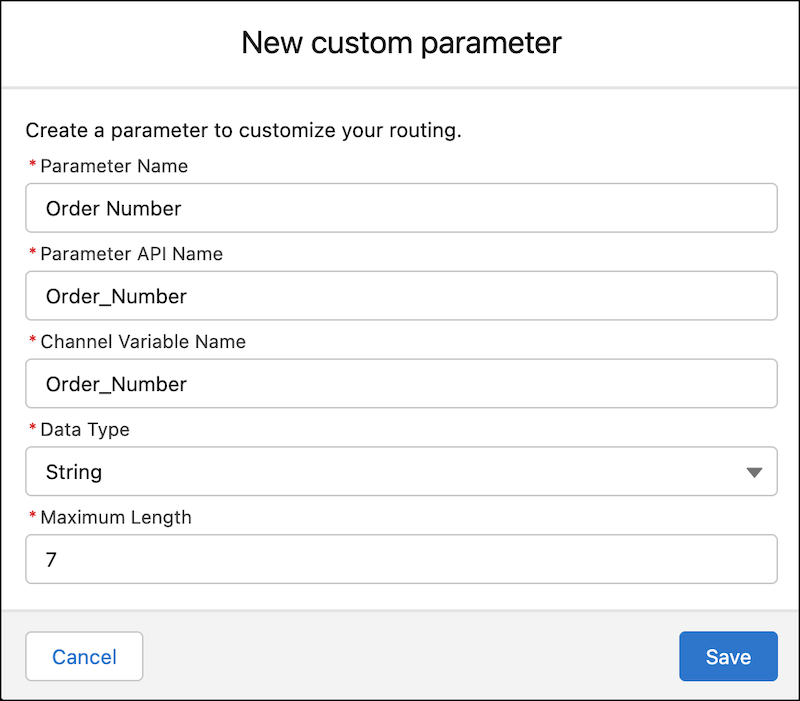
- String is the only option for Data Type. While the pre-chat form lets you show visible fields formatted as text, email, phone, number, dropdown, and checkbox fields, a flow automatically converts these fields to string fields. If you use a flow to send information from a pre-chat field to another record, the output appears as a string field. While most letters, numbers, and special characters allowed by the original field type are allowed by a string field, differences sometimes occur. For example, the flow converts a checkbox field to a string statement of true or a string statement of false in the resulting flow output. As another exception, the flow passes the original dropdown API value from a pre-chat form’s dropdown field, not the custom label for that field value.
- Save your changes, and create additional custom parameters for each hidden or visible field that you plan to add to your pre-chat form.
Add Visible Fields to Your Pre-Chat Form
- From Setup, in the Quick Find box, enter Embedded Service Deployments, and then select Embedded Service Deployments.
- Select View from the dropdown menu for your deployment.
- Click Edit Pre-Chat.
- Select Activate the pre-chat feature.
-
Choose whether to show the pre-chat form with every conversation, or with every
session.
- If you select Every Conversation, the display frequency of the pre-chat form depends on whether you add user verification to your messaging channel. If you add user verification, an Enhanced Chat conversation has no end. Your customer sees the pre-chat form only when messaging you for the first time. If you don’t add user verification, a customer can click End Chat to end a conversation. They see the pre-chat form the first time that they message, and each subsequent time that they start a new conversation after ending the previous one.
- If you select Every Session, the display frequency of the pre-chat form also depends on whether you add user verification to your messaging channel. Learn more here: Considerations and Limitations for Enhanced Chat
-
To add a standard field to your form:
- Under Visible Pre-Chat Fields, click Add Field, and then select the field that you want to show.
- Save your changes.
-
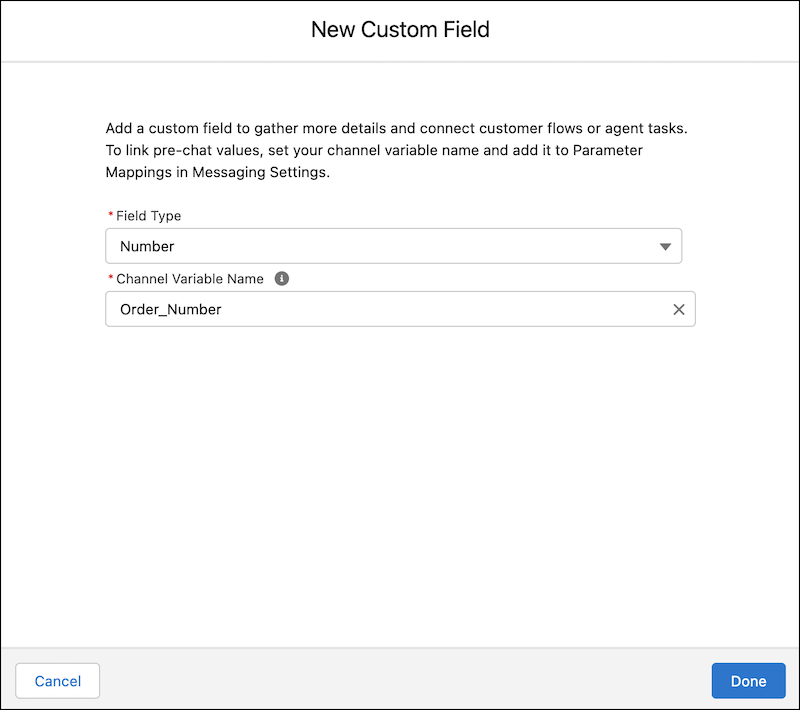
To add a custom field to your form:
- Under Visible Pre-Chat Fields, click Add Field, and then select Custom.
- To determine how the information appears, select your field type.
-
Find and set the channel variable name of the custom parameter.
If you selected Dropdown as your field type, also add a Dropdown Name, Dropdown API Name, and Dropdown API Values. There are a few things to note:
- Each pre-chat form can have up to 5 custom dropdown fields and each dropdown can have up to 200 values.
- A dropdown API name can only be used one time per org. If you delete a dropdown api name from your org, you still can’t use it again in that same org.
- Format each dropdown API value to start with a letter, contain only alphanumeric characters, and use underscores instead of spaces.
- We recommend creating a custom label for each dropdown value that displays on your pre-chat form, as it’s what your customer sees. You can create a custom label in each of your supported languages. If you don’t create custom labels, your customer sees the dropdown API values, which can include underscores.
- We pass the original dropdown API value to your flow, not your custom labels.
- Click Next.
- On the next page, optionally select a Default Dropdown API Value for your dropdown field, which appears in the field if a selection isn’t already made. Also, order your dropdown field values.
- Click Save (if you created a custom dropdown field) or click Done (for all other custom field types).
- Save your changes to the pre-chat form.
- To create a custom label for a custom field, return to the deployment settings page and click Set Custom Labels.
- Select the language for this custom label. You must create a custom label for each language that you support.
- Select Pre-Chat as the chat group.
- Under Label Group, select Dropdown Values to customize the labels for your field’s dropdown API values. Or, select Pre-Chat Form to customize the label for standard fields, or custom email, number, phone, checkbox, and text fields.
- Under Label Type, select Standard.
- Enter a custom label for your custom field, and then click Finish.
- Repeat this step for each language that you support.
- Return to the deployment settings page and click Publish.
Add Hidden Fields to Your Pre-Chat Form
End users don't see hidden pre-chat fields. Update your privacy policy to include what data you collect with hidden fields. Consider linking to the policy with a Messaging Component in the conversation. Collect the minimum amount of data needed for a service rep to do their job, and only store this data for as long as it's needed to close the case. Learn how to delete data.
- From Setup, in the Quick Find box, enter Embedded Service Deployments, and then select Embedded Service Deployments.
- Select View from the dropdown menu for your deployment.
- Click Edit Pre-Chat.
- Select Activate the pre-chat feature if it’s not already selected.
- Under Hidden Pre-Chat Fields, click to highlight a custom parameter from the Available list. Custom parameters appear if they’re associated with the messaging channel for this deployment and if they’re not already in use as a visible or hidden field on this deployment. A hidden pre-chat field must be a Text type field and can’t be required.
-
To move your field to the Selected list, click the arrow pointing toward the Selected
list.
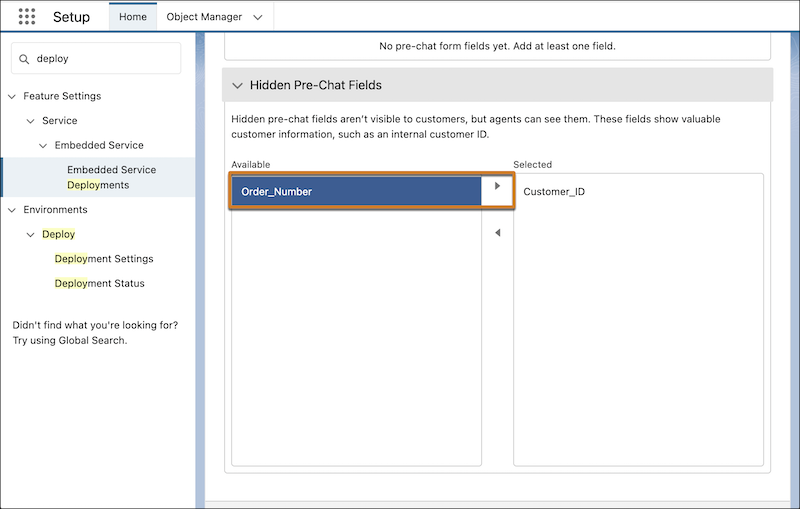
- Save your changes.
- Work with your developer to pass these values programmatically from your website or mobile app to Salesforce (Web, iOS, Android). The pre-chat field names in the code must be identical to what is specified in Setup.