
You are here:
Set Up Token-Based User Verification
Let customers have secure conversations with token-based user verification. Add keys or an Endpoint URL to create a keyset, and then turn on user verification in Setup.
Required Editions
| View supported editions. | |
 This article applies to:
|
Enhanced In-App Chat and Enhanced Web Chat channels |
 This article doesn’t apply to:
|
Enhanced WhatsApp, Standard and Enhanced Facebook Messenger, Standard and Enhanced SMS, Enhanced Apple Messages for Business, Enhanced LINE, and Bring Your Own Channel |
| User Permissions Needed | |
|---|---|
| To set up this feature: | Customize Application |
Add Your Keys or Endpoint URL to Create a Keyset
Create a keyset for token-based user verification. Choose whether to create your keyset from an endpoint URL or by manually uploading your keys.
- From Setup, in the Quick Find box, enter User Verification, and then select Enhanced Chat User Verification.
-
To create a Keyset from an Endpoint URL:
- Click New Keyset.
-
Name your keyset and indicate the JSON web key issuer. Enter an issuer that matches the
issparameter value in the JWT payload. -
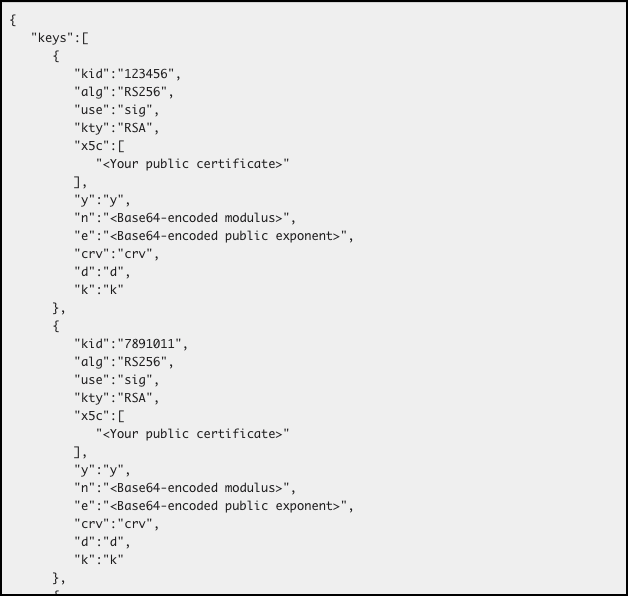
Under Type, select Endpoint URL, and add your JWKS URL Response
to the Endpoint URL field. Note the following when creating your URL: 1) The JWKS URL
Response must be hosted outside of Salesforce. 2) We support the RS256 and RS512 algorithms.
3) Formatting matters. Here’s an example endpoint format:
- Save your changes.
-
To create a keyset by uploading keys:
- Click New Key.
- Name your key and activate it.
- Upload your key file.
- Save your changes.
- Repeat steps a through d until all keys are uploaded.
- Click New Keyset.
-
Name your keyset and indicate the JSON web key issuer. Enter an issuer that matches the
issparameter value in the JWT payload. - Select Keys as the type.
- Search for and select each key to add to your keyset.
- Save your changes.
Turn On User Verification
Turn on user verification for Enhanced Chat.
- From Setup, in the Quick Find box, enter Messaging, and then select Messaging Settings.
- In the dropdown for your messaging channel, select Edit.
- Select the Add User Verification checkbox.
- Return to the Messaging Settings related list, and click the name of your messaging channel.
- Under User Verification, click New.
- Enter a configuration name. To let customers continue the same messaging conversation across channels, add the same configuration name to each channel.
- Select a keyset.
- Select Active.
- Save your changes.
Determine Authorization Token Expiration Time
Control when a messaging session gets renewed by your website or mobile app to continue the conversation.
When user verification is turned off, the field is labeled Authorization Token Expiration Time for Unverified Users and it controls the number of minutes until an Enhanced Web Chat session expires. The default value for this field is 360 minutes (6 hours) and you can specify up to 72 hours. Enhanced In-App Chat sessions is automatically renewed by the SDK so this value has a minimal impact on mobile app users.

When user verification is turned on, the field is labeled Authorization Token Expiration Time for Verified Users and it controls how long until Salesforce calls your client API (Web, iOS, Android) so that you can either let the session expire, or provide a valid identity token to renew the session. The default value for this field is 60 minutes.
