Loading
Salesforce now sends email only from verified domains. Read More
Salesforce Field Service
Table of Contents
Select Filters

          No results
          No results
          Here are some search tips

          Check the spelling of your keywords.
          Use more general search terms.
          Select fewer filters to broaden your search.

          Search all of Salesforce Help
          Optimize Your Schedule from the Field Service Dispatcher Console

          Optimize Your Schedule from the Field Service Dispatcher Console

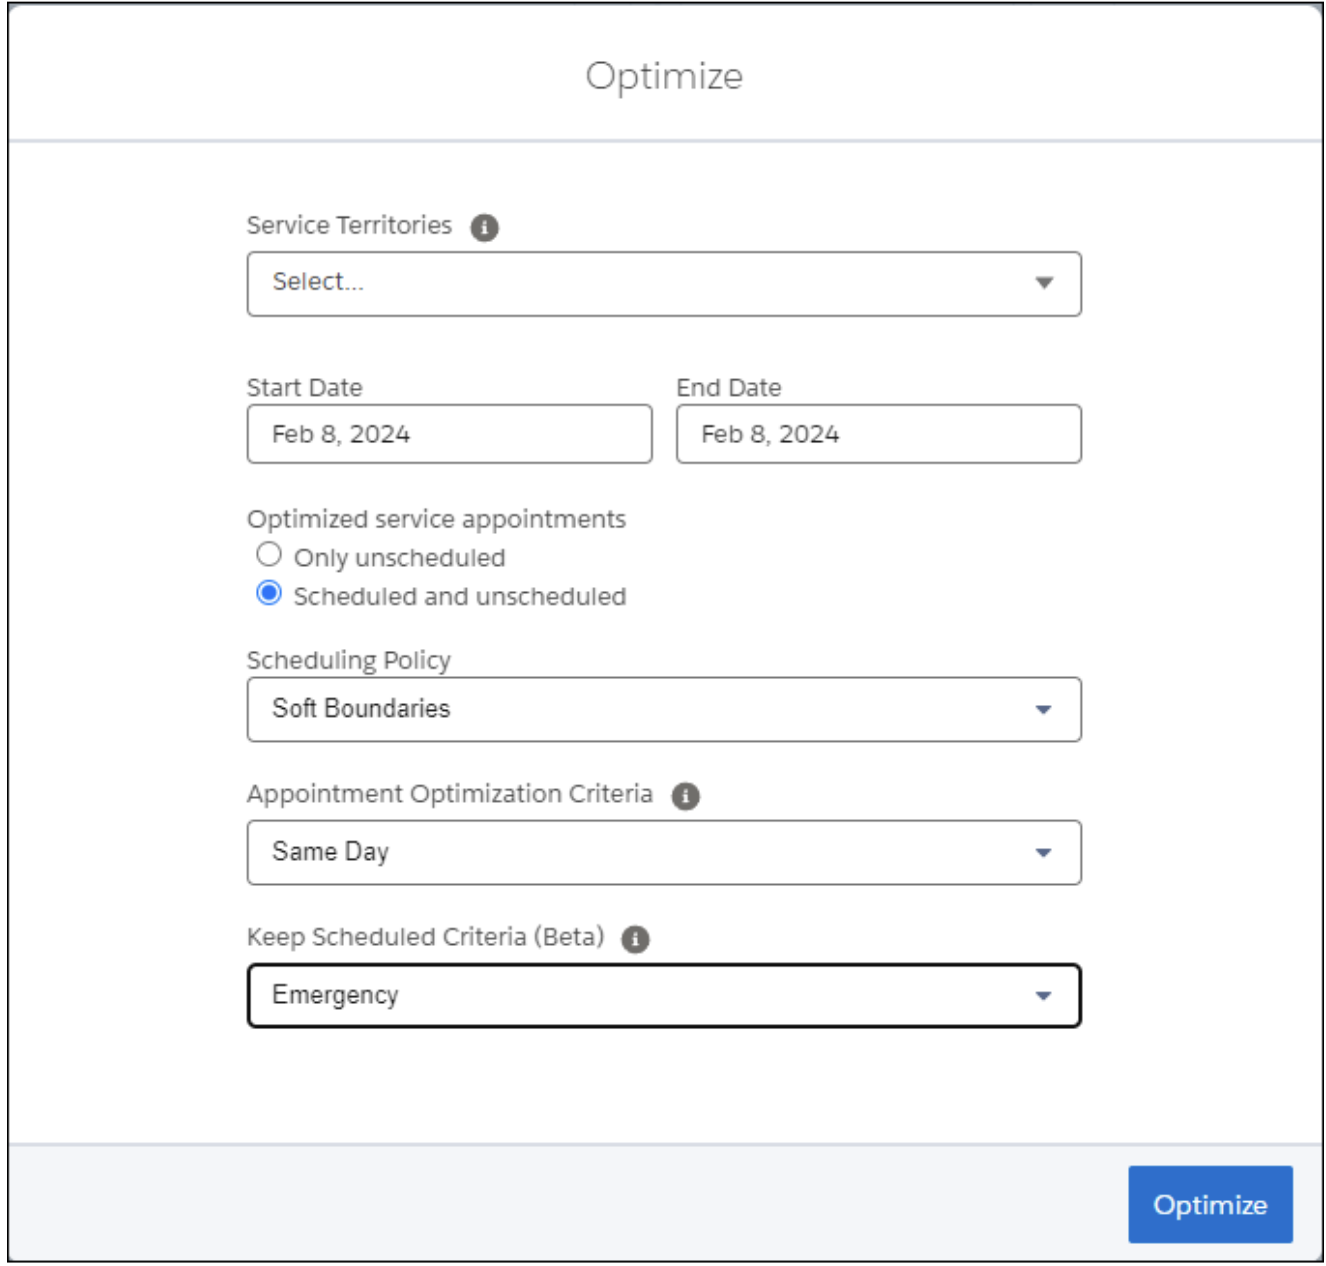
          Optimize your team’s Field Service schedule by running optimization directly from the dispatcher console for one or more territories. Use optimization to handle last-minute changes to your schedule. Manual optimization is ideal for handling cancellations, appointments that got dropped from the Gantt and need to be rescheduled, and high-priority last-minute appointments. It’s especially useful when selecting a scheduling policy that uses in-day optimization, which can optimize your schedule in as little as 5 minutes.

          Required Editions

          Available in: both Salesforce Classic (not available in all orgs) and Lightning Experience
          The Field Service core features, managed package, and mobile app are available in Enterprise, Unlimited, and Developer Editions.
          User Permissions Needed
          To optimize from the dispatcher console:

          One of these custom permission sets:

          • FSL Admin Permissions
          • FSL Dispatcher Permissions
          To use the Keep Schedule Criteria field in the dispatcher console: FSL Keep Scheduled Criteria

          Package icon This is a Field Service managed package feature.

          1. On the appointment list’s action menu, select Optimize.
            appointment list’s action menu
          2. Select the service territories. You see only territories that are selected in the dispatcher console.
            Note
            Note If you’ve enabled Dynamic Scaling (available only with Enhanced Scheduling and Optimization), and the scheduling policy is configured to run global optimization, you can optimize requests that are over 50,000 service appointments or 1,000 service resources.
          3. Select the start and end dates of the horizon you want to optimize. The default is the horizon shown in the dispatcher console. To avoid scheduling conflicts, it’s recommended to run optimizations for the current day, and at the most for two days.
          4. Select whether you want to optimize only appointments that aren’t scheduled or both scheduled and unscheduled appointments.  When you select only unscheduled appointments, appointments that are already scheduled are pinned. 
          5. Select a scheduling policy.
            Note
            Note It’s recommended to select a policy that uses in-day optimization as it takes a maximum of 5 minutes, while other policies run for several hours.
          6. To specify the type of appointments to optimize, select optimization criteria. Only appointments that meet the criteria are optimized. For example, you can optimize only those appointments defined as In Jeopardy or Emergency.
          7. If you’re using Enhanced Scheduling Optimization and have permission, define the criteria to keep appointments scheduled during optimization. For example, you can ensure that critical appointments with customer commitments are optimized but are never removed from the Gantt. These appointments can move to a different time slot or resource but remain scheduled.
            Note
            Note  If a service appointment matches the criteria you define, but it violates a rule, it’s pinned and isn’t optimized. To move the service appointments, for example, to fix the rule violations, select None from Keep Scheduled Criteria.
          8. Click Optimize. The Gantt is shaded in green and is locked during optimization.
            Gantt with green background
           
          Loading
          Salesforce Help | Article