
You are here:
Manage Scheduled Jobs in Field Service
Optimize your team’s Field Service schedule for one or more service territories across a specified range of days. You can configure the optimization to run automatically, for example, every night or several times a day, or run it as needed.
Required Editions
| Available in: both Salesforce Classic (not available in all orgs) and Lightning Experience |
| The Agentforce Field Service and Operations core features, managed package, and mobile app are available in Enterprise, Unlimited, and Developer Editions. |
| User Permissions Needed | |
|---|---|
| To optimize from the Classic Dispatch Console: | One of these custom permission sets:
|
| To create a scheduled job: | FSL Admin Permissions custom permission set |
 This is a Field Service managed package feature.
- Manage Scheduled Jobs When Using Enhanced Scheduling and Optimization
To automatically run optimization jobs regularly, you can set up scheduled jobs. - Scheduled Jobs Operation
The scheduled jobs parameters determine the scope of data included in the optimization request, such as which service resources and service appointments are included in the request, and the optimization horizon. The optimization horizon is the range of days is considered as available for scheduling. - Manage Scheduled Jobs When Not Using Enhanced Scheduling and Optimization
To automatically run optimization jobs regularly, you can set up scheduled jobs.
Manage Scheduled Jobs When Using Enhanced Scheduling and Optimization
To automatically run optimization jobs regularly, you can set up scheduled jobs.
-
Optionally, exclude service appointments with certain statuses from being
changed during schedule optimization by defining criteria to pin them in place.
- From the App Launcher, find and open Field Service Admin, and then click Field Service Settings.
- Under Optimization, click Logic.
- Scroll to Global Optimization and from Pin Criteria select the service appointment statuses to exclude from schedule optimization.
-
Save your changes.
The settings apply to optimizations that dispatchers run manually or in a scheduled job.
-
Optionally, define a default value to show in the Keep Scheduled Criteria field
in the Scheduled Jobs tab and in the Optimize window in the Classic Dispatch Console.
This field prevents service appointments with certain values from being dropped
from the schedule during optimization, but it enables them to be moved to a
different time slot or resource.
 Note If a service appointment matches the criteria you define but violates a rule, it’s pinned and isn’t optimized. For example, service appointments that meet the Keep Scheduled criteria and overlap with other appointments are considered pinned and aren't moved during optimization.
- From the App Launcher, find and open Field Service Admin, and then click Field Service Settings.
- Under Optimization, click Logic.
- Scroll to Global Optimization and from Keep Scheduled Criteria, select the service appointment value to show by default.
-
Save your changes.
The settings apply to optimizations that dispatchers run manually or in a scheduled job.
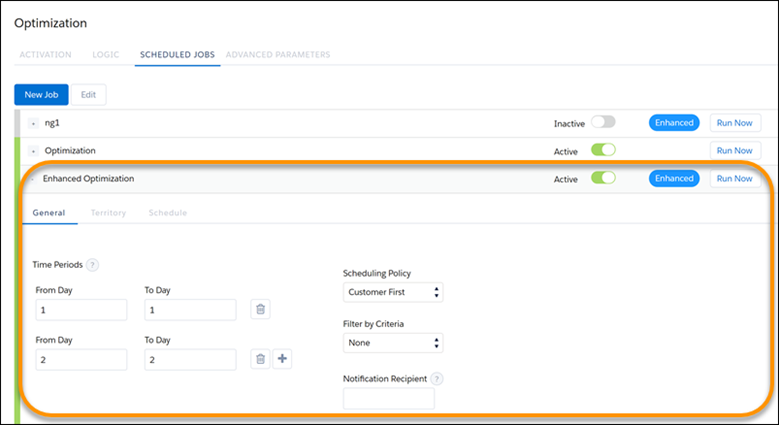
- Open the Scheduled Jobs tab.
- Click New Job.
- Give the job a unique name, and for Automator Type, select Enhanced Optimization.
-
In the General tab:
-
Add up to 10 time periods, within 30 days.
From Day is the first day of data that is fetched. To Day is the last day of data that is fetched. Day 0 refers to today from 00:00 to 11:59 PM, according to the user’s time zone. If you enter overlapping days, the data is loaded twice resulting in possible errors.
For example, if you define a value of 0 for From Day and To Day on the General tab, and define a recurring job on the Schedule tab to run each day at 6:00 PM, an optimization request is created and runs each day at 6:00 PM. The optimization horizon is 24 hours, from midnight the day the request is triggered to midnight the next day. You can also configure multiple time periods by using the + icon. For example, you can have From Day 0 to Day 6 and then select the + icon to add another period From day 7 to day 14. This configuration lets you optimize a two-week period in one optimization job but with two separate optimization requests.
Specifying multiple time periods in the same job lets you set up one job for multiple optimization horizons instead of setting up separate jobs for each horizon. Each time period generates its own optimization request and runs in parallel. The time periods also allow you to create a job that optimizes future dates.
Note You can’t define overlapping time periods if Enable optimization overlaps prevention is enabled in Field Service Settings (enabled by default).For Example, if all service appointments have arrival windows, set up time periods for individual days. The arrival windows force the service appointments to be scheduled on a specific day, and they can’t be scheduled by another optimization request running for a different time period. That way, the optimization focuses only on relevant options and results in a more optimized schedule.
If your optimization horizon includes more appointments than the allowed amount per optimization request, split the job into time periods. That way, each optimization request is within the limit.
- Select a scheduling policy. This scheduling policy is applied to the entire scheduled job unless you specify scheduling policies for individual territory groups in the Territory tab.
- To specify the type of appointments that are optimized, select a filter. Only appointments that meet the criteria are optimized.
- In Email Recipient Username, enter the username, and then select from the list. The field shows the email address. Use an email address where you want optimization job failure messages to be sent.
-
Add up to 10 time periods, within 30 days.
-
In the Territory tab:
- Search for and select up to 100 service territories and create a group. If you’ve enabled Dynamic Scaling you can select up to 1,000 service territories in a group. Only active service territories with Enhanced Scheduling and Optimization enabled are available for selection.
- Create up to 50 groups.
- Select a scheduling policy for each group.
Note- Each optimization request includes all the service territories in the group for each time period defined in the General tab. For example, if you have three time periods and five groups, 15 optimization requests run.
- You can click Select All to quickly select all of the service territories when you configure a scheduled optimization job, without having to select each territory individually. This is especially useful when you’re using dynamic scaling. With dynamic scaling, you don't need to manually set up optimization groups and define boundaries between areas that need to be optimized together, or split data due to system limits.
-
In the Schedule tab:
- Select the frequency.
- If this job is a recurring job, enter the details.
- If your optimization job is ready to run, activate the job.
- Save your changes.
- To run the job immediately without waiting for the scheduled time, click Run Now.
Scheduled Jobs Operation
The scheduled jobs parameters determine the scope of data included in the optimization request, such as which service resources and service appointments are included in the request, and the optimization horizon. The optimization horizon is the range of days is considered as available for scheduling.
The horizon of an optimization request is always in full calendar days (00:00-23:59), and is determined by the From Day and To Day fields in the General tab, where day 0 is today, day 1 is tomorrow, and so on.
The horizon days are in the timezone of the user who creates the scheduled job not the timezone of the optimized service territories.
Service resources are included in the optimization request if they have an active service territory membership (primary, secondary, or relocation) in one of the territories included in the optimization request territory group (Territory tab). The service resource territory membership start and end dates must overlap with the optimization horizon.
Service appointments are included in the optimization request if:
- Their territory is included in the optimization request territory group (Territory tab).
- Their Earliest Start Permitted and Due Date overlap with the optimization horizon. If the Arrival Window Start and Arrival Window End fields are populated, these values are used instead of Earliest Start Permitted and Due Date.
- They match the filter criteria defined in Filter by Criteria.
Or
- They are already assigned to one of the service resources in the optimization request, within the optimization request horizon.
From Day = 0
To Day = 3
Filter by Criteria = None
Territory group = Los Angeles, San Francisco
An optimization job is scheduled to start every night at 2:00 AM in the Los Angeles timezone (Pacific Daylight Time).
When the jobs starts at 2:00 AM on January 20 (the night between January 19 and January 20), the optimization request includes:
- Service resources with Los Angeles or San Francisco service territory memberships with a Start Date earlier than January 24, and an End Date after or equal to January 20 (time part of the date fields is ignored), such that the territory membership overlaps with the optimization period.
- Service appointments with:
- Territory Los Angeles or San Francisco
- Arrival Window Start or Earliest Start Permitted before Jan 24, 00:00 AND
- Arrival Window End and Due Date after Jan 20, 00:00
- Or
- Assigned Resource is one of the collected service resources in the optimization request, and the Scheduled Start is between Jan 20, 00:00 PM and Jan 23, 11:59 PM.
Considerations
- The optimization requests that run for each group within each time period are counted toward the schedule optimization request limits detailed in Schedule Optimization Request Limits. The entire scheduled job is counted as one job toward the limitation detailed in Platform Limits Affecting Field Service, regardless of the number of groups in the job. If you set up a recurring schedule that runs every x minutes, multiple scheduled jobs are created accordingly. For example, if you set it up to recur every 15 minutes, this is counted as 4 scheduled jobs. Setting up groups with scheduling policies helps you avoid reaching your org limits.
- For enhanced scheduled jobs, you can't define overlapping time periods if Enable optimization overlaps prevention is enabled in Field Service Settings (enabled by default).
- Optimization applies only to service appointments whose parent appointment is a work order or work order line item.
- Global optimization attempts to reschedule appointments that have rule violations. If it doesn’t manage to reschedule them, the appointments remain unscheduled.
- Global and In-day optimization validate that for already scheduled service appointments, the Scheduled End − Scheduled Start time = Duration, while taking resource efficiency into consideration. Service appointments that violate this validation are unscheduled.
- The same service appointments can appear in multiple optimization requests, possibly resulting in incorrect results.
- If you edit the name of the job, the groups are deleted. To avoid this issue, before editing the name, refresh your browser.
Manage Scheduled Jobs When Not Using Enhanced Scheduling and Optimization
To automatically run optimization jobs regularly, you can set up scheduled jobs.
-
Optionally, exclude service appointments with certain statuses from being changed during
schedule optimization.
- From the App Launcher, find and select Field Service Admin, and then click Field Service Settings.
- Under Optimization, click Logic.
- Under Global Optimization, select the service appointment statuses to exclude from schedule optimization.
- Save your changes. The settings apply to optimizations that you run manually or in a scheduled job.
- Open the Scheduled Jobs tab.
- Click New Job.
- Give the job a unique name, and for Automator Type, select Optimization.
-
Enter the optimization job’s details.
- Select the territories to optimize. We recommend including no more than 100 territories in a job.
- (Optional) If you selected multiple territories, select Optimize in stages underneath the territory list. In the Territories Per Stage field, enter the number of territories to optimize at a time. These settings help you stay within the scheduled jobs queue maximum of 100 items, and don’t affect optimization time. We recommend keeping this number low to avoid reaching optimization limits.
- For the time horizon, enter the number of days to optimize.
- To specify the type of appointments that are optimized, select a filter. Only appointments that meet the criteria are optimized.
- Select a scheduling policy to guide the optimization.
- Enter an email address where you want optimization job failure messages to be sent.
- Select the frequency and schedule.
- If your optimization job is ready to run, activate the job.
- To run the job immediately without waiting for the scheduled time, click Run Now.
- Save your changes.

Considerations:
- Optimization applies only to service appointments whose parent appointment is a work order or work order line item. Only active territories included in the scheduled optimization job are optimized.
- Global optimization doesn’t reschedule appointments that have rule violations. Unschedule those appointments and reschedule them.
- Global and In-day optimization validate that for already scheduled service appointments, the Scheduled End − Scheduled Start time = Duration, while taking resource efficiency into consideration. Service appointments that violate this validation are unscheduled.
- Emails are sent only when optimization jobs fail to initiate. If the optimization job succeeds or fails in a later stage, an email isn’t sent.
Considerations for Optimization Run Time:
Optimization run time corresponds to the thoroughness of a scheduled optimization job. The higher the run time, the closer you get to an optimal schedule.
To set your preferred optimization run time, from the App Launcher, find and open the Field Service Admin app. Click Field Service Settings | Optimization | Logic. In the Optimization run time per service appointment field, select Low, Medium, or High, and save your changes. You can decide to change your run time before a particular optimization job.
For better-quality results, use High. For quicker results, use Low. In many cases, Low is enough to produce a satisfactory schedule. Regardless of your run time setting, run time never exceeds six hours. The run time ratio for Low:Medium:High is 1:2:3, so High-level optimization takes three times as long as Low-level optimization.
Longer run times can be beneficial in the following scenarios.
- Many candidates per service appointment—Service resources are considered candidates for a service appointment if they comply with the applied scheduling policy’s work rules. For example, a scheduling policy can require candidates to be working in the relevant service territory in the required time, to have the required skills, and to have a home base that is within the maximum travel range from the service appointment. If a service appointment has many candidates, a longer run time allows the optimizer to consider more scheduling options.
- Service resources start their day from a centralized service depot—When many service resources start from the same place and could potentially be routed to the same appointments, more run time helps the optimizer determine the optimal routes.
- Service appointments have the same priority—Higher-priority service appointments serve as anchors during optimization and narrow down scheduling options. When all, or most, service appointments have the same priority, more time is needed to determine the optimal routes.
- Complex work A complex work chain is a chain of related service appointments. The dependency could be the chronological order of the service appointments, or that they have to be done by the same service resource. Complex work requires more computation time. If complex work is common, consider allowing more run time.
- Street-Level Routing (SLR)—Aerial travel times require a quick arithmetic calculation. For SLR, the optimizer requires additional time to fetch travel times from a GIS server. However, as optimization continues to be used, Field Service learns your service territories’ SLR travel times and grows more efficient. When optimizing a new service territory, a longer run time is recommended.
If optimization runs longer than your org’s session timeout value, it gets stuck in the In Progress status. The optimization job fails, resulting in an error when it tries to deliver the results to your Salesforce org.
To avoid failed optimizations, increase your session timeout value to at least 2 hours, or select a quicker optimization run time.
See Also
- Field Service Limits and Limitations
- Optimize a Single Resource’s Schedule
- Monitor Optimization Requests
- Optimize Your Schedule from the Field Service Classic Dispatch Console
- Prevent Overlapping Field Service Optimization Requests
- Set Up Optimization of Large Field Service Datasets with Dynamic Scaling (Beta)