
You are here:
Escalation Rule Entries
Escalation criteria specify the conditions under which a case escalates. We store your criteria in a rule entry.
Required Editions
| View supported editions. |
When Salesforce applies an escalation rule to a case, it inspects the case and compares the case to the criteria in the rule entry. If the case matches the criteria defined in the rule entry, Salesforce runs the escalation actions.
Let’s break down the parts of an escalation rule entry and go over the best practices for each step:
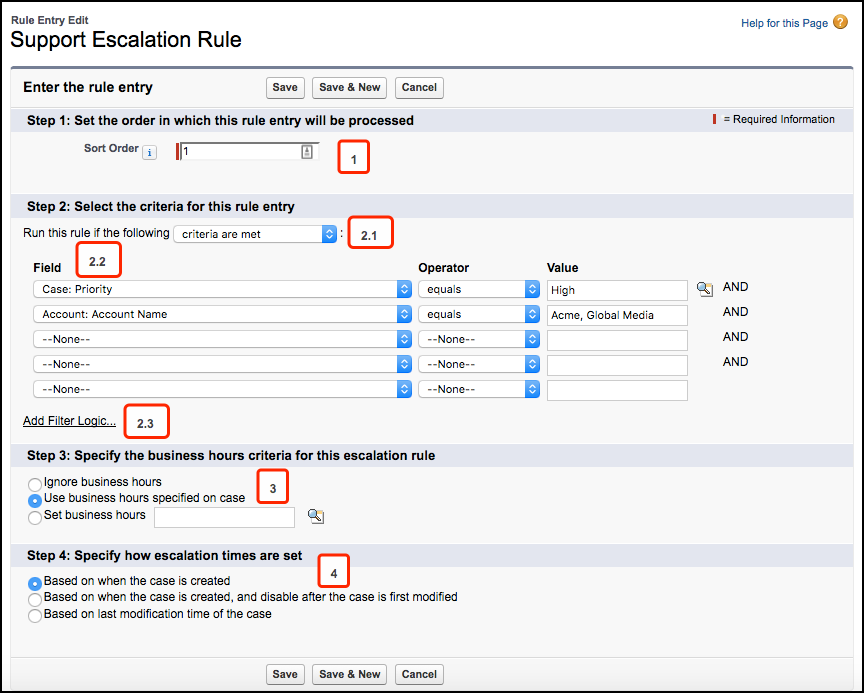
- Step 1: Rule Entry Order
-
The Sort Order determines the sequence in which Salesforce evaluates rule entries [1]. Typically, orgs use one escalation rule that’s made up of several rule entries.
 Tip As a best practice, put the most complex rule entries at the beginning of the sort order. Put more generic rule entries at the end of the sort order.
Suppose that you have five rule entries. Salesforce looks at the first rule entry to see if its criteria matches the case. If the criteria matches, then Salesforce stops evaluating and escalates the case. If the criteria doesn’t match, then Salesforce looks at the second rule entry to see if it matches, and so on, until it finds a match.
If the first rule entry is generic, then Salesforce finds a match and escalates the case without continuing to evaluate later rule entries.
It’s a good practice to put a generic “catch-all” rule entry at the end of the rule entry order. The catch-all rule entry is designed to escalate cases that don’t meet the criteria specified in the other rule entries. For example, perhaps you want to escalate cases that have been open for more than 48 hours. Create a rule entry that contains no criteria so that it catches all remaining cases, and specify that cases escalate 48 hours after they were created.
- Step 2: Rule Entry Criteria
- The rule entry criteria define the case field values that trigger an escalation. When Salesforce evaluates the rule entry, it looks at the
criteria and sees if the criteria match the field values set on the case. If the criteria
match, the case is escalated.
- Run this rule if the criteria are met
- You can define escalation criteria using field values by selecting criteria
are met [2.1].
Select the field, select the operator, and select the value [2.2]. For example, suppose that we want to escalate cases that are high priority and from our two biggest customers, Acme and Global Media. We can create a rule entry that escalates cases where the Priority field equals High and the Account: Account Name field equals Acme or Global Media.
You can specify more field values by filling out the rows.
Tip By default, the filter concatenates the rows using AND. However, if you want to use a different filter operator, click Add Filter Logic [2.3]. You can refine the filter using parentheses, AND, and OR. For example, (1 AND 2) or (3 AND 4). - Run this rule if the criteria are met
- You can define escalation criteria using a formula by selecting formula
evaluates to true.
Enter a formula that returns a value of True or False. Salesforce triggers the rule if the formula returns “True.”
- Step 3: Business Hours Criteria
- Business hours let you specify when your support team is available [3]. If business hours
are specified on the escalation rule, then escalation actions occur only during business
hours.
Let’s look at some examples. Let’s say that your support team is based in San Francisco and works from 9 AM-5 PM Monday-Friday, Pacific time.
- Ignore business hours
- If you don’t want to use business hours when calculating when cases are escalated, select Ignore business hours. In this situation, a case is escalated without consideration of the support team’s business hours or the case’s business hours. For example, a case might escalate at 3 AM Pacific time, even though the support team isn’t available.
- Use business hours specified on the case
- A case might have different business hours than your support team. If business hours are
specified on the case, then the case escalates during the case’s business hours.
Suppose that your support team is located in San Francisco and works 9-5 Pacific time, but your customer is located in New York and operates on Eastern time. You could specify Eastern business hours on the case, so that your support team knows to contact the customer during Eastern business hours. If Use business hours specified on the case is selected, then the case escalates during East Coast business hours. So, a case could escalate at 6 AM Pacific, because that’s within Eastern business hours (9 AM -5 PM Eastern, which is 6 AM-2 PM Pacific).
- Set business hours
- Use the lookup to select the business hours that are defined for your company. If you select this option, then cases are escalated during these hours. Perhaps you’ve defined business hours as 9 AM-5 PM Pacific time. If you select the 9-5 Pacific time business hours, then cases would only be escalated during that time period.
- Step 4: How Escalation Times Are Set
- Specify when the escalation clock starts ticking by specifying how escalation times are set
[4]. Your selection here affects when the time period specified in the Age
Over field begins to run. You can set the Age Over field on
the Escalation Actions page.
- When case is created
- The escalation clock starts ticking when the case is created, and the case escalates
when the time period set in the Age Over field expires.
If Age Over is set to 5 hours, then the case escalates five hours after the case is created. If the case is created at 9 AM on Monday morning, it would escalate at 2 PM on Monday afternoon.
- When case is created, and disable after case is first modified
- The escalation clock starts ticking when the case is created but stops when the case is
modified, provided that the case is modified before the Age Over time period
expires.
If Age Over is set to 5 hours, then the case escalates five hours after the case is created unless the case is modified before five hours elapse. If the case is created at 9 AM on Monday morning and isn’t modified within the five-hour period, then the case would escalate at 2 PM on Monday afternoon. However, if the case is created at 9 AM on Monday and a support rep modifies the case at 10 AM, then the case wouldn’t escalate.
- Based on last modification time
- The escalation clock starts ticking when the case is modified.
If Age Over is set to 5 hours, then the case escalates five hours after the case is last modified. Suppose that the case is created at 9 AM on Monday morning and a support rep modifies the case at 10 AM. The case would escalate at 3 PM on Monday afternoon, which is five hours after the 10 AM modification.