
You are here:
Customize the Embedded Pre-Chat Form
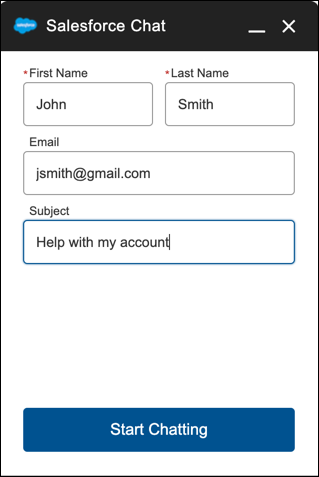
Gather contact information and learn about customer needs before chatting. Create a custom pre-chat form and associate Salesforce records like leads, cases, and contacts. You can also customize the field labels used on the form.
Required Editions
| View supported editions. |
| User Permissions Needed | |
|---|---|
| To set up Embedded Chat: | Customize Application AND Modify Metadata |
Legacy Chat will be retired on February 14, 2026. To avoid service interruptions to your end users, switch to enhanced Chat (formerly Messaging for In-App and Web). Enhanced Chat offers many of the legacy Chat features that you love plus asynchronous conversations that can be picked back up at any time. Learn about migrating in Help and Trailhead.
When you design your pre-chat form, select a use case that automatically associates information from the form to Salesforce records. When a customer enters their name or email address, Salesforce matches the information with a contact or lead record. If no match is found, a new record is created.
For example, if you select the Service scenario, Salesforce relates the customer’s information with Case and Contact records.
| If you select: | Then Salesforce associates the pre-chat information with these record types: |
|---|---|
| Sales | Lead records |
| Service | Contact records Case records |
| Basic | Contact records |
You can select the fields that are shown on the pre-chat form, change the order of the fields, and make fields required. To make the form more user-friendly to customers, add up to four fields.
To set up the pre-chat form:
- From Setup, in the Quick Find box, enter Embedded Service, and then select Embedded Service.
- Select the Embedded Service deployment that you want to work with, click the arrow next to the deployment name, and then select View.
- Click Edit next to Chat Settings.
- In the Pre-chat section, move the radio button to Active.
- Click Edit.
-
Select the use case for the pre-chat form.
- Select the main reason that customers use chat. The reason that you select affects the type of Salesforce record that’s created from the information that customers enter into the pre-chat form.
- Select the record type that’s created from the pre-chat form. The dropdown menu shows record types that are available on the object.
- Click Next.
-
Select the fields shown on the pre-chat form.
-
To change the order of the fields, use the up arrow and down arrow.
 Note For the Service scenario, fields are grouped by object. Contact fields always appear above Case fields.
 - To add a field, click +. You can add only fields that are available on the object.
- To remove a field, click X.
- To require customers to fill out a field, select Required next to the field.
- Click Save.
-
To change the order of the fields, use the up arrow and down arrow.
- Optionally, select a custom Lightning Component to replace the standard component. To learn more about custom components for pre-chat, see Lightning Web Components for Embedded Service in the Embedded Service Developer Guide.
To create custom labels for your form:
- From Setup, in the Quick Find box, enter Rename Tabs and Labels, and then select Rename Tabs and Labels.
- Set your primary deployment language from the Select Language dropdown list.
- To rename a tab, select Edit next to the Contacts, Leads, or Cases based on your pre-chat objective. Select Reset to revert to the original name.
- Enter the singular and plural forms of the new tab name. Also, if applicable for the language, select Starts with a vowel sound for labels that begin with a vowel to ensure the proper article (such as a or an). Then select Next. When you rename a tab or an object, you can’t use the name of another standard tab, custom object, external object, or custom tab.
- Enter your labels for the standard field labels. If necessary, enter both a singular and plural form for each label. Select Starts with a vowel sound for labels that begin with a vowel. Then save your work.