
You are here:
Set Up Quick Actions (Optional)
Integrate your quick actions with Service Assistant using the Quick Actions manager in the Agentforce Builder.
Required Editions
| View supported editions. |
Before you begin, complete these prerequisites.
- You can only complete this task in the Legacy Agentforce Builder. Service Assistant isn’t supported in the New Agetnforce Builder.
- You must add all your quick actions to your Case page layout. Adding quick actions to the layout is required for them to show in the Quick Actions manager within the Agentforce Builder and in a service plan. See Add Quick Actions to the Case Page Layout.
- Create versions of any standard Agentforce topics you want to use with your quick actions. You can't assign quick actions directly to standard Agentforce topics, only to versions of the topic. See Edit a Standard Topic.
- All quick actions used in Service Assistant must have only a single
CaseIdinput. - All quick actions require instructions that detail what the action does and when it’s used. Like topic instructions, these instructions help Service Assistant determine when an action is relevant to include in a service plan step. The Quick Actions manager includes a required field for adding these instructions. For specific examples and more details, review Guidelines for Creating Quick Actions and Quick Actions Sample Library .
- We provide you with instructions for the standard Summarize Case, Draft Email, and Close Case quick actions. You can modify our provided text to suit your needs. Although these quick actions automatically appear in the Quick Actions Manager, you must manually add their instructions in the Quick Actions Manager. In addition, you must make sure they’re added to your case page layout.
- If you choose to setup and use the Summarize Case quick action, make sure you have the Work Summaries User permission set assigned and set up Einstein Work Summaries for Case (beta). You must enable work summaries and select where the summary appears, either in the case feed or as a case comment. If you choose case comments, you must create a version of the Summarize Case quick action. See the first procedure below.
- Review the table to understand what quick action types are supported and the required permissions. The standard Service Assistant permissions provide access and use of most quick actions in a drafted service plan. However, additional permissions are required for Flow, Visualforce, and the Summarize Case quick actions.
| Quick Action Type | Supported Quick Actions | Required Permissions |
|---|---|---|
| Standard Case object |
|
|
| Custom Case object |
|
|
Prepare the Summarize Case Quick Action (Optional)
Required Editions
To use the Summarize Case quick action in Service Assistant, complete these prerequisite steps.
| User Permissions Needed | |
|---|---|
| To set up the Summarize Case quick action: | Customize Application OR System Admin AND Work Summaries User permission set |
The Summarize Case quick action requires setting up Einstein Work Summaries for Case (beta). During Work Summaries setup, you must choose where case summaries appear: in the case feed or case comments. If you select case comments, you must create a version of the Summarize Case quick action. The steps guide you through the process.
- Enable work summaries for Case (beta).
- Select where Case summaries appear.
-
Optional: If you choose to show the case summary in the case comments, create a version of
the Summarize Case quick action.
- From Setup, in the Object Manager, select Case, and then open the Buttons, Links, and Actions Setup page.
- Click New Action.
- For the Action Type field, select Create a Record.
- For the Target Object field, select Case Comment.
- For Standard Label Type, select Summarize Case.
- For Name, enter Summarize_Case_Comment.
- Save the quick action.
- From the left panel, select Case Page Layouts, and then select Case Layout.
- From the Case Layout menu, select Mobile and Lightning Actions.
-
Select the Summarize Case quick action with the name
Summarize_Case_Comment, and then place the action into the Salesforce Mobile and Lightning Experience Actions section.You can confirm the name by hovering over the Summarize Case label. - Save your work.
Setup Quick Actions for Service Assistant
Use the Quick Actions manager in the Agentforce Builder to add your quick actions to Service Assistant.
Required Editions
| User Permissions Needed | |
|---|---|
| To set up quick actions in the Quick Actions manager: | Customize Application OR System Admin AND Agentforce Default Admin permission set AND Service Planner Builder permission set AND Work Summaries User permission set (required only if using the Summarize Case quick action) |
You use the Quick Actions manager in the Agentforce Builder to integrate your quick actions with Service Assistant.
The Quick Actions manager is where you select what quick actions you want to use in Service Assistant and then assign them to topics and provide instructions for each quick action. The instructions define the quick action, its goal, and any conditions or requirements for the action. All quick actions require instructions. See Guidelines for Creating Quick Action Instructions and Quick Actions with Topics.
To get you started, we provide you instructions for the Draft Email, Close Case, Summarize Case standard quick actions. The instructions are provided in the steps and you can modify them. You must manually add these actions to the Salesforce Mobile and Lightning Experience Actions section of your Case layout for them to appear in the Quick Actions manager.
- In the Set Up Quick Actions section of the Service Assistant Setup page, click Go to Agent Studio.
- From the Agentforce Agents Setup page, under Agent Name, select Service Assistant.
- From the Agent Details Page, click Open in Builder.
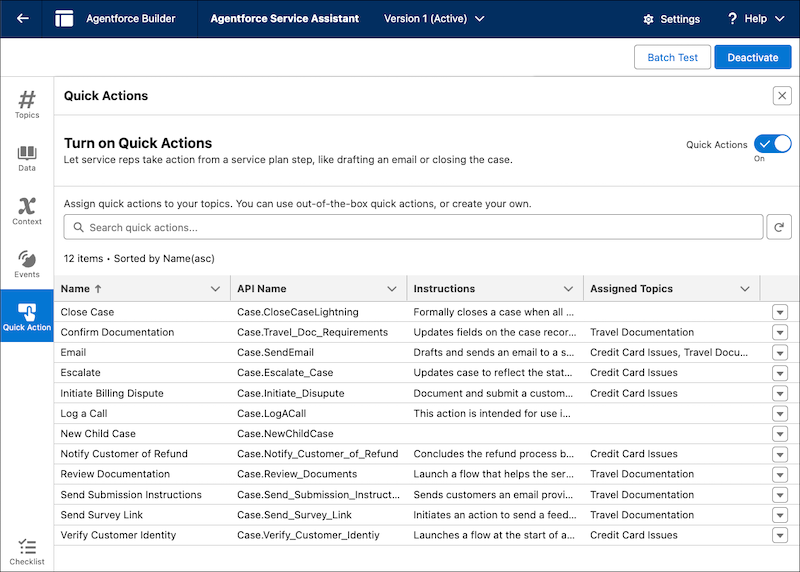
- From the Agentforce Builder, in the left rail, select Quick Action.
- From the top of the Quick Actions manager, confirm your agent is deactivated. If it’s not, click Deactivate. Quick actions can be assigned only when your agent is deactivated.
- Turn the feature on.
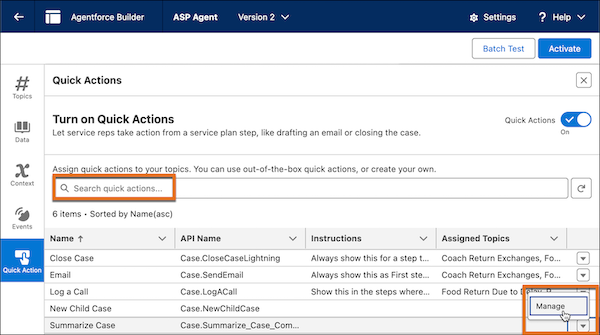
-
From the list of quick actions, search for a quick action or locate the action in the
quick actions list, and then click Manage.
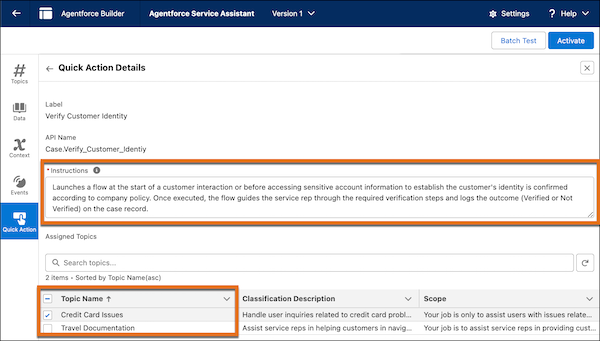
-
From the Quick Action Details page, in the Instructions field, add your instructions and
then assign the quick action to topics. You can assign the quick action to multiple
topics.
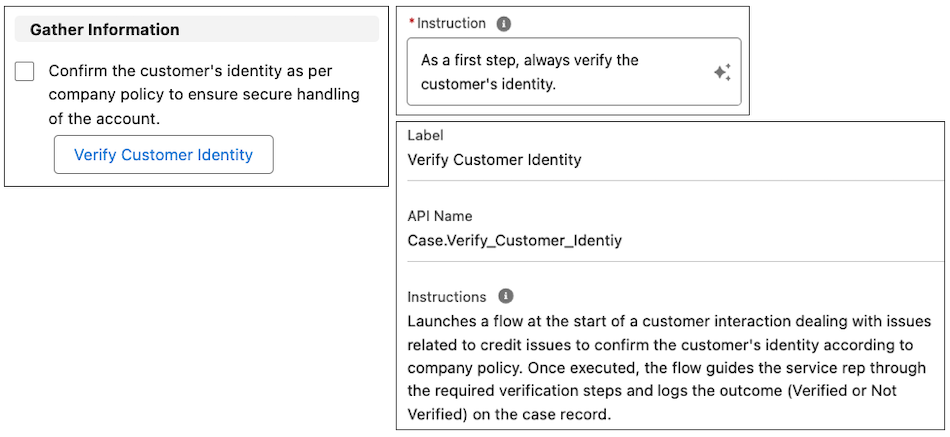
Quick action instructions define the action and detail the action’s goals, conditions, and requirements. Here’s an example.
Name: Verify Customer Identity
Description: Launches a flow at the start of a customer interaction dealing with issues related to credit issues to confirm the customer's identity according to company policy. Once executed, the flow guides the service rep through the required verification steps and logs the outcome (Verified or Not Verified) on the case record.
- Save your assignments.
- Repeat steps 7 through 9 for each quick action you want to use in Service Assistant.
-
Optional: If you use the Draft Email, Summarize Case, or Close Case quick actions, provide
these instructions. You can modify them.
- Summarize Case: Creates a case summary that incorporates Service Plan information, such as completed steps and the final outcome. Intended for use when the case is nearing resolution, the case is resolved, or the customer or service rep requests a summary. Service reps initiate the quick action directly from a service plan step for an in-workflow experience.
- Close Case: Closes the case when all required steps to resolve issues are completed and no further action is needed. Once executed, the support process is formally concluded and no additional steps can be performed.
- Send Email: Drafts and sends an email to a specified recipient directly from a service plan step. The email can be used for customer communications, including, but not limited to, providing status updates, conveying resolution details, and requesting or supplying additional information during case management or follow-up.
- After you complete your quick action assignments, click Activate. To make edits to your quick action instructions or make changes to what topics they’re assigned to, click Edit at the bottom of the page or click the pencil icon in the Instructions field.
- Test your work by drafting a few service plans.
Keep in mind that any changes made to a quick action name or instruction after service plans are generated aren’t considered new case information. The Redraft Plan button doesn’t appear in the component. You must make changes to the topics or the Subject and Description fields of the case and then redraft the plan.
Also, when updating or creating new quick actions, they don’t automatically surface in drafted service plans. You must redraft the service plan.
Example Service Plan with Quick Actions
Here's an example service plan showing the quick action and topic instructions that form the plan steps. The examples follow the quick action instruction best practices described in Guidelines for Creating Quick Actions. The samples also show both methods for combining quick actions with topics, as described in Quick Actions with Topics. For more examples, see Quick Actions Sample Library.
Keep in mind that there's no single method that guarantees your quick actions show in a service plan. We recommend trying out all our provided methods and guidelines. Also, quick actions might not show in plan steps right away. Try drafting a few plans first and then update your instructions if they don't show.
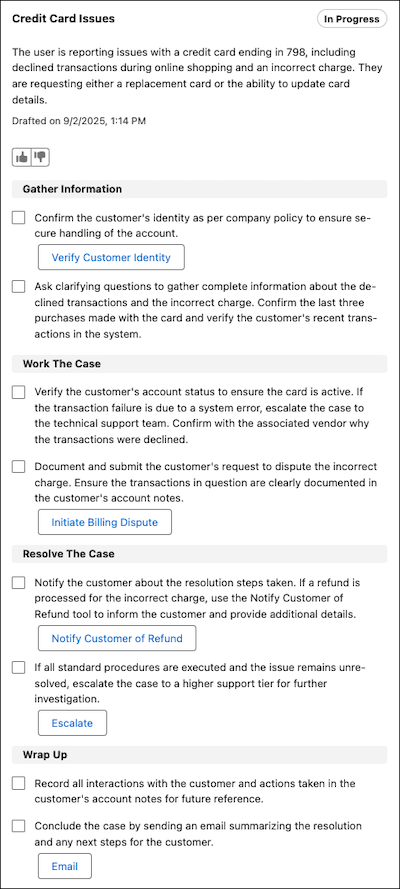
Example 1: Verify Customer Identity. This example uses the independent instructions approach.
Example 2: Notify Customer of Refund. This example uses the dependent instructions approach.
.png)