
You are here:
Set Up Similar Cases (Optional)
Show a list of similar cases in a service plan that service reps can review for context while working on a case.
Required Editions
| View supported editions. |
When you set up Similar Cases and a service rep drafts a service plan, Service Assistant searches your historical case data to retrieve a set of cases similar to the active case that the rep is working on. The cases serve only as a reference guide for service reps. The cases aren't used as grounding sources during the creation of a service plan.
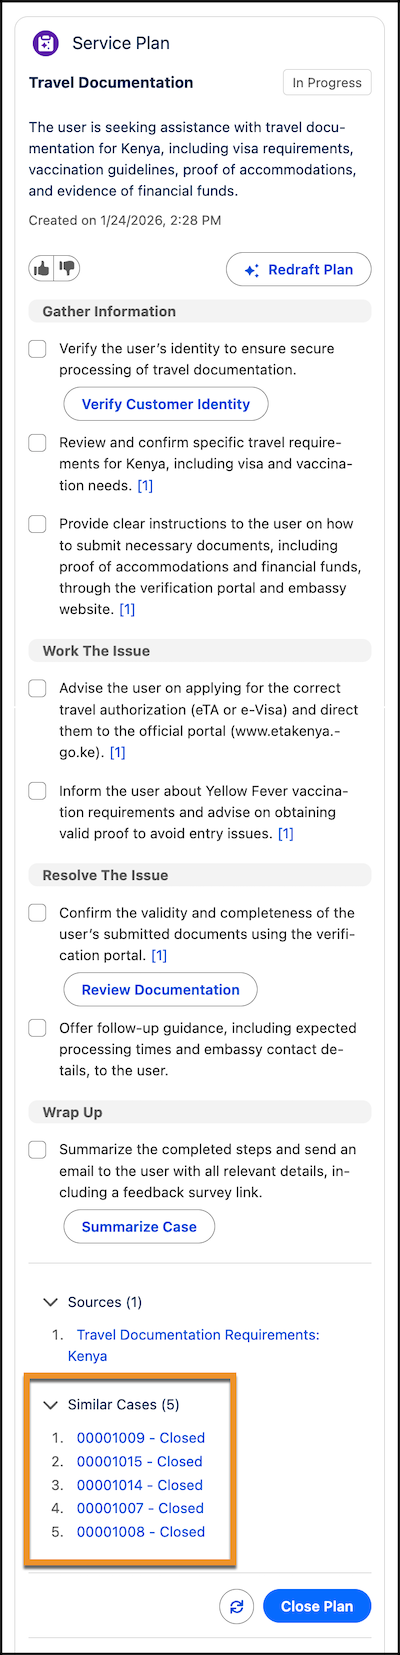
To find cases similar to the one a service rep is working on, your Case data must first be processed and indexed into a searchable format using Data 360.
A basic understanding of Data 360 concepts is helpful but not required. Specifically, the steps guide you through the creation of a basic configuration using the Subject and Description fields to get you started. We indicate where you can make your own customizations, such as including additional standard fields and custom fields.
Setup requires creating a data stream and selecting which standard and custom Case fields you want included. The creation of a data stream stores your Case data in a Data Lake Object (DLO), which is then transferred to a Data Model Object (DMO) that processes your Case data. This transfer is a manual process that we guide you through.
After, you create a search index that chunks this data to optimize it for searching. Then build a data retriever and configure it to sort, filter, and return the final list of similar cases to the component.
Each procedure contains a video that demonstrates the steps. A full video playlist is provided here.
Considerations and Guidelines
Access and Permission Details
- Service Assistant admins require the Data Cloud Architect permission set to set up similar cases for Service Assistant. The permission set must have access to your Data 360 default data space. See Associate a Permission Set with a Data Space.
- The ServicePlanner User (agent user) requires the Data Cloud User permission set to access and create a list of similar cases in the service plan.
- To enable service reps to view the list of similar cases in the service plan, assign them the Service Planner User permission set. To view the actual cases, service reps also require record-level access on the Case records.
General Details
- The list of similar cases at the bottom of the service plan serves only as a reference for working on a case. The listed cases aren't used as grounding sources when generating the service plan.
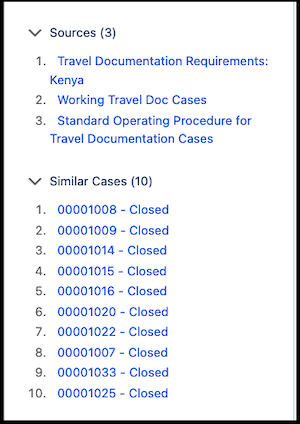
- The list of similar cases contains up to 10 cases. Each entry in the list displays the case number, status, and a link to the case. This display can’t be modified.
- Service Assistant sorts the list of cases based on the level of similarity, starting with the case that has the highest similarity.
- When knowledge grounding is set up through Agentforce Data Libraries and you’ve enabled
Show Sources, you see citation numbers, such as [1], at the end of plan steps. These
numbers refer only to the knowledge article that generated the step, which is listed in
the Sources section. These citations don’t refer to the list of similar cases, as they’re
not used as a grounding source for the service plan. In addition, if you set up service plan translation, the case status’ aren’t
translated. By default, the list always shows the number and status. The status is always
shown in English. The “Similar Cases” heading is translated.
Setup and Configuration Guidelines
- Each step can take time to complete, such as building a search index. The time depends on the amount of case data. When completing each step, wait until you receive a success message before moving to the next step.
- When you create a data stream, you choose what case fields are ingested into Data 360. You can add any standard or custom case fields. We recommend selecting text fields.
- While you can add any fields you want in a search index, the index can’t be modified after it’s created. To add or remove fields after you create the index, you must build a new search index.
- The search and retrieval of similar cases has a default threshold. Cases retrieved require a score of 0.6 or higher on a scale of 0.0 to 1.0. This threshold can’t be modified. You can view the scoring in the Retriver Playground. See Step 5: Test your Retriever.
- The search includes your entire case history by default. However, you can limit the
search to a specific time period by setting a filter on the
Created Datefield within your retriever. - Ensemble retrievers aren’t supported. You can use an individual retriever only.
- The list of similar cases shows the case number and status only. You can’t change this regardless of the search criteria that you set in your search configuration.
- After you complete the general setup, you can perform an advanced setup by adding data to the search from related objects like CaseComment and CaseFeed. This requires repeating all setup steps for each Case object you want to add. You then use the Data Transformer tool to combine all data into a single retriever. See Create a Batch Data Transform.
Set Up Similar Cases
To show a list of similar cases in a service plan for an active case, complete these setup steps.
Required Editions
| User Permissions Needed | |
|---|---|
| To set up similar cases for Service Assistant: | Data 360 is provisioned and turned on and you have these permission sets. Data Cloud Architect permission set AND Service Planner Builder permission set |
Before you begin, make sure that your default Data 360 data space is enabled on the Data Cloud Architect permission set. See Associate a Permission Set with a Data Space.
The setup steps walk you through a basic similar cases configuration to get you started. This configuration retrieves cases based on the subject and description fields. The configuration also sets a filter to only retrieve cases within a specific date range so that your entire case data isn’t indexed. You can make modifications to the sample configuration to include custom case fields and more advanced retrieval logic. We indicate in the steps where you can make the modifications.
If you already ingest your case data into Data 360 through data streams, object mappings, and have a case search index and retriever built, start with Step 5: Test Your Setup.
Step 1: Set Up a Case Data Stream
To initiate the flow of your case data into Data 360, create a data stream for the Case object. This step gathers your case data and prepares it to be processed, chunked, and indexed, which is necessary to create a searchable format for Service Assistant to retrieve and present similar cases in the component.
Here’s a guided setup that demonstrates the setup steps. There’s no audio. To open the video in full screen, click here.
- From the App Launcher, enter and select Data Cloud.
- From the Data Cloud menu tab, select the Data Streams tab. If you don’t see the tab, click the More tab and then select Data Streams.
- From the Data Streams Setup page, click New. The New Data Stream Guided Setup opens. It might take time to load.
- From the first page of the guided setup, select Salesforce CRM and then click Next.
-
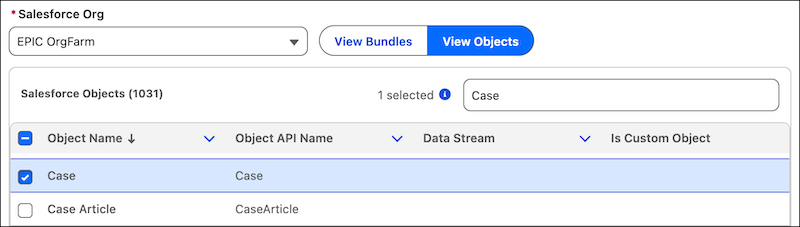
From the second step of the guided setup, complete these steps.
- Select View Objects.
- From the Salesforce Objects lookup field, search for and select Case.
- Click Next.
-
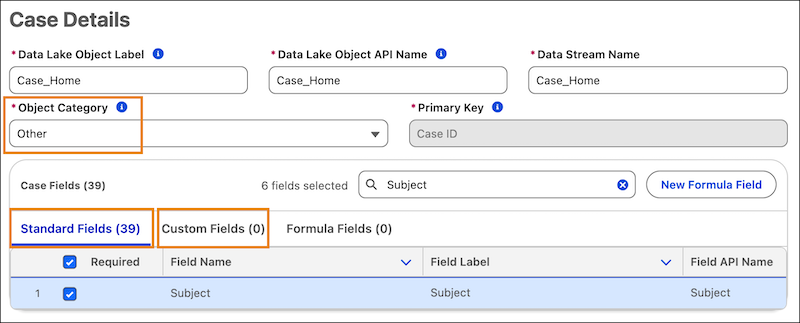
From the third step of the guided setup, make these configurations.
- In the Case Details section, set the Object Category field to Other. You can change the prepopulated label, API name, and name of the data lake object. If you already set up a Case data stream for other use cases beyond Service Assistant, then provide a new name for your data stream. Add a separate data stream for the Similar Cases feature because it requires a specific configuration that might not work for other purposes.
-
In the Case Fields section, deselect the fields that are set as required by default.
Then select these fields: Subject,
Description, Created Date, and
Closed. Next, add any additional standard and custom fields you want
included.
Important: The indicated fields are only recommendations to get you started. They serve to capture the general details of your Cases. To add more customizations, you can add more standard fields and your custom fields. We included the Closed status field to narrow the search to officially resolved cases. The CaseID and System Modstamp fields are required by default and can't be deselected. The CaseNumber and CaseStatus fields are included in the search by default, but they aren't shown as selected in the list of fields.
- Click Next.
- From the last page of the guided setup, leave the Data Space field set to default, and then click Deploy.
Your case data is now ingested into Data 360 and stored in a data lake object (DLO). The Data Streams list view page opens. Confirm that the data stream status shows Processing. If not, review your configuration or try creating another data stream. Processing can take a while. After a few minutes, click the Refresh button.

Wait until Last Run Status shows Success and Data Stream shows Active.

Next, go to the Data Lake Objects tab to start mapping the DLO to its data model object (DMO).
Step 2: Map Your Case Data Lake Object
To unify your case data into a single source and make it available for chunking and indexing, connect the data in the data lake object (DLO) to a data model object (DMO). This unifies your Case data into a single source in Data Cloud, making it available for chunking and indexing that’s used by Service Assistant to search for relevant cases to display in the component.
Here’s a guided setup that demonstrates the setup steps. There’s no audio. To get started, go to the Data Lake Objects page. To open the video in full screen, click here.
- From the Data Cloud menu tab, select the Data Lake Objects tab. If you don’t see the tab, then click the More tab and then select Data Lakes.
- From the Data Lake Objects page, in the Name column, click the name of your data lake object. In our example, the name is Case_Home.
- In the Data Mapping component, click Start.
- From the mapping page, in the Data Model Entities section on the right side of the page, click Select Objects. The page may take time to load.
-
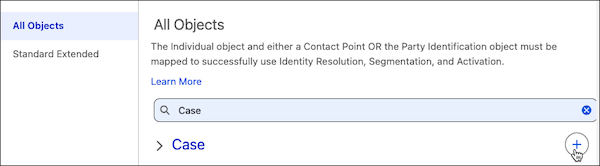
From the Select Objects panel, in the Standard Data Model tab, select the All
Objects tab. Then use the lookup field to search for
Case, click +, and then click
Done at the bottom of the panel. The object mapping canvas
opens.
-
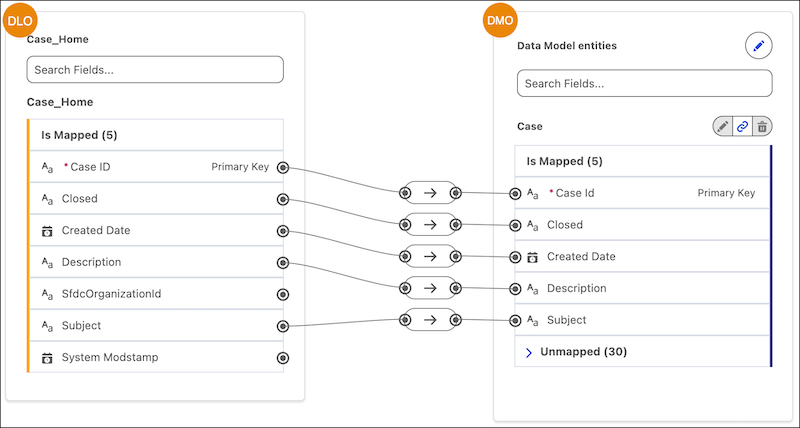
To confirm that each DLO field on the left side of the canvas is correctly mapped to a DMO
field on the right side, review your object mapping. The
SfdcOrganizationid and System Modstamp fields don't
require a mapping.
-
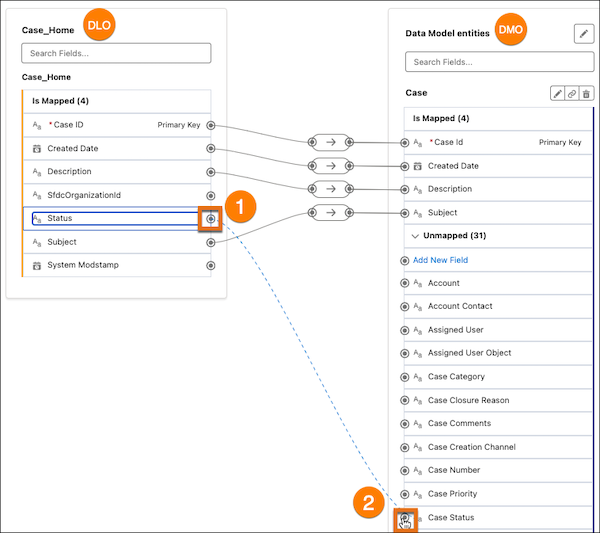
Optional: Complete the mapping for any standard or custom fields that aren’t
automatically mapped by default. To create a mapping, select a DLO field on the left (1) and
then map it to its DMO on the right (2).
Standard and custom DLO field names can be different from their DMO field names, as shown in the following example. For a list of standard Case DLO to DMO mappings, see Salesforce CRM: Case Mappings. Mapping the System Modstamp field is optional.
- When your mappings are complete, click Save & Close.
Step 3: Set Up a Search Index
To enable Service Assistant to find similar cases, use Data 360 to process and index your case data into a searchable format. The search index breaks down your case field data into chunks, which improves filtering and searching for similar cases. The data chunks form the basis for finding accurate matches to the active case that the service rep is working on. You can specify what Case fields to include for chunking and indexing.
The steps set up a sample search index based on the Description field. The Description field typically contains the most detailed case information. After it's indexed, these data chunks form the basis for finding accurate matches to the active case the service rep is working on.
To maximize search relevance, we recommend prepending the Subject field to the Description. Because the Subject often provides a concise summary of the issue, combining it with the detailed Description field makes sure that Service Assistant can identify relevant cases, even when the description text itself lacks sufficient context. More details are provided in the steps.
Here’s a guided setup that demonstrates the setup steps. There’s no audio. Go to the Search Index page to get started. To open the video in full screen, click here.
- From the Data Cloud menu tab, select the Search Index tab. If the menu doesn't show the tab, click the More tab and then select Search Index.
- From the Search Index record list page, select New > Advanced Setup > Next. The Search Index Builder opens and initiates the guided setup for the search index.
-
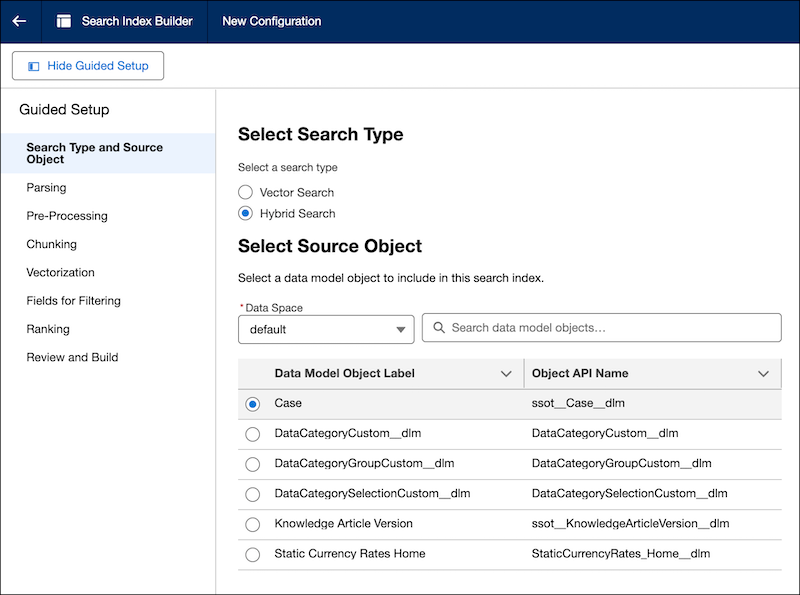
From the Search Index Builder, in the Search Type and Source Object tab, make these
selections.
- In the Select Search Type section, select Hybrid Search.
-
In the Select Source Object section, keep the Data Space field set to
Default and then select Case in the Data
Model Object Label column.
- Click Next in the top right of the page.
-
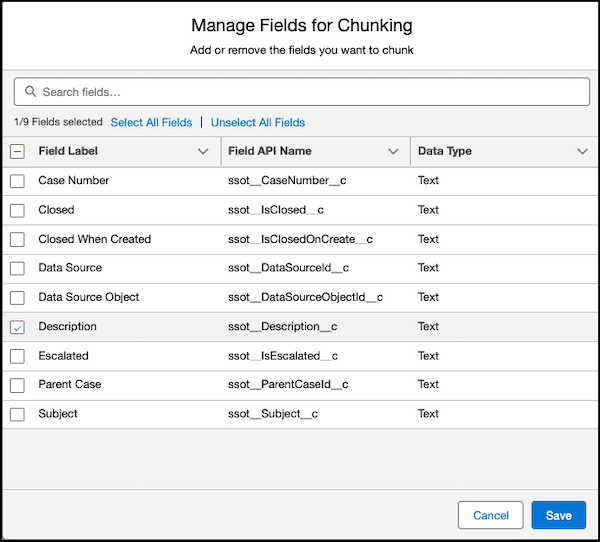
From the Chunking tab, under the Select Fields to Chunk section, click Manage
Fields and then select Description. Description is
mandatory because its content helps identify similar cases. You can select other fields such
as your custom fields. Then click Save.
The Description field contains the most relevant information for chunking. When a plan is drafted, Service Assistant uses your chunked index field data to identify similar cases.
Optionally, select Subject in this step. However, to produce a single set of chunked data that simplifies the search and retrieval of similar cases, we recommend prepending the Subject field to the Description field. Take the next steps to complete prepending.
-
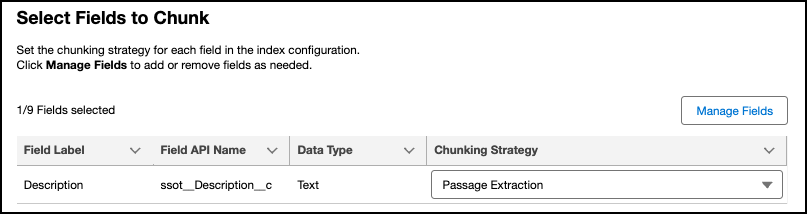
From the list of selected fields, in the Chunking Strategy column, make sure
Passage Extraction is selected for each field and then click
Passage Extraction.
Review Chunking Strategies for details on the Passage Extraction chunking strategy. In this strategy, the HTML tags within the content of Case fields are indexed into smaller chunks.
-
From the pop-out menu, activate Prepend fields to each chunk. From
the Select Field picklist, select Subject. Click
Save and then click Next at the top of the
page.
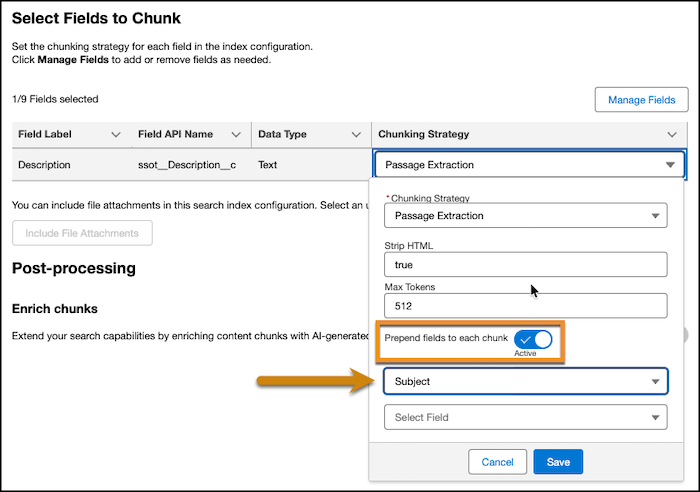
What prepending is: The content of the Subject field is copied and placed at the beginning of every piece of text from the Description field.
Why prepending is used: Pre-pending the Subject increases the power of your search for similar cases and makes it more accurate. The Subject is usually the best, shortest summary of the case. By attaching it to every single section of the longer Description text, you guarantee that the main topic of the case is always included in the searchable data. This helps Service Assistant find relevant cases even if a small, isolated paragraph in the Description doesn't explicitly mention the main subject or the description lacks ample detail. - From the Vectorization tab, in the Select Embedding Model field, select Multilingual E5 Large Embedding Model. Then click Next at the top right of the page.
-
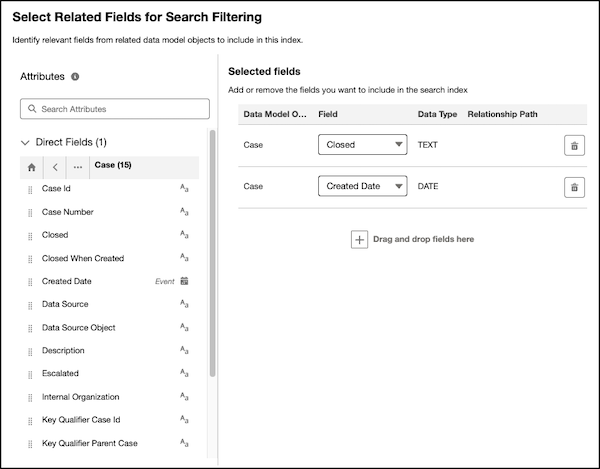
From the Fields for Filtering tab, drag the Closed field from the Attributes section to
the Selected fields section. Then click Next.
In our example, we only included the Closed and Created Date fields to set general filtering criteria. Including the Closed field is recommended to ensure the search only retrieves Cases that are closed. However, you can select any field for your use cases. We also recommend adding the Created Date field so that only cases from a specific point in time are referenced in the search. This allows you to limit the search to a specific range so that your entire case data isn’t indexed.
The fields you select in your search index filter are used to populate the fields available in the retriever search that you configure in the next procedure. The difference between setting filtering fields in the search index versus the retriever is that the search index makes the fields available for filtering, while the retriever applies the filters to find similar cases.
- Skip the Ranking tab. Service Assistant doesn't support ranking. Click Next at the top right of the page.
-
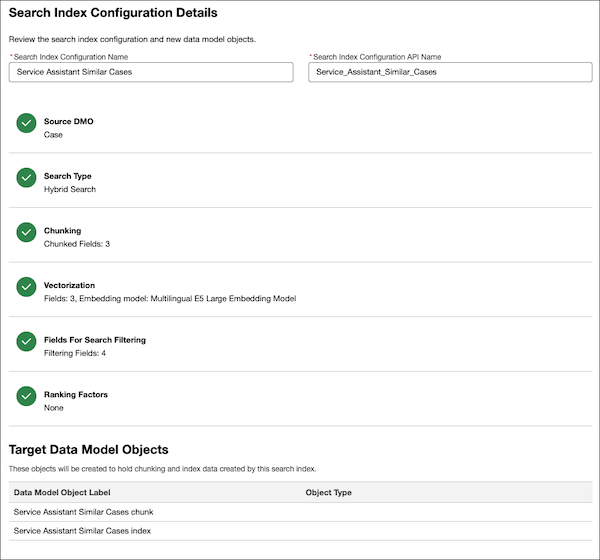
In the Review and Build tab, optionally change the name of the search index configuration.
Also, review your configuration to make sure all of your settings are marked as successful.
Then click Save.
Important: Carefully review your selections to make sure that you have the standard and custom fields that you want included. After you complete the search index setup, you can't make changes. To make changes, create a new search index.
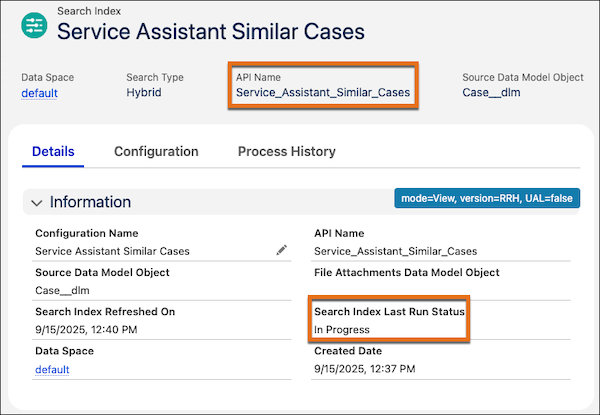
The Search Index Builder closes. Your Search Index detail page opens and begins to build. The initiation of the build process can take time and you see an empty status in the Search Index Last Run Status field. This empty status may persist for a while. After a few minutes, confirm the status shows In Progress. The build may take a while. Before moving on to the next step, confirm that the Search Index Last Run Status field shows Ready.
Step 4: Set Up a Retriever
Create a data retriever that sorts and filters your indexed Case data and creates a list of similar cases in the service plan.
This step continues from your search index setup. The search index configuration determines which fields in your entire Case data to chunk and index. Now, set up a retriever to choose which fields and associated data to retrieve from that indexed data.
As part of the retriever setup, you add filters to return only cases that meet specific criteria. These filters are based on the filters that you added to your search index. In our example configuration for the search index, we added filters to return only closed cases that were created after a specific date. We set the same filters in our retriever. You can add more filters in your retriever based on what you set in your search index.
Service Assistant uses your filters to retrieve and rank cases that are similar to the active case that the service rep is working on. Cases with the highest similarity appear in the list in the service plan. The retrieval search returns only cases with a similarity score of 0.6 or higher. You can’t modify this threshold.
Here’s a guided setup that demonstrates the setup steps. There’s no audio. Use the App Launcher and go to AI Models to get started. To open the video in full screen, click here.
- From the App Launcher, enter and select AI Models.
- From the AI Models navigation panel, select Retrievers.
- From the Retrievers list view page, select New Retriever.
- Select the individual retriever option, and then click Next. The Retriever Builder opens.
-
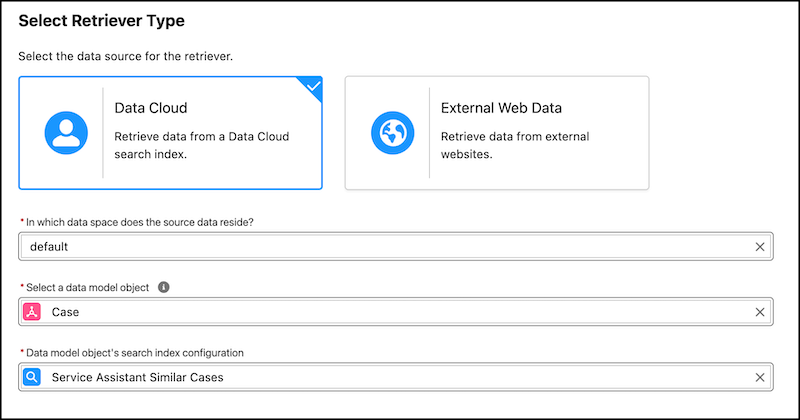
From the Select Retriever Type tab, select Data Cloud and then set
these field settings.
- For the data space field, select default.
- For the data model field, select Case
- For the Search Index field, select the name of the search index you created.
- Click Next.
-
From the Define Retriever Filters tab, set filters to restrict the search to return only
cases that meet specific conditions.
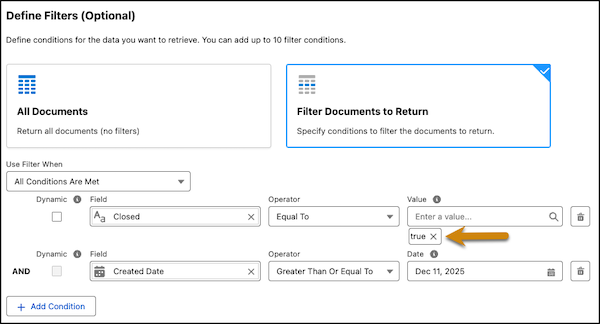
Filters define and apply conditions used to search for and retrieve similar cases that meet specific criteria. The filters you set here leverage the filters set in your search index configuration. In our example configuration, we set filters in the search index based on the Closed and Created Date fields. As a result, these fields are accessible in the retriever filter setup.
- Select Filter Documents to Return.
- From the Use Filter When picklist, select All Conditions Are Met.
- Under Dynamic, in the lookup field, enter and select Closed.
- Set the Operator field to Equal To.
-
Set the Value field to true.
Important: The “t” in true must be lowercase. This requirement applies to any picklist field.
- From the lookup field, enter and select Created Date.
- Select a date in the Date field.
- Click + Add Condition to set any additional filtering conditions. Then complete the steps again for any additional filters you want to set.
- After setting all your filters, click Next.
-
From the Configure Retriever Results tab, specify the number of results to return and
select which field data to return from your indexed Case data.
-
In the Number of results to return field, set the number of cases to return.

While Service Assistant automatically shows a maximum of 10 similar cases in the component, configure the retriever to return 30 or more cases. We recommend this because the retriever first aggregates a pool of cases from your search index. Then, it filters those cases based on your retriever filters and the 0.6 similarity threshold.
If you set a low return number, it's possible that no cases pass both filters, leaving the list empty. A larger pool makes sure that the component is populated with similar cases.
- From the retriever Fields to Return section, in the Field Label field, enter Created Date.
-
From the retriever Fields to Return section, in the Field Label field, enter
Id. Then, from the Field Name field, select Direct
Attributes > Case > Case Id.
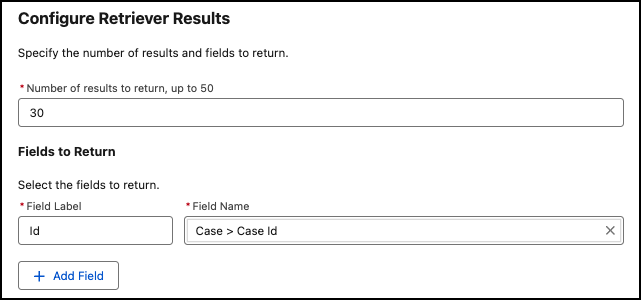
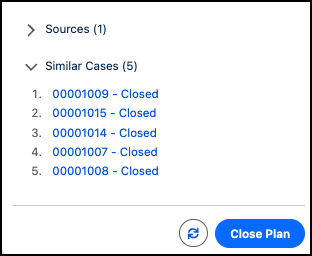
Setting retriever results determines how the case is listed in the search results. However, Service Assistant always shows the Case ID and Status fields in the component by default, as shown in the provided image. You can't change this configuration. Regardless of this preset configuration, the retriever setup still requires you to set fields to return. We recommend setting the Id field.
- Leave the Citation Settings off and then click Next.
-
In the Number of results to return field, set the number of cases to return.
-
Review your configuration and save your work.
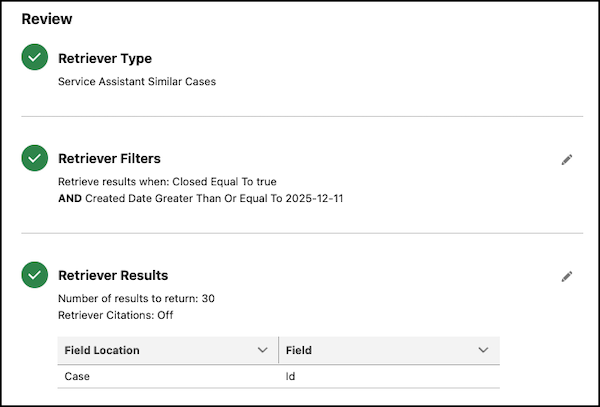
The setup of your retriever is complete and the retriever detail page opens. Make sure that your retriever is active. If not, click Activate. Stay on the retriever detail page and go to the next step.
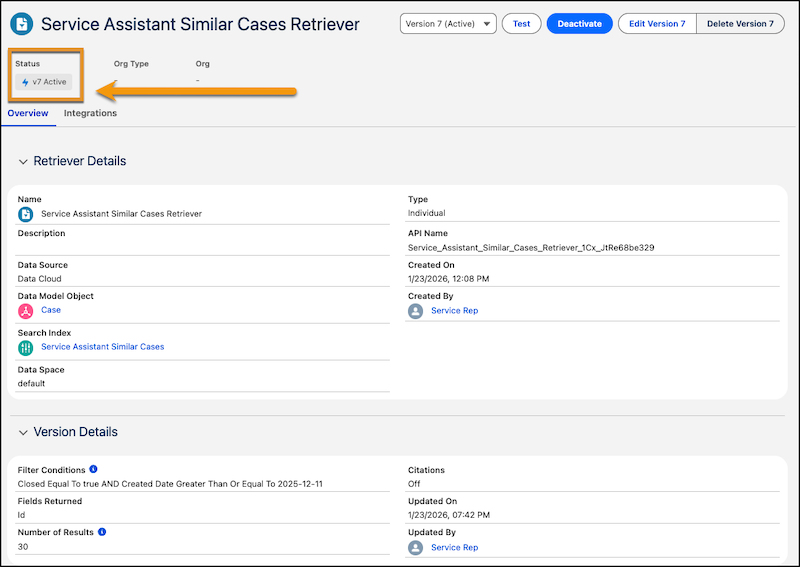
Step 5: Test Your Setup
Use the Retriever Playground in AI Models to verify that your search index is working and that it retrieves a set of similar cases.
Here’s a guided setup that demonstrates the setup steps. There’s no audio. Make sure you’re on the retriever detail page. To open the video in full screen, click here.
- From the retriever detail page, click Test. The Retriever Playground opens.
-
From the Retriever Playground, confirm that your retriever is selected and that your
search conditions match the parameters you set during your retriever setup.
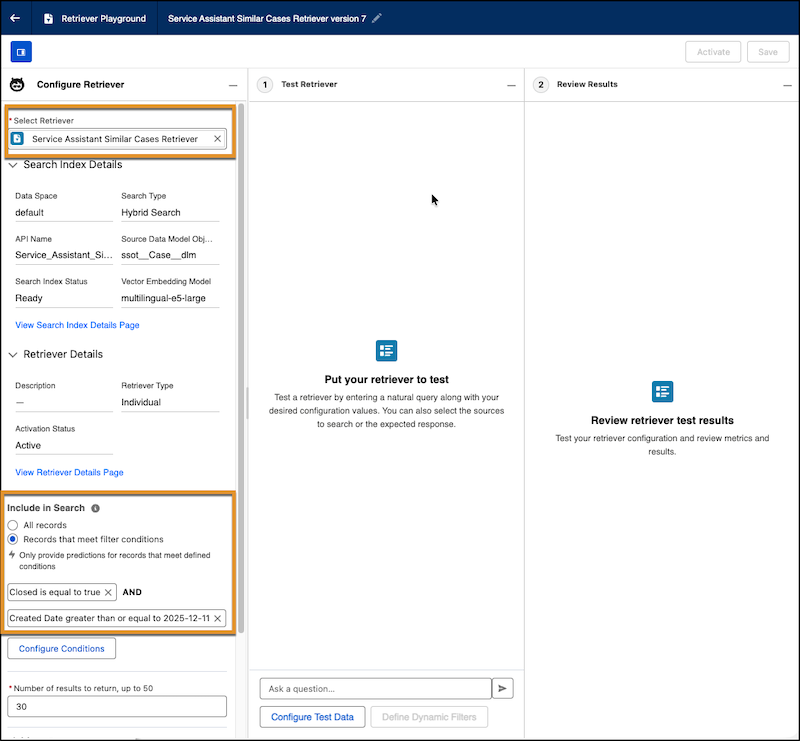
- Confirm that your filter conditions are listed in the Include in Search section. These conditions correspond to the filters configured during your retriever setup.
-
Use the chat box to search for cases and review your results.
Enter terms that relate to key terms used in the subject and description of the case types you want to test. All cases are scored on a scale 0.0–1.00. Only cases that have a score of 0.6 or higher are shown in the Service Assistant component. If you see that no cases pass the 0.6 threshold, the Subject or Description fields aren’t populated with enough or relevant information.
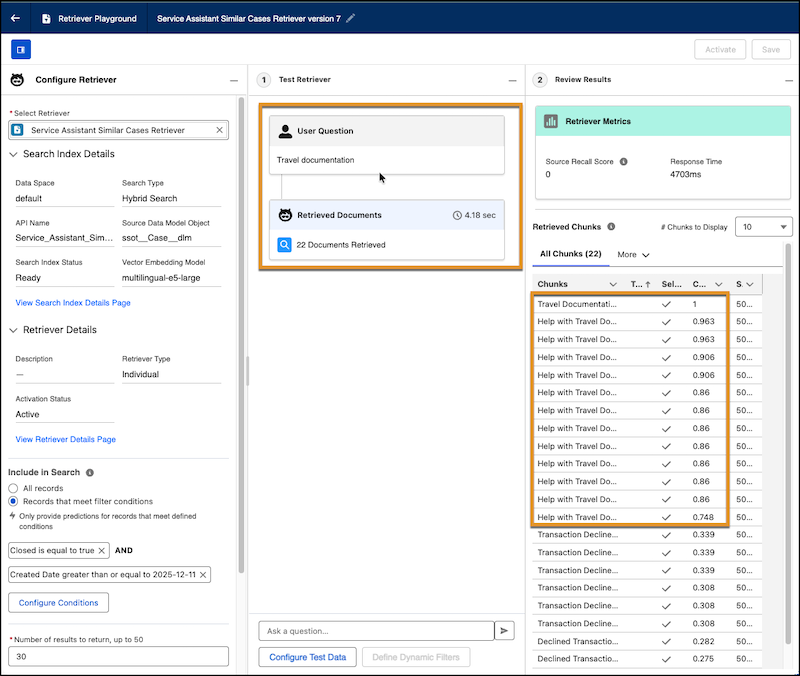
If cases aren’t populated or they don’t meet the 0.6 threshold, try these troubleshooting steps.
- Confirm that you have Cases of the type you're searching for in the companion org. Try different search terms.
- Review both the data stream configuration and your object mappings to ensure the right fields are included and mapped to the right DMO.
- Make sure that you have the correct fields included in the Fields for Filtering tab of your search index. If you find that fields are missing, then you must create a new search index.
- Review the filter settings configured in your retriever. If you filter by the Closed field or any picklist field, make sure that the Value field is set to “true”. The “t” must be lowercase.
- Adjust your test queries and conditions in the Retriever Playground. Click Configure Conditions and update your filters, widen the date range, or improve case field content. If more accurate cases are returned, apply the changes you made to your search index and retriever, then rebuild the search index and update your retriever as needed.
Step 6: Integrate Your Retriever with Service Assistant
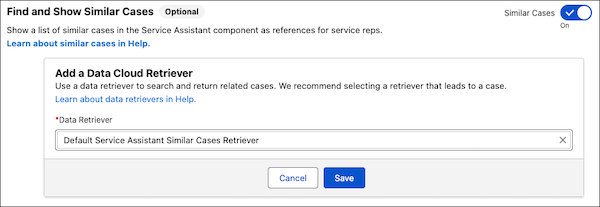
To use your retriever in Service Assistant, turn on the similar cases feature and then add your retriever.
Here’s a guided setup that demonstrates the setup steps. There’s no audio. Go to the Service Assistant Setup page. To open the video in full screen, click here.
- From Setup, in the Quick Find box, enter and select Service Assistant.
- From the Service Assistant Setup page, go to Step 4: Customize Experience by Object.
- From the Case tab, in the Find and Show Similar Cases (Optional) section, turn on Similar Cases.
- From the Add a Data Cloud Retriever section, select your data retriever.
- Click Save.
Step 7: Draft Service Plans and Troubleshoot
To confirm that similar cases appear in the service plan, go to a case record and draft a service plan. The component lists up to 10 cases.
If you have existing cases with service plans, refresh the Case record page to see a list of similar cases populated in the component.
If you don’t see any similar cases in service plans, try these troubleshooting steps.
Confirm that general setup is complete.
- From the Service Assistant Setup page, remove your selected retriever. Then turn off the Similar Cases feature and turn it back on. Then draft a new service plan.
- Confirm that your data stream, search index, and retriever are active.
- Confirm that the search index Last Run Status shows Ready before you expect results in Service Assistant. If you don’t see Ready, rebuild your search index or create a new one.
Review the search index configuration.
- Review your chunking and filter conditions set in your search index. Make sure that you set the Subject and Description as fields for chunking. Follow the guidance in Step 3 of Set Up Similar Cases.
- Review and modify any other fields you selected for chunking and filtering. Make sure they’re included in your search index chunking and filtering configuration and are available when you configure your retriever.
- If you set a date range in your search index, review and modify the range.
Review your retriever settings.
- Review the filter settings in your search index and in your retriever. If you filter by the Closed field or any picklist field, make sure that the Value field is set to “true”. The “t” must be lowercase.
- Confirm that you selected the right retriever and that it's an individual retriever. The Similar Cases feature doesn't support ensemble retrievers.
- For the data retriever, increase the number of results returned to 50.
- In the AI Models tab of Data 360, go to your retriever and open the Retriever Playground. Run queries similar to real case subjects and descriptions. Only results with a similarity score of 0.6 or higher appear in Service Assistant. If you see no cases or only low-scoring cases, adjust your test queries on the retriever detail page. Update your filters, widen the date range, or improve case field content. If more accurate cases are returned, apply the changes you made to your search index and retriever.
