
You are here:
Set Up Service Assistant
Get to know the Service Assistant setup process and complete the general setup.
Required Editions
| View supported editions. |
Use the Service Assistant Setup page with the steps provided here to guide you through the general Service Assistant setup process. What follows is an overview of the process, considerations, and the setup steps.
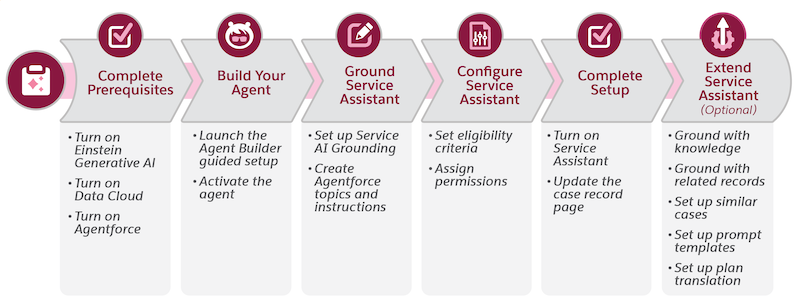
Setup Overview
The provided steps guide you through the mandatory setup for Service Assistant. You must:
- Turn on Einstein Generative AI
- Turn on Agentforce and create your Service Assistant agent
- Set up Service AI Grounding
- Set an eligibility criteria
- Turn on Service Assistant
- Assign mandatory permissions
In addition to the mandatory setup, there are several optional features that enhance Service Assistant’s capabilities. Set up guidance for these features is provided in Extend Service Assistant as their setup takes additional time and planning. We recommend setting up these features after you complete the general setup and confirm that you can draft service plans.
| Optional Feature | Description | Reference guides and Set up Steps |
|---|---|---|
| Knowledge Grounding through Agentforce Data Libraries | Adds knowledge article information to service plans to increase the detail and effectiveness of a plan. | |
| Messaging and Voice Record Grounding | Analyzes transcripts of messaging and voice records attached to a case to summarize what took place and start plan steps from where the conversation left off. | |
| Quick Action Grounding | Adds automated workflows to service plans. Quick actions show as buttons within plan steps to give service reps easy access to complete tasks a plan step requires, like changing the case status or summarizing a case. | |
| Similar Cases | Shows a list of similar cases in a service plan that service reps can review for context while working on a case. The list serves only as a reference guide for service reps to provide additional context while they work an active case. The listed cases aren't used as grounding sources during the creation of a service plan. |
|
| Translation | Translates service plans into a service reps’ preferred language. | |
| Prompt Templates | Adds service plan information to case emails, case summaries, case comments, and the case feed. |
Agent Setup Considerations
- Service Assistant isn’t supported in the new Agentforce Builder. You must use the legacy builder. Agentforce Script isn’t supported.
- The provided steps walk you through all mandatory agent setup to create your Service Assistant agent and add topics and instructions. Topics and instructions play a critical role in Service Assistant and require a particular structure. Make sure that you have reviewed Grounding Service Assistant with Topics and Best Practices for Service Assistant Topics.
- Service Assistant has its own agent template: Agentforce Service Assistant. When you create the agent, an agent user is automatically assigned and named ServicePlanner User. The user is automatically assigned two permission sets: Service Planner Agent User and Agentforce_Service_Assistant Permissions. Keep in mind that Agentforce_Service_Assistant Permissions is the default permission set name. If you provide your agent a different name other than Service Assistant, then your name is shown in the permission set name.
- The steps don’t provide guidance for grounding Service Assistant in your knowledge base through Agentforce Data Libraries. We recommend setting the feature up after you complete the general setup and confirm you can draft a service plan. See Set Up Knowledge Grounding.
- The steps provide a general overview of how to confirm you can draft a service plan. More detailed testing guidance is provided in Test and Troubleshoot Service Assistant. Testing Service Assistant in the Agentforce Builder or the Agentforce Testing Center isn’t supported because service plans are created through a Lightning web component. In the Agentforce Builder, you can only perform a general check of your topics and instructions to make sure they’re selected based on your input. To test Service Assistant, you must manually draft and review service plans on Case records.
Complete General Setup
Take the provided steps to complete the general setup of Service Assistant.
Required Editions
| User Permissions Needed | |
|---|---|
| To complete general setup: | Service Planner Builder permission set AND Agentforce Default Admin permission set AND Customize Application OR System Admin |
Before you begin:
- Make sure you have the Service Planner Builder permission set. The Service Assistant Setup page and Lightning web component aren’t accessible without the permission set.
- Review Grounding with Topics and Topic Best Practices to understand how to create topics for Service Assistant.
- Review Service Plan Eligibility Criteria to understand how to use a flow that controls what case types can have a service plan. Setting an eligibility criteria is mandatory.
Step 1: Turn on General Features
Turn on Einstein Generative AI and Data 360 to use Service Assistant. Data 360 is only required if you set up the knowledge grounding or similar cases features.
- From Setup, in the quick find box, enter and select Einstein Setup.
-
From the Einstein Setup page, turn on Einstein.
You can configure the other features listed in the Einstein Setup page, but they’re not required. See Set Up Einstein Generative AI.
For setting up the Einstein Trust Layer, you can choose the Case object fields you want to mask to prevent their exposure to the agent reasoning engine (LLM). See Select What Data To Mask. Keep in mind that data masking is off by default and we don’t recommend turning it on because it can slow down performance. If you do turn it on, leave the
Company
                Name
field unmasked. -
Optional: From the Setup menu, select Data Cloud Setup, and
from the Data Cloud Setup page, click Get Started.
Data 360 is required only if you choose to use knowledge grounding using Agentforce Data Libraries or set up similar cases. The enablement of Data Cloud in your Salesforce org can take time. You can continue the setup steps while the Data Cloud setup completes.
After completing the steps, go to the Agentforce Agents Setup page.
Step 2: Turn on Agentforce
Turn on Agentforce to get started creating your Service Assistant agent.
- From Setup, in the quick find box, enter and select Agentforce Agents
- From the Agentforce Agents Setup page, turn on Agentforce.
- Refresh the page and then stay on the Agentforce Agents Setup page to complete the next step.
Step 3: Create a Service Assistant Agent
Use the legacy Agentforce Builder to create a Service Assistant agent. Then create your topics and instructions. Service Assistant isn’t supported in the new Agentforce Builder.
These steps walk you through the agent creation process. You’re required to create your agent and add topics and instructions. Service Assistant isn’t supported in the new Agentforce Builder. You must use the legacy builder.
We recommend creating a topic and instructions for each Case type you want Service Assistant to help resolve. Your topics must be specific and detail the exact step-by-step process for resolving the Case. Review Ground Service Assistant with Topics and Topic Best Practices.
Steps for grounding the agent in your knowledge base with Agentforce Data Libraries aren’t included here because the feature is optional and takes additional time to test. See Grounding with Knowledge and Set Up Knowledge Grounding (Optional).
- From the Agentforce Agents Setup page, click + New Agent.
- From the Agentforce Builder guided setup, in the Select an agent tab, select Agentforce Service Assistant and click Next.
-
From the Customize your agent tab, take these steps to configure the Company and
Agent User fields. All other fields are set by default, and we don't recommend making
any changes.
- In the Company field, describe your company.
-
In the Agent User field, make sure New Agent User is
selected.
An agent user for Service Assistant is created and automatically set to the listed configuration. The Service Planner Agent User and Agentforce_Service_Assistant Permissions permission sets are automatically assigned to the agent. Don't remove them.
Email: noreply@salesforce.com
Username: ServicePlanner User
Agent Type: Service Assistant
Profile: Einstein Agent
User license: Einstein Agent
Permission sets: Service Planner Agent User and Agentforce_Service_Assistant Permissions
Permission set license: Service Planner Access
- Leave the Keep a recorcod of conversations with ehnahced logs and Agent can access records fields disabled. They don’t apply to Service Assistant since it creates service plans through a Lightning web component.
- Click Create. The Agentforce Builder opens and shows the Topics tab.
- From the Topics tab, click New and select + New Topic.
-
In the Create a Topic guided setup, follow the guided setup to create a topic and
instructions for your agent. For specific best practices and an example Service
Assistant topic, see Ground Service Assistant with Topics.
Your topics and instructions should contain your company's policies for the particular Cases that Service Assistant helps resolve. In the guided setup, you have the option to add Agentforce actions, but they're not required for Service Assistant. Service Assistant doesn’t complete any direct actions for the customer or service rep. If you add actions, they're only used as an additional grounding and treated like instructions.
-
Complete steps 5-6 again for all topics and related instructions you want to create
for your agent.
Once you create all your topics and instructions, the general setup of your agent is complete. You can optionally ground Service Assistant in your knowledge base using Agentforce Data Libraries. However, because creating an Agentforce Data Library isn’t required and requires custom permissions, we provided the setup steps and testing guidelines in Set Up Knowledge Grounding (Optional).
If you have a data library of the knowledge data type already built, you can select it in the Data Library field on the Data tab. Service Assistant only supports the knowledge data type.
If you choose to complete your data library setup, make sure that you have the Data Cloud Architect permission set and the permission set has access to the default data space. You also need the Knowledge User permission enabled on your user record.
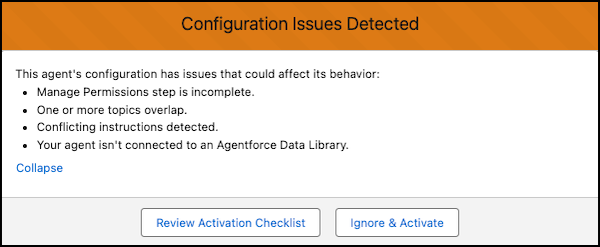
-
From the top right of the Agentforce Builder, click
Activate.
After activating your agent, a configuration error message appears stating that permissions aren’t complete and a data library isn’t set up. You can safely click Ignore and Activate. This is a default message from Agentforce. Your agent has all necessary permissions assigned and doesn’t require a data library. Be sure to review any overlapping topics or instructions.
After activating your agent, exit the Agentforce Builder and go to the Service AI Grounding Setup page.
Step 4: Turn On Service AI Grounding
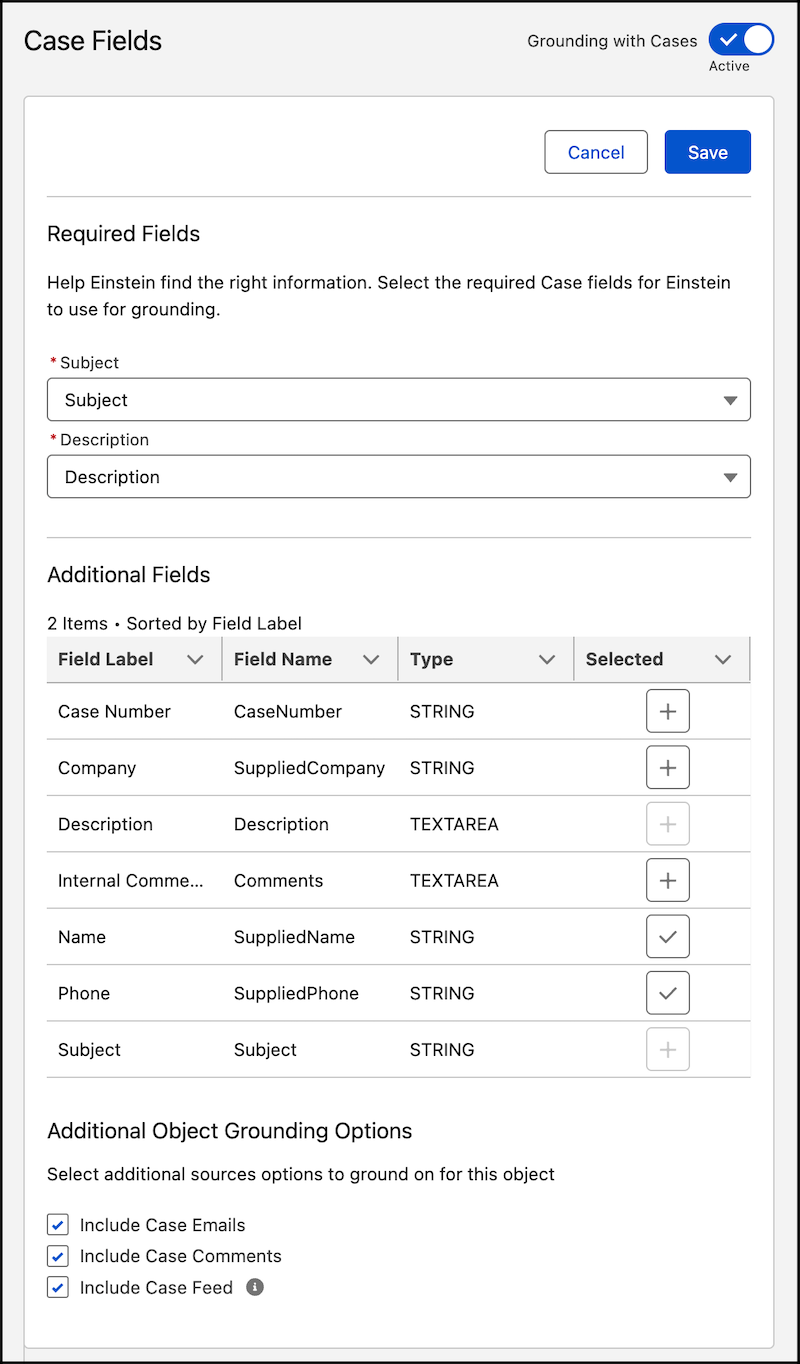
Complete the steps to ground Service Assistant in the case data so it drafts a case summary and begins creating a service plan.
Service Assistant uses Service AI Grounding to analyze the active case data based on specific fields configured in the feature step. By default, the feature includes the Subject and Description fields to generate a case summary, categorize the topic, and draft initial plan steps. To provide more detailed grounding context, you can add additional fields and objects, such as Case Email, Case Comments, and Case Feed.
This feature references only the active case. It doesn’t leverage your historical case data.
- On the Service AI Grounding Setup page, knowledge grounding is shown as a grounding source, but it’s not supported in Service Assistant. Use Agentforce Data Libraries instead.
- Encrypted fields aren’t supported for grounding.
- Only String and Text Area type fields are supported for grounding.
- Only text from case emails, case comments, and case feed is supported. PDFs, images, and other attachments aren’t used as grounding sources.
- If you choose to enable case feed grounding, you must provide Service Assistant access to the case feed. Service Assistant has access to case emails and case comments by default.
- The check box for the case feed has an info bubble that states the object is only available for grounding using Einstein Case Summaries. The object is supported in Service Assistant.
- Service Plans are grounded in the case data based on the ServicePlanner User’s permissions rather than the individual service reps’ permissions. This means service reps can view information from your selected fields and objects in case summaries and service plans, even if they don’t have direct access. Set your grounding configuration to ensure that the ServicePlanner User's permissions align with the data access intended for your service reps. See Service Assistant Grounding Data Access.
- From Setup, in the quick find box, enter and select Service AI Grounding.
- From the Service AI Grounding Setup page, turn on the feature.
- From Choose Objects and Fields for Grounding, select Case and then turn on Grounding with Cases.
-
From the Required Fields section, set these settings.
- In the Subject field, select Subject.
- In the Description field, select Description.
- From the Additional Fields section, select the fields you want as a grounding source for Service Assistant.
- From the Additional Object Grounding Options section, select if you want Service Assistant to use case emails, case comments, or case feed as grounding sources.
- Save your work and then turn on Grounding with Cases.
Here's an example configuration. After completing the steps, go to the Flows Setup page.
Step 5: Start Your Eligibility Criteria Setup
Use an autolaunched flow to set conditions that determine which cases can have a service plan.
To complete this task, we guide you through the configuration of the Check Service Plan Eligibility flow template that you can configure to your preferences. See Service Plan Eligibility Criteria.
Optionally, you can use your own flow, which must be an autolaunched flow that has one string input and one boolean output. If you use your own flow, skip this step and move on to the next one.
- From Setup, in the quick find box, enter and select Flows.
- From Flows Setup, under All Flows, select Check Service Plan Eligibility.
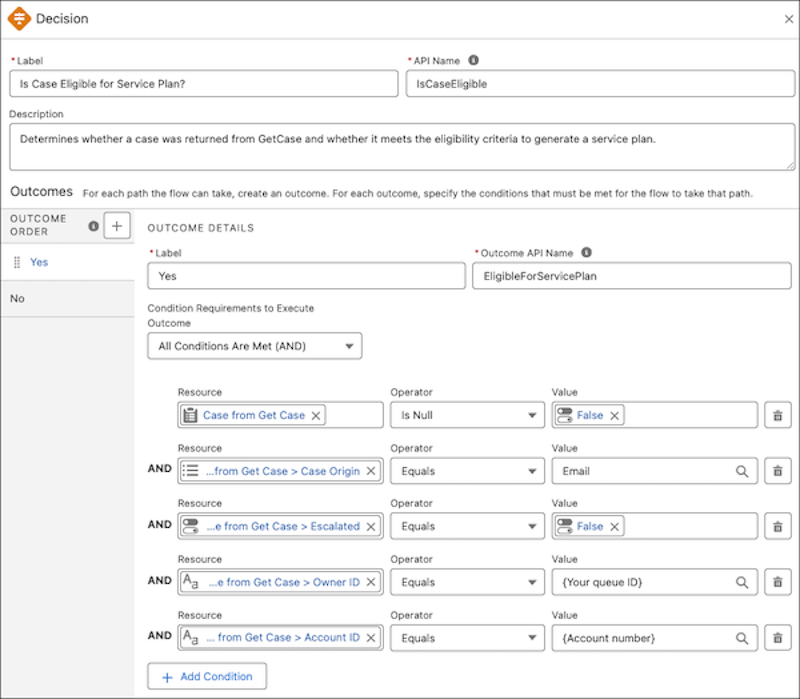
- From the Flow Builder canvas, select the Decision element, and then click Edit Element.
-
Under Outcome Details, in the Yes tab, delete the
ineligibilityReason resource. By default, a condition is set to
have the Priority = High. You can choose to keep or remove the condition.
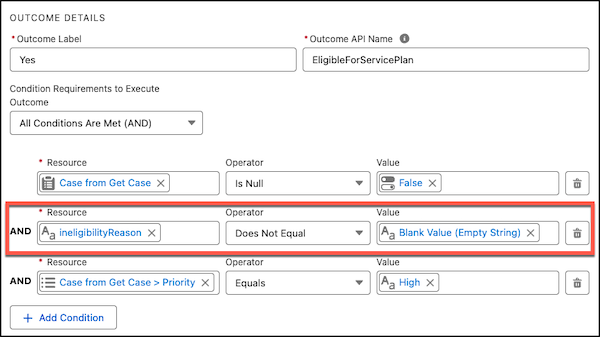
-
Add any other conditions you want the case to meet.
Here’s an example set of conditions.
- CaseOrigin= Email
- Escalated = False
- OwnerId = {Queue ID}
- AccountId = {Account number}
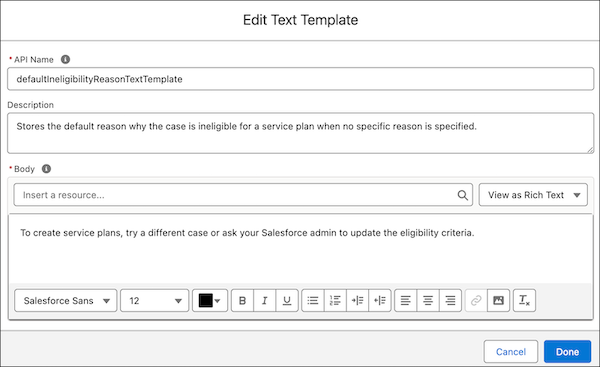
-
Optional: From the Manager Tab, under Text Templates, select
DefaultIneligibilityReasonTextTemplate to modify the default
body text.
The text tells service reps that a case can’t have a service plan because it doesn’t meet the eligibility criteria. Remember that the message the service rep sees is based on the eligibility criteria you’ve set in the flow. For example, if a condition set in the Decision element isn’t met, service reps are provided a message such as “You can't create a service plan because the case isn't part of the specified queue.”
- Click Save as New Flow.
- In the Save As window, provide a name and optional description, and then click Save.
- Activate your flow.
After activating your flow, exit Flow Builder and go to the Service Assistant Setup page.
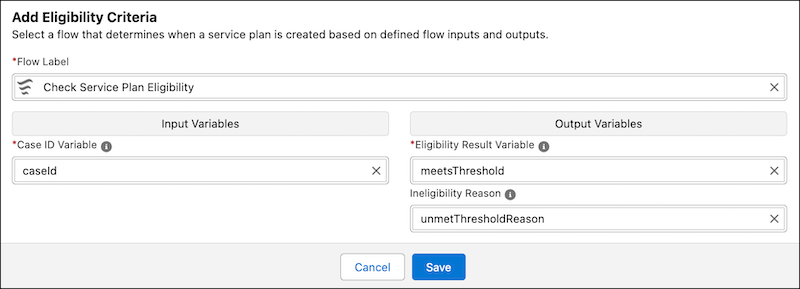
Step 6: Complete Your Eligibility Criteria Setup
Complete your eligibility criteria setup by adding your configured flow to the Service Assistant Setup page.
- From Setup in the quick find box, enter and select Service Assistant.
- Go to Step 4: Customize Your Experience by Object, and in the Case tab, go to the Add Eligibility Criteria section of the Case tab.
- From the Flow Label field, select your configured eligibility flow.
- From Input variables, select your variable.
- From Output Variables, set the fields for Eligibility Result Variable and Ineligibility Reason Variables.
-
Save your work.
Here’s an example configuration of eligibility criteria set on the Service Assistant Setup page.
After completing your eligibility criteria setup, go to the Turn on Service Assistant for Case section. We recommend skipping the Find and Show Similar Cases, Setup Quick Actions, and Turn on Service Plan Translation sections. These features are optional and can be set up anytime after you've completed all general setup.
Step 7: Turn On Service Assistant
Turn on Service Assistant in the last section of the Case tab.

Next, add Service Assistant to the Case record page.
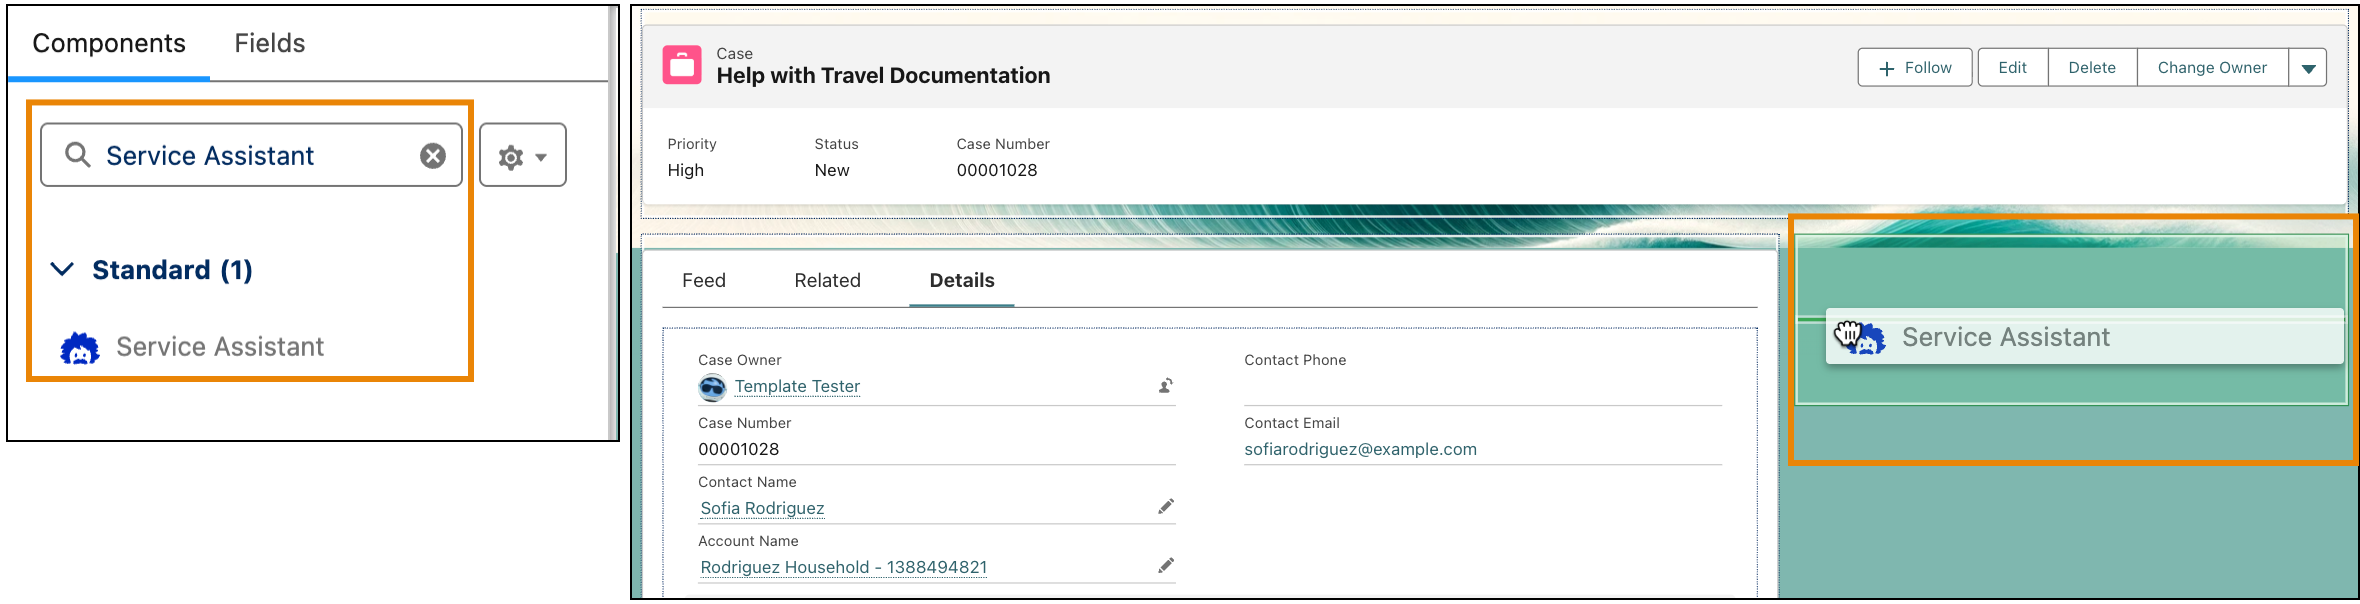
Step 8: Set Up the Service Assistant Component
To finalize your setup, add the Service Assistant component to the Case record page.
- From the Apps Launcher, select Service.
- From the tabs menu of the Service page, select Cases.
- From the Cases page, open a case record. Ideally, select a Case that meets your eligibility criteria.
-
From the record page, click
 , and then select Edit Page.
-
From the Components menu, search for and select Service Assistant, and then add the
component anywhere onto the canvas.
- Click Save, and then click Activate.
-
From the Activation: Case Record Page window, under Org Default, click
Assign as Org Default.
- From the Assign form factor window, select Desktop, and then click Next.
- From the Review Assignment window, click Save.
Selecting Assign as Org Default provides all your service reps access to the page. Service reps without the Service Planner User permission set see an empty space where the Service Assistant component is located. To prevent this result, activate the page for only service reps with the Service Assistant User permission set by selecting Assign to Apps, Record Types, and Profiles. When you do this, each service rep with the permission set must also have a profile assigned. - At the top-right of the page, click Save and then click Activation….
-
From the Activation: Case Record Page window, select App
Default, then click Assign as App Default.
- From the Select Apps window, under App Name, select Service Console, and click Next.
- From the Select Form Factor window, select Desktop, and click Next.
- From the Review Assignment window, click Save.
- At the top-right of the page, click Save.
- Exit the Lightning App Builder to go back to the Case Record page.
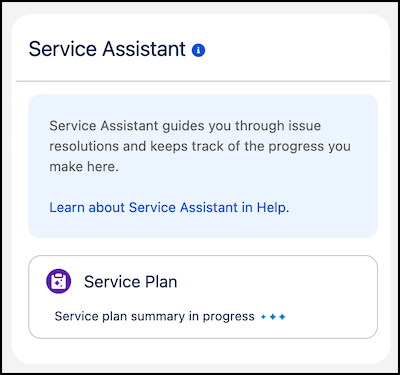
-
From the Case record page, confirm you see the Service Assistant component on the
page and that a plan summary is in progress.
- Optional: If the creation of the plan summary fails or you see error messages, review the troubleshooting steps in Troubleshoot Service Assistant Error Messages.
-
When you see a plan summary, click Draft Plan in the component
and review the service plan.
Review the service plan to confirm that the steps are relevant to the case details and your topics and instructions. For detailed testing guidance, see Test Service Assistant.
An example service plan is provided. Service plans are separated into several sections to guide case resolution: Gather Information, Work The Issue, Resolve The Issue, and Wrap Up. “Gather Information” is always included, while the appearance of the other sections depends on the amount and clarity of your topics and instructions in relation to the case data from your Service AI Grounding configuration. The more detailed your instructions and case data, the more comprehensive the plan.
If you find that your plan isn’t detailed enough or doesn’t align with your topics and instructions or your grounding configuration set in Service AI Grounding, review your configuration for these grounding sources. When you make updates to topics and instructions or to the grounding fields on the case record, the Redraft Plan button shows. Click the button to draft a new plan. If you don’t see the Redraft Plan button, refresh the page.
 Note Service Assistant can propose its own steps that aren’t based on your grounding sources. Such steps are indicated with an (*), as shown in the first step under Work The Issue. Proposed steps show when there isn’t enough information in your grounding sources.
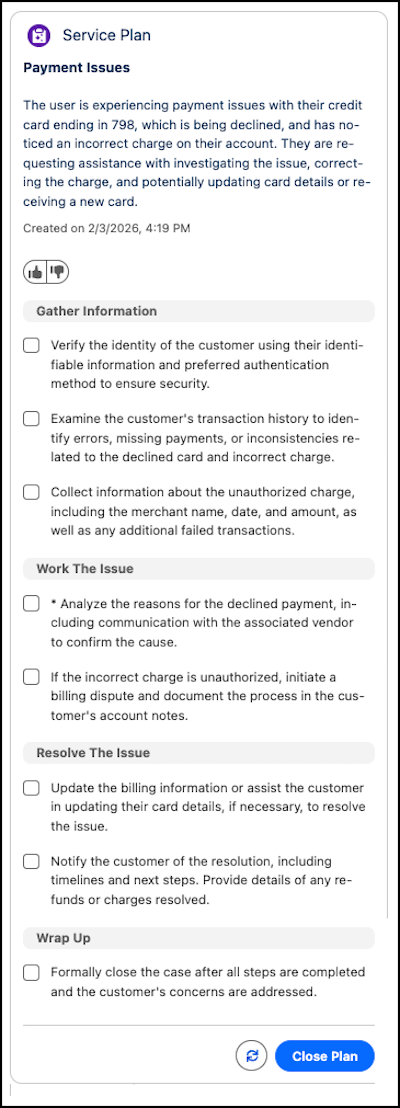
After you verify that you have a drafted service plan, go to the Permission Sets Setup page to complete permission assignments.
Step 9: Give Users Access
Assign your users their specific permissions according to the provided permissions table.
The ServicePlanner User (the agent user) is automatically assigned the Service Planner Agent User and Agentforce_Service_Assistant Permissions permission sets when you create a Service Assistant agent.
You must manually assign the Data Cloud User standard permission set only if you choose to use the knowledge grounding or similar cases features.
If you choose to enable case feed grounding in your Service AI grounding configuration, you must provide the ServicePlanner User (the agent user) access to the case feed. Service Assistant has access to case emails and case comments by default when you enable the objects for grounding.
| Persona | User License | Standard Permission Sets |
|---|---|---|
| Service Rep | Salesforce |
|
| ServicePlanner User (agent user) | Einstein Agent |
*This is a default name provided by Agentforce. If you provided your agent a specific name in the Agent Creator, then the permission set name matches your agent name. |