
You are here:
Configure Omni-Channel Unified Routing
Configure Omni-Channel Unified Routing for voice calls as part of contact center creation or incorporate it into your preexisting contact center. Omni-Channel Unified Routing uses Salesforce Omni-Channel as the routing engine. This means that you manage reps, queues, routing logic, rep statuses, and Command Center for Service directly in Salesforce. Use Amazon Connect to fulfill certain telephony requirements only.
Required Editions
This article applies to:
- Salesforce Voice with Amazon Connect
- Salesforce Voice with Partner Telephony from Amazon Connect
| View supported editions. |
| User Permissions Needed | |
|---|---|
| To view the Amazon Contact Centers page: | Customize Application AND Manage Call Centers |
| To create and manage a contact center: | Salesforce Voice Contact Center Admin |
Do you want to configure Omni-Channel Unified Routing for telephony partners other than Amazon? See Unified Routing for Partner Telephony.
Configure Omni-Channel Unified Routing in Salesforce
Start configuring Omni-Channel Unified Routing for voice calls in Salesforce. These instructions show setup for queue-based routing.
Before you begin:
- In Omni-Channel settings, turn on Enhanced Omni-Channel and Enable Skills-Based and Direct-to-Agent Routing. If you are using Standard Omni-Channel, upgrade to Enhanced Omni-Channel.
- Turn on Salesforce Voice through one of the supported telephony models: Salesforce Voice with Amazon Connect or Service Cloud Voice with Partner Telephony from Amazon Connect.
- Make sure you have an Amazon Contact Center created according to the telephony model specifications and that you have claimed a phone number in Amazon Connect.
- Add users to your contact center and make sure that they are mapped to telephony provider users.
- Request an evaluation of the Amazon Connect Service API rate limit for the UpdateContactRoutingData API to meet call volume needs. See Increase Amazon Service Quotas.
- Make sure you have access to sample Amazon Connect flows. New contact centers include
access to Unified Routing sample flows directly in Amazon Connect. For preexisting
contact centers, download JSON files from the Sample Salesforce Voice flows page in GitHub
and import them into your Amazon Connect instance. Our documentation references these flows:
- Sample SCV Omni-Channel Subflow - Omni Routing With Case Creation (queue-based routing)
- Sample SCV Omni-Channel Subflow - Omni Routing for Skills
- Sample SCV Omni-Channel Subflow - Omni Routing for Direct To Agent
- Sample SCV Transfer Flow For Omni Routing Transfers
- Sample SCV Voicemail Subflow for Omni Routing
-
From Setup, in the Quick Find box, enter and select
Amazon Setup. Scroll down to More Voice Settings and turn on Update Amazon Connect Queues and Routing Profiles. - Verify that Omni-Channel is enabled.
- Verify that you have a service channel for routing voice calls or create a service channel for routing voice calls.
-
Return to the Quick Find box in Setup and enter
Routing
              Configurations
. Define a routing configuration or edit an existing routing configuration.- Set Routing Model to Most Available or Least Active. The External Routing selection isn’t compatible with Omni-Channel Unified Routing.
- Set Percentage of Capacity to 100%.
-
Return to the Quick Find box in Setup and enter
Queues. Create a Salesforce queue with Voice Call as a Supported Object. Associate the queue with the routing configuration defined in Step 4. Create additional queues as needed for your contact center, based on your routing needs and business logic. -
In addition to the queues you created for routing, set up a separate queue in
Salesforce with Voice Call as a Supported Object. You can name it
whatever you want, but conceptually this is your holding queue. It will be mapped to a
working queue in Amazon Connect.
- Associate your holding queue with a routing configuration that has a routing model of Most Available or Least Active (not External Routing).
- Don’t add any contact center users to the holding queue.
 Note This holding queue that’s mapped to a working queue in Amazon Connect satisfies one of the core requirements for this feature. It makes sure that reps have access to the queue set in the Set working queue block in the Amazon Connect flow, which is a prerequisite to connect the call.
 -
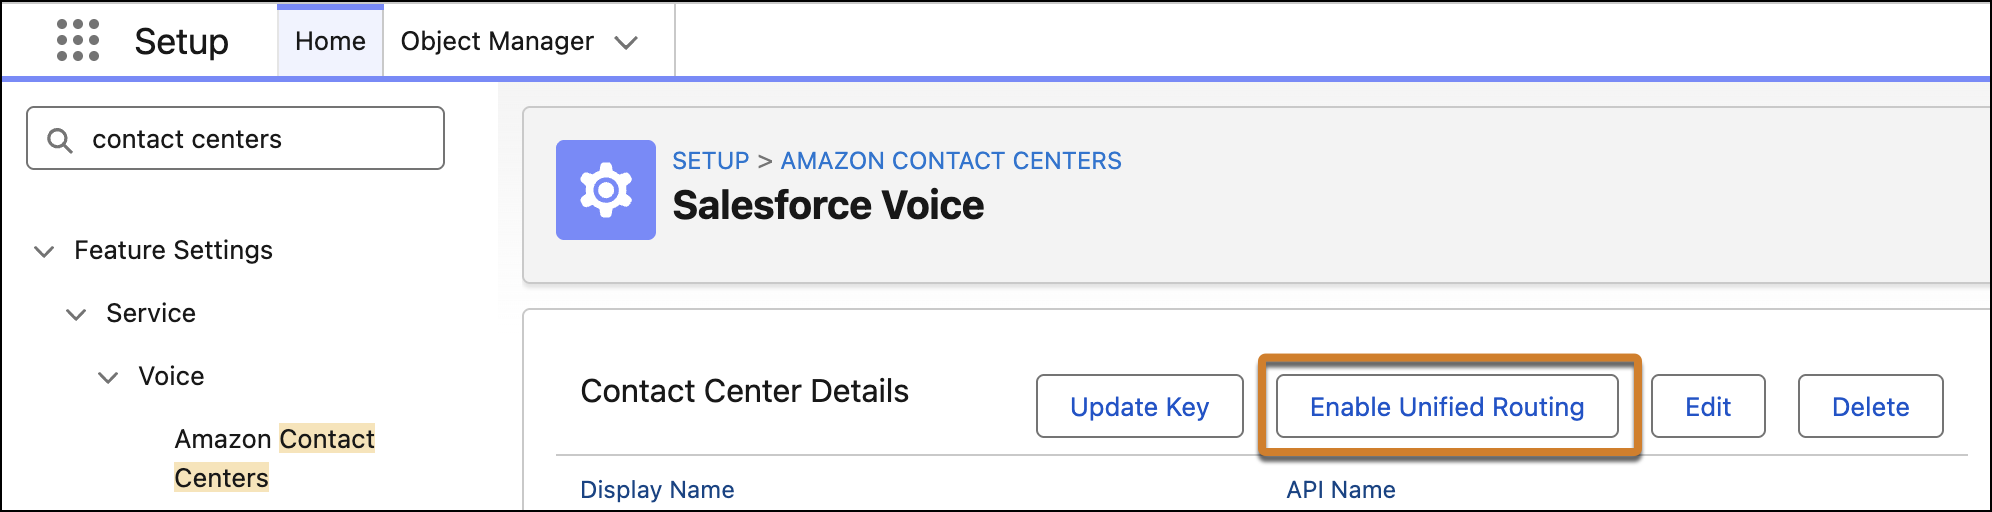
Return to the Quick Find box in Setup and enter
Amazon Contact
              Centers
. Select your Amazon Connect Contact Center. -
In the Contact Center Details section, click Enable Unified
Routing.
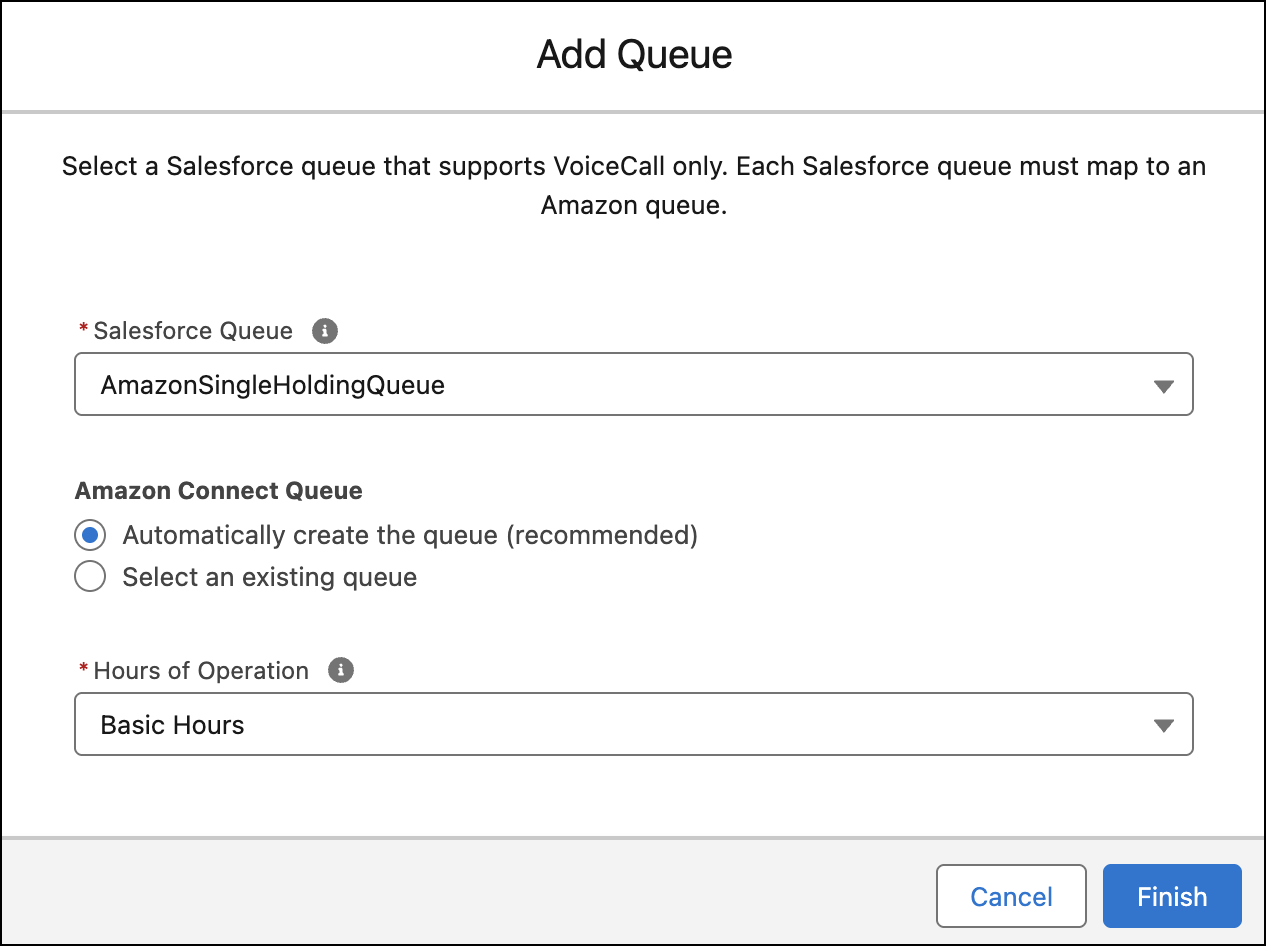
-
Under Contact Center Queues, add the holding queue you created to the contact center.
- For Salesforce Queue, select the queue created in Step 6.
- For Amazon Connect Queue, select Automatically create the queue. This maps the Salesforce queue to a new queue in Amazon Connect.
-
Go to the Contact Center Groups section and add a new contact center group to
the Amazon Connect Routing Profile.
-
Associate the holding queue to this contact center group.
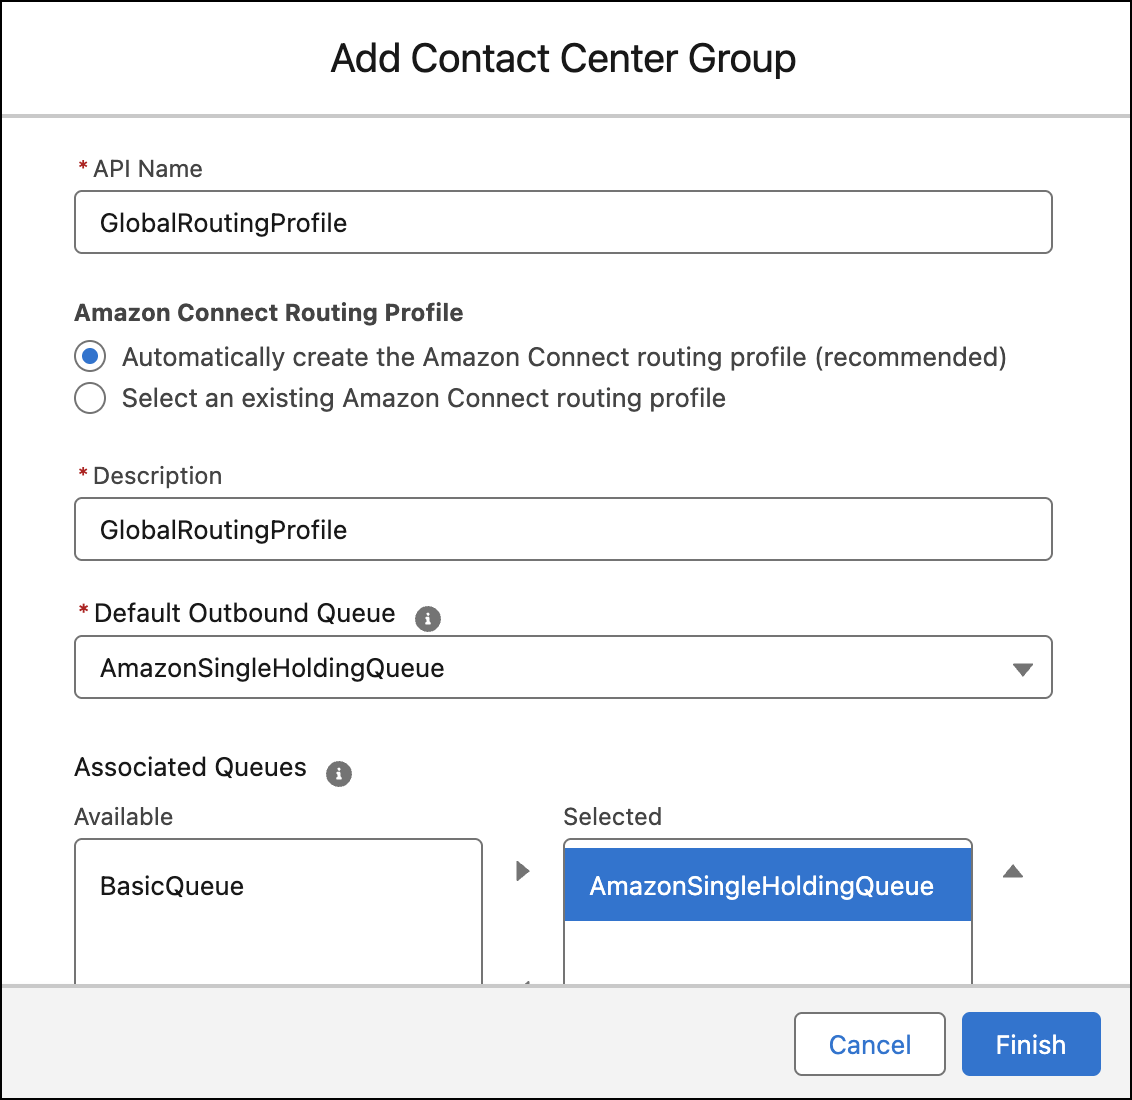
-
Associate the holding queue to this contact center group.
-
Assign contact center users to groups.
- Go to the Contact Center Users section and select the checkboxes next to users in the contact center. Click Assign to Group. Under Contact Center Group, select the group you made, and then save your work.
- If you have multiple contact center groups, make sure each user is assigned to a group and that the holding queue is associated with each group.
-
Go to the Contact Center Channels section, create a Contact Center
Channel.
- To route this phone channel’s calls to a specific queue, select Queue in the Call Routing Type field, and then enter the name of the Salesforce queue you want to route calls to.
- To route this phone channel’s calls with an Omni-Channel flow, select Omni-Channel Flow in the Call Routing Type field, and then enter the names of the Omni-Channel flow and fallback queue.
- To learn more about direct-to-rep or skill-based routing, follow our linked documentation.
After Salesforce configuration is complete, finish Omni-Channel Unified Routing basic setup in Amazon Connect.
Optional: Configure Omni-Channel Unified Routing in Salesforce but Keep Queues in Amazon Connect
For existing Voice customers migrating to Omni-Channel Unified Routing who have applications that require queue information in Amazon Connect, a holding queue is recommended but isn’t required for queue-based routing. However, you must make sure that you follow these recommendations to ensure that telephony requirements are met.
- All of your Amazon Connect queues are mapped to Salesforce queues. Queues must be present inside Salesforce because Omni-Channel handles the routing instead of Amazon Connect.
- Create a Salesforce contact center group for each routing profile in Amazon Connect. If you don’t use a holding queue, make sure that all reps have access to the queue set in the Set working queue block, which is a prerequisite to connect the call.
Configure Unified Routing in Amazon Connect
Finish the basic setup for voice calls to use Omni-Channel Unified Routing in Amazon Connect.
- To go to the Amazon Connect Admin Dashboard associated with your contact center, go to the Contact Center Details section in Salesforce and click Telephony Provider Settings.
- Make sure all reps in your contact center have auto-accept enabled in Amazon Connect so that Omni-Channel can handle routing and accepting calls. Auto-accept is on by default for reps added to a contact center after Unified Routing is enabled in Salesforce. For all other reps, such as preexisting users in the contact center, follow Amazon’s instructions to enable auto-accept calls for reps.
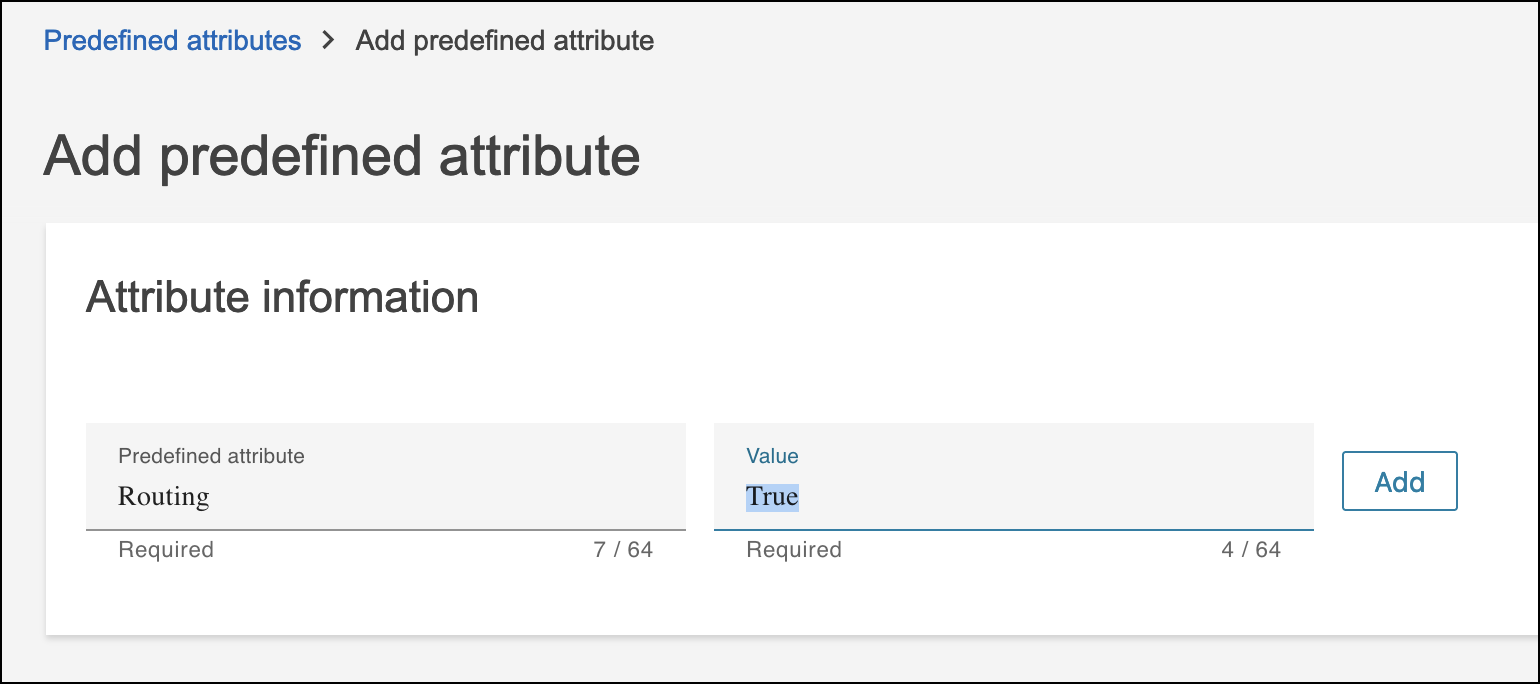
-
Follow Amazon’s instructions to create a predefined attribute for routing
contacts to reps. Make sure your security profile has the permissions required
to add predefined attributes to Amazon Connect.
- Set Predefined attribute to Routing. Because Salesforce uses this value as part of an API call, you must use Routing.
- Set Value to True.
-
In Amazon Connect, select Routing and then select
Flows.
Note
- These instructions reference sample Amazon Connect flows for admins setting up Omni-Channel Unified Routing in a brand new contact center. For a contact center with preexisting flows, interpret the steps and referenced flows according to your current setup. For example, edit your inbound flow to meet the requirements below.
- If you’re using our sample flows end-to-end, edit the Sample SCV Inbound Flow to transfer to the Sample SCV Omni-Channel Subflow - Omni Routing With Case Creation flow.
-
Edit the Sample SCV Omni-Channel Subflow - Omni Routing With Case Creation flow or
your preexisting inbound flow that’s connected a phone number according to your business
needs.
While Salesforce provides sample Amazon Connect flows as a reference, each organization usually adds unique business logic to their flow implementations. If you are updating an Amazon Connect flow to enable Omni-Channel Unified Routing, reference the example flow (Sample SCV Omni-Channel Subflow - Omni Routing With Case Creation) and keep these considerations and requirements in mind.
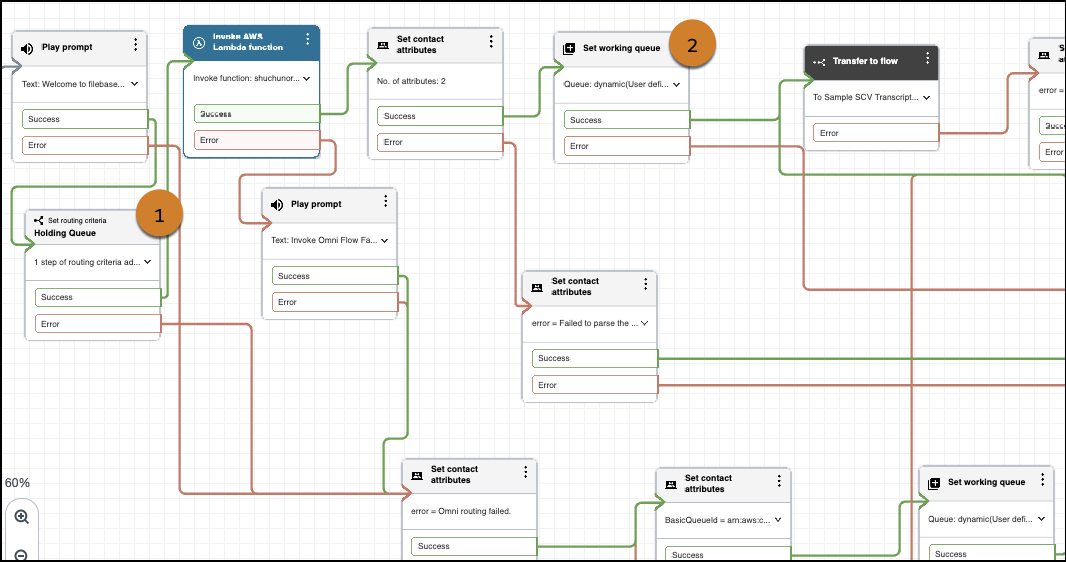
-
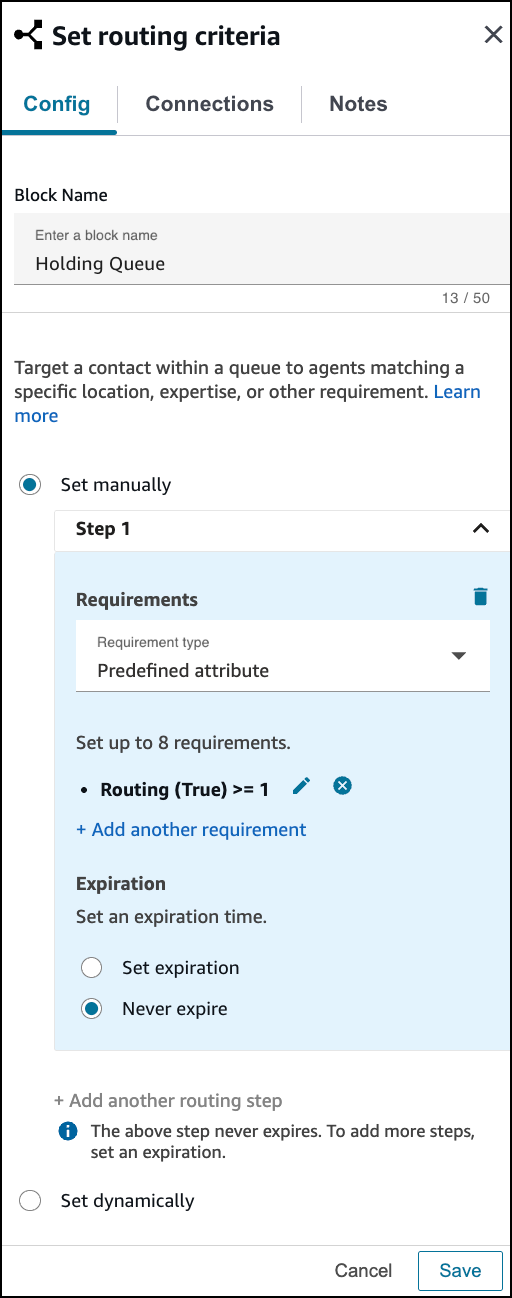
Include a Set Routing criteria block (1) before the Invoke
AWS Lambda function block that invokes the executeOmniFlow method.
-
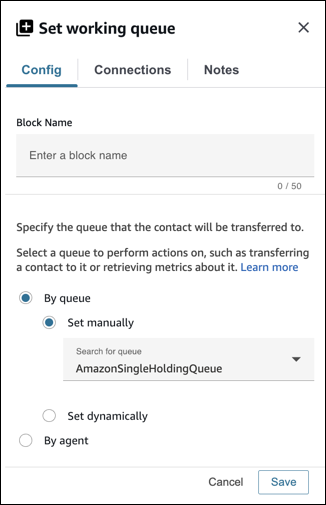
If you’re using the holding queue approach that we recommend, the Set
working queue block (2) should be set By Queue
manually to the working (holding) queue.
-
If you’re an existing Voice customer migrating to Omni-Channel Unified Routing
and you want to maintain your current configuration in Amazon Connect, the
Set working queue block (2) should be set By
Queue dynamically to have the queue value returned by executeOmniFlow.
This value can be accessed using Namespace as External and Key as queue, as shown in
the screenshot. You can also set the queue manually by using a specified queue
ARN.

-
Include a Set Routing criteria block (1) before the Invoke
AWS Lambda function block that invokes the executeOmniFlow method.
- Save your work and publish the flow.