
You are here:
Complete the Recommended Setup for Shift Management
Use the Shift Management Setup tab to complete the recommended setup. Choose defaults for your data and assign permissions to managers and planners.
Required Editions
| Available in: Lightning Experience |
| Available in: Enterprise and Unlimited Editions |
| Shift Management is available as an add-on license with Work.com and Workplace Command Center. |
| User Permissions Needed | |
|---|---|
| To set up Shift Management: | Workplace Command Center permission set license Edit on employees |
- From the App Launcher, search for shift and select Shift Management Setup.
-
Find Add Permissions Sets and click Add. This step adds
permission sets for admins, shift planners, workplace managers, and employees.
As the admin user, assign the permission set Workplace Shifts Admin to yourself
before you continue.
- From Setup, in the Quick Find box, enter users, and then select Users.
- Open your user record.
- Hover over Permission Set Assignments and click Edit Assignment.
- Add Workplace Shifts Admin to the enabled permission sets.
- Save your changes.
-
Find Define App Settings and click Setup.
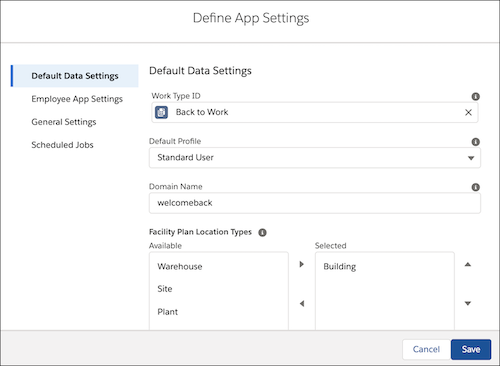
- For the Work Type Id, search for and select
Back to Work. This default provides a shift
length of 8 hours. Workplace managers can select a different work type
when they create facility plans.
You can't choose a work type that creates service appointments automatically. Make sure that custom work types don't have Auto-Create Service Appointment selected.
- For the Default Profile Id, select the profile to use when field service users are created. Use the new profile that you created by cloning the Standard Platform User. For example, Shifts Employee User Profile.
- Enter a domain name. The domain name is used to create unique usernames
for your employees in the format
Email.domain name. For example, if the email issylvia.curan@example.comand the domain isbacktowork, then you see the usernamesylvia.curan@example.com.backtowork. - Select which location types to use for facility plans. Workplace managers can create facility plans only for service territories with location types that match the ones you choose here.
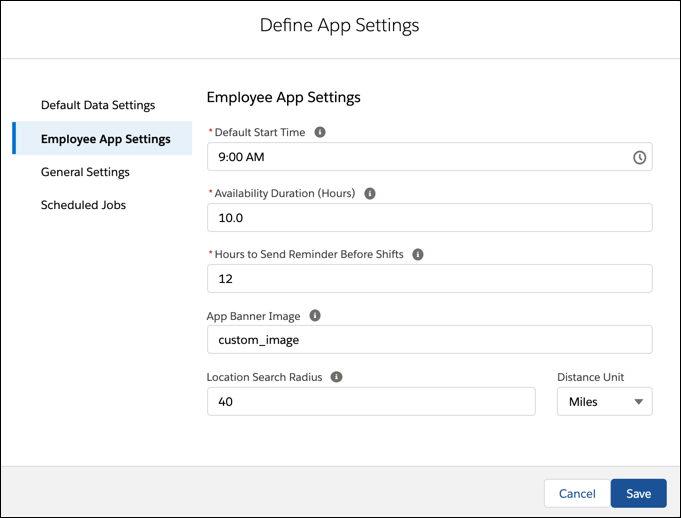
- On the Employee App Settings tab, set a default start time, the
availability duration for scheduling, and a shift reminder period.
Optionally, change the mobile app banner image by referencing a static
resource in your Salesforce org. If you chose the Shift Booking mobile
app tab, set the search radius for nearby locations.
- On the General Settings tab, select the option to require unique location names.
- On the Scheduled Jobs tab, activate all the scheduled jobs.
- Save your changes.
- For the Work Type Id, search for and select
Back to Work. This default provides a shift
length of 8 hours. Workplace managers can select a different work type
when they create facility plans.
-
To add employee and location data to the shift management app, find Add Employees and
Locations and click Start.
During the import process, we copy employee and location data into the service appointment and service territory objects required for shift management. If you add more employees and locations, you can return to this setup page to import data again.
-
To assign user permissions, find Assign Planners and Managers and click
Start.
- To create a user Territory record, select a user and location. Click
Add.
The User Territory gives the person access to view and manage people and appointments within the location territory. When you create the user territory record, a row is added to the permissions screen.
- To assign custom permission sets, click the icons in the Shift Planner and Workplace
Manager columns.
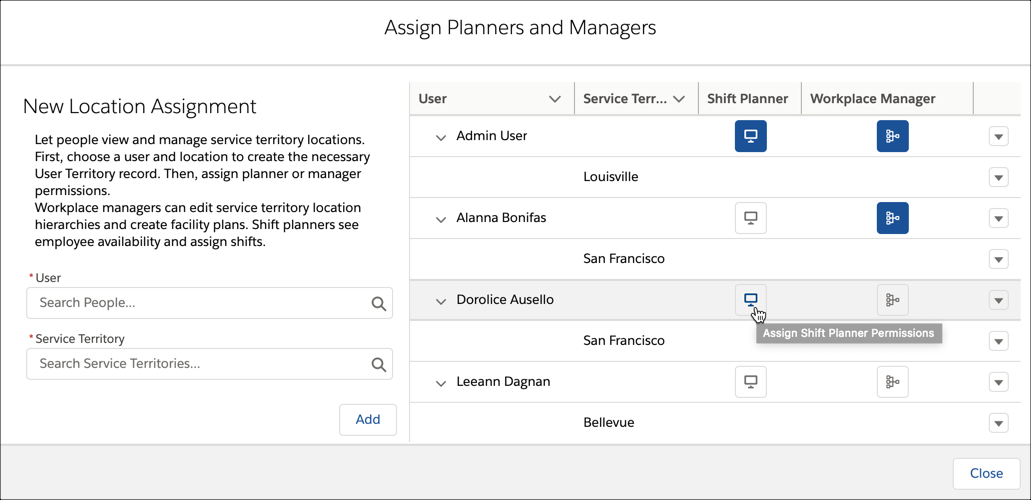
- Shift planners are assigned these permission sets: Workplace Shifts Shift Planner, Workplace Shifts Shift Planner App Settings, SFS Dispatcher Permissions, and SFS Dispatcher License.
- Workplace managers are assigned these permission sets: Workplace Shifts Workplace Manager, Workplace Shifts Workplace Manager App Settings, SFS Dispatcher Permissions, and SFS Dispatcher License.
- To create a user Territory record, select a user and location. Click
Add.
-
To provide service territory access for shift planners and workplace managers, run the scheduled
job that sets up sharing.
- Go to Field Service Settings | Sharing | Scheduled Jobs.
- Expand the User Territories job.
- Select all territories.
- Click Save.
- Close and reopen the tab, then click Run Now to trigger the job. You can see the scheduled job at Setup | Apex Jobs.
- Set up the Optimization scheduled job. After you activate the scheduled job, your shift planners can manually optimize shifts in the Shift Schedules tab.
-
Add the Shifts at a Glance component to your custom Command Center home page.
- From the App Launcher, select the Command Center. To access the Lightning App Builder, click the gear icon and select Edit Page.
- Under Custom, find Command Center - Shifts Quicklook and drag the component onto the page.
- Save your changes.
 Note To view data in the Command Center - Shifts Quicklook component, your users need the Workplace Shifts Command Center and Workplace Shifts Command Center App Settings custom permission sets.