
You are here:
Grant Buyers Access to External Accounts for a B2B Store
An external account is an account for which the buyer isn’t a contact. You can grant a B2B buyer access to an external account by assigning them the Buyer Manager role. When shopping in a B2B store, the designated buyer can switch to an external account that they have access to. The buyer can purchase on behalf of that account or add and activate users, reset passwords, and view their shopping carts, depending on how you configure their privileges.
Required Editions
| View supported editions. |
Which Salesforce Commerce Product Do I Have?
A buyer that you designate to access an external account must be assigned the preconfigured Buyer Manager permission set. The assignment must include system permissions or be assigned an equivalent custom permission set. The buyer must have the Customer Community Plus license or a license with a higher level of privileges.
A buyer that you designate to manage buyers in an external account must also have delegated external user administration rights, which you assign to the buyer’s profile. For more information, see Delegate External User Administration.
The buyer’s account and the external account must be part of buyer groups that are assigned to the same store. You can create up to 200 external managed accounts per user.
-
Configure the buyer’s account.
- From the buyer’s account record, go to the External Managed Account related list.
- Click Configure.
- Enter a name for this external managed account record.
- For User, enter the name of the buyer.
- For Target Account, enter the name of the external account that the buyer can switch to.
-
Under Authorized Access, select the privilege level to assign to the buyer for the
account and move it to the Selected Access list.
To allow the buyer to purchase on behalf of the external account, select Buy For. To allow the buyer to manage users in the external account, select Manage Users.
- Save your changes.
-
Share the external account with the buyer.
You can create Apex-based rules to automate sharing. For more information, see Sharing a Record Using Apex.
- From the account record of the external account, select Sharing from the dropdown menu.
- In the Search dropdown, select Customer Portal User.
-
Search for the buyer.
Leave Account Access as Read Only.
- Save your changes.
-
Add the Account Switcher option to the profile menu in the store.
At present, the Account Switcher supports only business accounts.
- In Experience Builder, click the profile menu.
- Under Authenticated User Options, select Edit Default User Profile Menu.
- If the Account Switcher menu item is already added, skip to step g. Otherwise, click + Add Menu Item.
-
In the Type field, select Modal.
For older stores built on the Aura platform, select Event.
- In the Event field, select Account Switcher.
- Enter a name for the menu item, for example, Switch Accounts.
- Click Save Menu.
When the buyer logs into the store, they can select the Switch Accounts option from the user profile menu and choose an external account.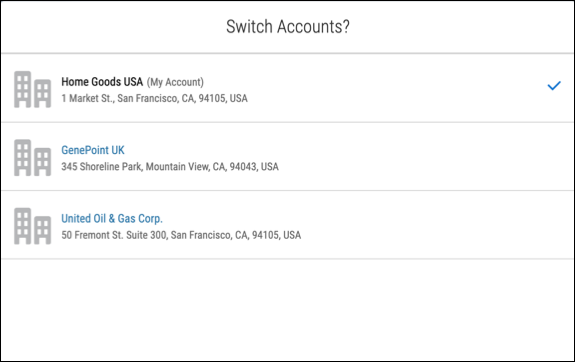
You can use {!CurrentUser.effectiveAccountId} as the Account Id attribute
value in components that track account IDs. This value updates the data that’s displayed in
the component to the account that’s being switched to. For example, the Related Record list
component shows the Members list on the Account Management page and uses
{!CurrentUser.effectiveAccountId} in the Parent Record Id field by
default. When the user who is managing the target account switches to the target account,
the information on the Account Management page switches to the context of the target
account. The managing user can manage target account members from there.
To implement behavior based on account switching, you can create a custom component and use
the account ID {!CurrentUser.effectiveAccountId}.

When setting up an account-based expression, use the expression User.Commerce.EffectiveAccountId to ensure that the buyer’s selected account is used and not their user account. If you don’t specify an EffectiveAccountId, the system defaults to the user account.
