
You are here:
Automate Attaching Documents to Document Checklist Items
Make it easy to attach documents to Document Checklist Items to save time for your staff and make document processing more efficient.
- What Does the Automation Do and When Should You Use It?
You can set up Admissions Connect to automatically attach applicant documents to Document Checklist Items when they are uploaded to Salesforce. That way, the files are always associated with the right applicant and the right application requirements. After the file is associated with a Document Checklist Item, it’s available for your admissions staff to review. - Records Involved in Managing Application Documents
Before we describe the automation, let's review the types of records that are involved in managing application documents. - How Does the Automation Work?
Admissions Connect provides a TDTM_ContentDocumentLink trigger handler that relates Content Document records to Document Checklist Items using Document Type Mapping custom metadata type records. These metadata records let you map the Description field of Content Version records (aka Salesforce Files) to Document Types. When a file is uploaded and a Content Document Link record is created to associate the file with an Application record, if the Content Version record Description matches a Document Type, the Content Document Link is updated to point to a Document Checklist Item instead of the Application. - Automation Example
Let’s look at two of the default records and see how they work together when adding documents from Common App to Salesforce. - Review and Create Document Type Mapping Custom Metadata Type Records
Admissions Connect provides default Document Type Mapping metadata records. Remember that these records let you map the Description field of Content Version records (aka Salesforce Files) to Document Types. Review the defaults and create your own, if needed. - Implementation Considerations
Your institution is responsible for creating an import strategy that ensures application documents are associated with the correct applicant and include a Description.
What Does the Automation Do and When Should You Use It?
You can set up Admissions Connect to automatically attach applicant documents to Document Checklist Items when they are uploaded to Salesforce. That way, the files are always associated with the right applicant and the right application requirements. After the file is associated with a Document Checklist Item, it’s available for your admissions staff to review.
This type of automation is great if you’re importing documents from other applications or databases, like Peoplesoft. Just make sure your import strategy creates the records that are required to trigger the automation.
Records Involved in Managing Application Documents
Before we describe the automation, let's review the types of records that are involved in managing application documents.
-
Document Types identify the type of document that an applicant uploads. Document Types are created in Setup. You specify a Document Type when setting up your Action Plan Template Items that are Document Checklist Items.
-
Content Version records are how you create Content Documents via the API. Your import strategy likely uses a third-party tool to create these records. The Description you provide for the Content Version is duplicated on the Content Document’s Description.
-
Content Document Links associate a Content Document to another Salesforce record. These records can be automatically created when you create your Content Version records and this workflow is likely part of your import strategy.
How Does the Automation Work?
Admissions Connect provides a TDTM_ContentDocumentLink trigger handler that relates Content Document records to Document Checklist Items using Document Type Mapping custom metadata type records. These metadata records let you map the Description field of Content Version records (aka Salesforce Files) to Document Types. When a file is uploaded and a Content Document Link record is created to associate the file with an Application record, if the Content Version record Description matches a Document Type, the Content Document Link is updated to point to a Document Checklist Item instead of the Application.
If the Description doesn't match any Document Types, the Content Document Link to an Application record is left as is. If multiple Document Checklist Items related to the same Application have the same Document Type, the Content Document is linked to the first Document Checklist Item that’s marked as Required. If multiple required Document Checklist Items have the same Document Type, we use the lowest-value Sequence field on the coordinating Application Material Mapping record to determine which Document Checklist Item to link to. If there’s no Sequence value, we alphabetize the Document Checklist Items and use the first one.
To get you started, Admissions Connect provides default Document Type records and Document Type Mapping custom metadata type records. To see a list of the default records, see Quick Start Asset Reference List.
Automation Example
Let’s look at two of the default records and see how they work together when adding documents from Common App to Salesforce.
-
A Document Type called
Writing Supplement(with the API name ofWriting_Supplement). -
A Document Type Mapping custom metadata type record called
Writing Supplementthat maps the Document Description ofWriting Supplementto the Document Type API Name ofWriting_Supplement.
In this scenario, let's assume that you used a third-party tool to import application documents into Salesforce as Content Documents and linked them to the Contact and Application records through Content Document Links.
Let's also assume that you've configured Admissions Connect to automatically assign Action Plans to Application records based on the details in an applicant's Application record. When Action Plans are assigned, they include Action Plan Items that are Document Checklist Items. Now all the pieces are in place for the TDTM_ContentDocumentLink trigger handler to kick in.
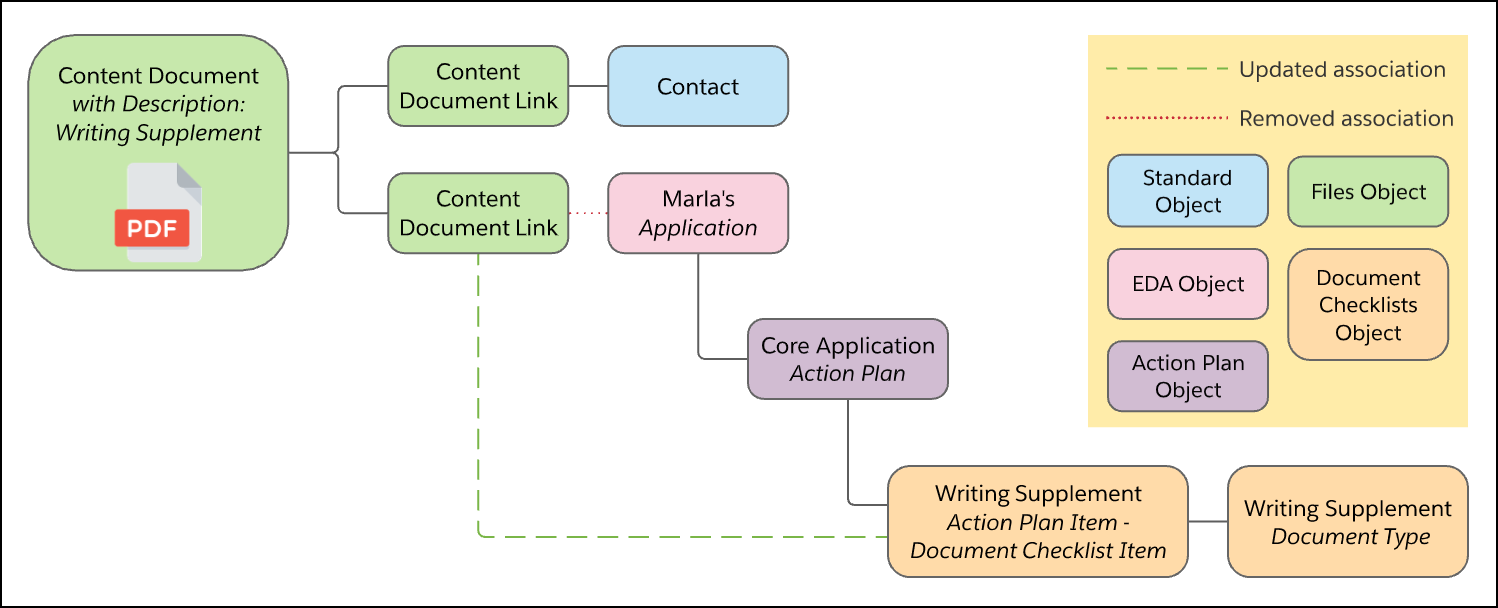
Using the trigger and Document Type Mapping custom metadata type records, we parse incoming Content Document records that are attached to an Application to determine whether their Description matches one of the defined Document Type records. In our example, a Content Document with a Description of Writing Supplement is attached to an Application record. The trigger removes that association and updates it to a Document Checklist Item on that same Application record that has a Document Type of Writing Supplement. Writing Supplement—the description on the Content Version record—is matched to Writing_Supplement—the API name of the Document Checklist Item's Document Type—using one of the preconfigured Document Type Mapping custom metadata records.
Here's how this looks visually.
Review and Create Document Type Mapping Custom Metadata Type Records
Admissions Connect provides default Document Type Mapping metadata records. Remember that these records let you map the Description field of Content Version records (aka Salesforce Files) to Document Types. Review the defaults and create your own, if needed.
See Quick Start Asset Reference List.
-
From Setup, search for and then select Custom Metadata Types.
-
Click Manage Records next to Document Type Mapping.
-
Click New.
-
Fill out these fields.
- Label
- Enter a name for this Document Type Mapping record. We recommend using the text string you provide on the Document Description field.
- Document Type Mapping Name
- Enter an API name for this Document Type Mapping record.
- Document Type API Name
- Enter the API name of the Document Type.
- Document Description
- Enter the text string that you plan to use when specifying a Description for Content Version records. Remember that the same Description gets used on the Content Document record.
-
Save your changes.
Implementation Considerations
Your institution is responsible for creating an import strategy that ensures application documents are associated with the correct applicant and include a Description.
When creating your Content Version records with your ETL tool, the casing on the Description field doesn't matter, but the spacing does. For example, a Description of writing supplement is matched with the Document Type Writing Supplement. A Description of writing supplement is not matched because it has too many spaces. When setting up your automation, make sure to use the Description values that you've specified in the Document Type Mapping records.
The TDTM_ContentDocumentLink trigger handler runs on Before Insert of ContentDocumentLink records, which means the trigger can redirect the link to the Document Checklist Item only at the moment the ContentDocument is attached to the Application. Make sure that your Action Plans are assigned to Applications before uploading applicant documents. Otherwise, the documents stay attached to the Application record.
Keep in mind that the TDTM_ContentDocumentLink trigger only attaches a ContentDocument to a Document Checklist Item record if the item doesn't already have a ContentDocument attached. In other words, the trigger ignores Document Checklist Items that have files, which means you can’t use this automation to update or replace documents already attached to Document Checklist Items.
Also consider the daily limit on the number of files that can be added to Salesforce. See Salesforce CRM Content Limits and Increase the Maximum number of 'Content Versions' published per day in Salesforce Help.
If you’re uploading large batches of files in your org, we recommend disabling the Content Version trigger to avoid platform event limits. This trigger works in conjunction with the Admissions Connect - Refresh Record platform event, which allows the Document Checklist Item Preview component to automatically refresh when new versions of a document are uploaded. Turn the trigger back on after the uploads are complete.
To help your admissions staff easily access files that aren't moved to Document Checklist Items, add the Files related list to the Application Lightning record page. Also add the Files related list to the Application Review Lightning record page, just make sure to configure the list to show files related to Applications.