
You are here:
Configure Intakes
Customize and use Intakes for the nonprofit Case Management managed package.
Intake is the process by which candidates seeking support from your organization are evaluated for enrollment in your programs. Use Intakes to track this process from the initial inquiry to the final result, which could be an approval to receive services or a referral to another provider for help.
Intakes are a collection of information from the Contact, Assessment, Program Engagement, and Case objects. An edit on an Intake also edits the related record for that object. For example, changing a client's phone number on an Intake also changes the phone number on their Contact record.
- Required Setup for Intakes
Intakes were released in Case Management version 1.14 (8/18/2020). If you started using Case Management before that date, or if the feature isn't configured in your org, complete the required setup steps. - Configure Intake Checklists
Configure and use Intake Checklists. - Create Different Intake Processes
There are two ways to create different Intake processes, using Intake Checklists and record types. - Configure Intake Stages
Edit, remove, or add new Intake Stages. - Configure Intake Results
Edit, remove, or add new Intake Results values. - Customize Intake Fields on Intakes
Customize Intake-specific fields on the Intake Layout. - Customize the Look of Intake Record Pages
The Intake Record Page includes commonly-used components like Intake Source, Client Information, Assessments, Documents, Intake Results, and Program Engagements. You can edit the page to move these components around, and within the Client Information component, you can modify the visibility of the client photo, badge, pronouns, watchlist, and Client ID elements. - Customize Client Information on Intake Record Pages
Customize Client Information fields that display on Intakes, including Demographic Information, Contact Information, and Emergency Contact Information. - Add Client Information Sections to Intake Record Pages
You can create an entirely new Client Information section on the Intake Record Page, in addition to Demographic Information, Contact Information, and Emergency Contact Information. - Edit Referral Related Lists on Intakes
Edit the fields in custom related lists for Inbound Referrals and Outbound Referrals.
Required Setup for Intakes
Intakes were released in Case Management version 1.14 (8/18/2020). If you started using Case Management before that date, or if the feature isn't configured in your org, complete the required setup steps.
Intakes were released in Case Management version 1.14 (8/18/2020). If you started using Case Management before that date, or if the feature isn't configured in your org, complete the required setup steps. If you already have Intakes in your org, you can skip this setup. If you plan to use Referrals, also complete the required setup in Configure Referrals.
First, add Quick Actions to Intakes so that users can create Outbound Referrals and Program Engagements from an Intake.
- Click
 , then click Setup.
 -
Click Object Manager.
-
Click Intake.
-
Click Page Layouts.
-
Click Intake Layout.
-
In the palette, click Mobile & Lightning Actions, then:
-
Drag New Outbound Referral to the Salesforce Mobile and Lightning Experience Actions section.
-
Drag New Program Engagement to the Salesforce Mobile and Lightning Experience Actions section.
-
-
Click Save.
Next, Add the Intake field to the Program Engagement page layout.
- Click , then click Setup.
-
Click Object Manager.
-
Click Program Engagement.
-
Click Page Layouts.
-
Click Case Management Program Engagement Layout.
-
Drag the Intake field from the palette to the Additional Details section.
-
Click Save.
Then, let users create Intakes from Outbound Referrals. You can enable Run Flows in user profiles or permission sets, or enable Flow User on a user detail page:
- Click , then click Setup.
-
In the Quick Find box, enter Users, then click Users.
-
Click a user's name.
-
Click Edit.
-
Select Flow User.
-
Click Save.
Finally, if you plan to use Referrals, also complete the required setup in Configure Referrals.
Configure Intake Checklists
Configure and use Intake Checklists.
Create Intake Checklists to help users complete the intake process and navigate Intake records. Use Intake Checklists to guide users through necessary intake tasks, such as collecting personal information and completing assessments. Intake Checklists also help users navigate Intake records in a preferred order when you link tasks to page anchors that you configure on the Intake page layout.
Intake Checklists use an existing Salesforce feature, Action Plan Templates, to create individual checklists. After you create Action Plan Templates, use Action Plan Template Groups to group the checklists by criteria meaningful to your organization, such as by program. The Action Plan Templates and Action Plan Template Group tabs are accessible from the App Launcher in your org but aren't added to the Case Management app. If you want to learn about other ways to use Action Plan Templates, see Enable Action Plans in Salesforce Help.
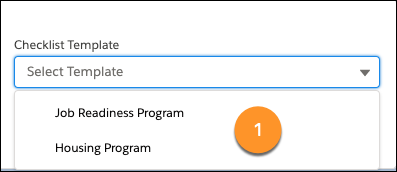
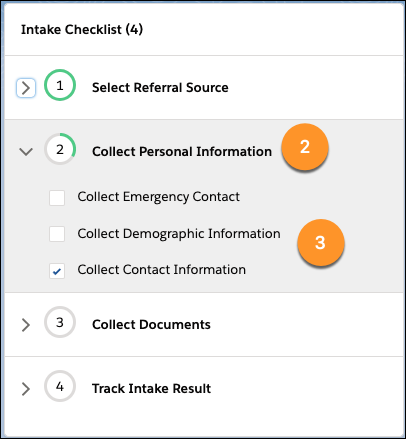
After you create Intake Checklists using Action Plan Templates and Action Plan Template Groups, users can add them to Intake records following your organization's guidelines. On an Intake, users add an Intake Checklist by selecting an Action Plan Template Group (1), such as Housing Program.
In the Action Plan Template Group, there can be one or more Action Plan Templates (2), such as Collect Personal Information, each with one or more Tasks (3), such as Collect Emergency Contact. Users can check off tasks as they complete them.
One-Time Setup
To use Intake Checklists, complete these one-time setup tasks.
-
Give users access. See User Permissions in Salesforce Help.
-
For users to create Action Plan Templates and Action Plan Template Groups, give Read, Create, and Edit access on Action Plan Templates and Action Plan Template Groups. Confirm Action Plan Template tab visibility on user profiles; see View and Edit Tab Settings in Salesforce Help.
-
For users to add Intake Checklists to Intake records, give Create and, optionally, Delete access on Action Plan. Give Read access on Template and Template Groups. Finally, confirm that Edit Tasks is enabled in System Permissions, either from a user profile or permission set.
-
-
Set up Sharing Settings for Action Plan, Action Plan Template, and Action Plan Template Group. See Sharing Settings in Salesforce Help.
-
If you previously made changes to the Intake record page: Edit the Intake page following these instructions and select either Main Region with Header, Sticky Left Sidebar (the checklist will not scroll with the page) or Header and Left Sidebar (the checklist will scroll with the page). Then, add the Action Plan Checklist component to the left sidebar, and in Field API Name of Action Plan Template Group lookup, enter caseman_ _ActionPlanTemplateGroup_ _c.
Create an Intake Checklist
To create an Intake Checklist, create Action Plan Templates first, then add the Action Plan Templates to Action Plan Template Groups. An Action Plan Template is a set of tasks for users to complete when they intake clients that can be checked off upon completion. An example of an Action Plan Template is Collect Personal Information, with the tasks Collect Emergency Contact, Collect Contact Information, and Collect Demographic Information.
After you create Action Plan Templates, add them to Action Plan Template Groups. Action Plan Template Groups are what users select when they add an Intake Checklist to an Intake record. Set up different Action Plan Template Groups for different programs to provide program-specific intake steps, for example, one for a Housing Program and one for a Job Readiness program. Although both Action Plan Template Groups are likely to include the Action Plan Template to Collect Personal Information, the Housing Program Action Plan Template Group might include an Action Plan Template named Housing Assessment, and the Job Readiness Program Action Plan Template Group might include an Action Plan Template named Employment Assessment.
You can also link an Action Plan Template to a page anchor on a section of the Intake page. For example, you can add a page anchor from the Action Plan Template Employment Assessment to the section of the Intake page that has employment assessment information.
First, create Action Plan Templates.
-
From the App Launcher, find and select Action Plan Templates.
-
Click New.
-
Give the Action Plan Template a name that describes the tasks it contains; this is the name of your checklist. Our example is Collect Personal Information.
-
Don't change the Action Plan Type—it will always be Industries.
-
From Target Object, select Intake.
-
Optionally, select Let users add items to action plans to let users add their own action plans to an Intake record.
- Click Save.
-
-
Click New Task.
-
Enter a Subject, which is the name of a task. Our example is Collect Emergency Contact.
-
Select a Priority.
-
Enter the number of days that a user has to complete the task after they add the Intake Checklist to a record.
-
Optionally, make the task required.
-
Optionally, assign the task to a specific user. Tasks are automatically assigned to the person who creates the checklist on a record.
-
Click Save.
-
Optionally, click New Task to add additional tasks. In our example, we would also add Collect Contact Information and Collect Demographic Information.
-
-
When you're done, click Publish Template.
 Note You won't be able to use the Action Plan Template until it's published. Action Plan Template tasks can't be changed after they're published.
 - Click Publish.
-
Optionally, create more Action Plan Templates. When you're done, move on to add Action Plan Templates to Action Plan Template Groups.
Next, add the Action Plan Templates to Action Plan Template Groups.
Now, users can create Intake Checklists.
-
From the App Launcher, find and select Action Plan Template Groups.
-
Click New.
-
Give the Action Plan Template Group a name, which is the name that users will see when they select a checklist on an Intake record. Our example is Housing Program.
-
From Template Object, select Intake_ _c.
-
Click Save.
-
On the Action Plan Template Group, click the Related tab.
-
Next to Action Plan Template Group Items, click New.
-
From Action Plan Template, search for and then select an Action Plan Template. Our example is Collect Personal Information.
-
Enter a name that reflects the Action Plan Template you chose. For example, Collect Personal Information. This name isn't visible to users.
-
Optionally, enter the order that the Action Plan Template will appear in the checklist. 0 is the top position, followed by 1, 2, 3, and so on.
-
If you want to link the Action Plan Template to a page anchor already configured on Intakes, enter a page anchor name.
-
Click Save.
-
-
Repeat step 7 to add additional Action Plan Templates. In our example, we’ll also add Housing Assessment.
Optional: Add Anchors for Intake Checklists
Add page anchors from the Intake Checklist to sections of the Intake page to help users navigate Intake records. For example, if you have an Action Plan Template named Employment Assessment, add a page anchor to Assessments on the Intake page so you can link to it from the Intake Checklist.
-
Click the Intakes tab.
-
Click an Intake name.
-
Click
, then click Edit Page. -
Under Components, enter Page Anchor in the search bar.
-
Drag Page Anchor to the place on the page that you will link to.
-
In the right panel, under Anchor, enter a name for the anchor.
-
Click Save.
-
Click Activate. You have a few options for activating the Intake record page. For more information, see Activate Lightning Experience Record Pages in Salesforce Help.
-
Make the page the org default for the object.
-
Make the page the default object record page for specific Lightning apps.
-
Assign the page to a combination of Lightning apps, record types, and profiles.
-
Assign the page to a form factor, such as a desktop or phone.
-
-
On the activation screen, click the tab for the option you chose, and follow the steps to activate the page.
-
Add a link to the page anchor in an Action Plan Template Group.
Optional: Allow the Intake Checklist to Scroll
Intake Checklists appear on the left sidebar of an Intake record in a fixed position, which means that the Intake Checklist always stays in the same position on the page, even when the page is scrolled. If you want the Intake Checklist to scroll with the rest of the page, or if you want to add other components to the left sidebar, you’ll need to change the page layout.
-
Click the Intakes tab.
-
Click an Intake name.
-
Click
, then click Edit Page. - In the right panel, next to Template, click Change.
-
Select Header and Left Sidebar.
-
Leave the mappings as default, unless you want to make additional changes.
-
Click Done.
Then, make any additional changes to the look of Intake record pages.
Optional: Add Action Plans Related List
Let users add their own Action Plans on Intake records.
First, update the page layout for Intakes.
- Click , then click Setup.
- Click the Object Manager tab.
-
In the list of objects, click Intake.
-
Click Page Layouts.
-
Click Intake Layout.
-
In the palette, click Related Lists.
-
Drag Action Plans to the page layout.
-
Click Save.
-
Click Yes.
Then, add the related list to the Intake page.
-
Click the Intakes tab.
-
Click an Intake name.
-
Click
, then click Edit Page. -
From the Components panel on the left, find Related List - Single and drag it to the page layout.
-
Click Save.
-
Click Activation… You have a few options for activating the Intake record page:
-
Make the page the org default for the object.
-
Make the page the default object record page for specific Lightning apps.
-
Assign the page to a combination of Lightning apps, record types, and profiles.
-
Assign the page to a form factor, such as a desktop or phone.
-
-
On the activation screen, click the tab for the option you chose, and follow the steps to activate the page.
Create Different Intake Processes
There are two ways to create different Intake processes, using Intake Checklists and record types.
Your organization may need different intake processes based on your programs, the people applying for your programs, or your organization's policies. For example, you may need one type of Intake for a job readiness program and another type of Intake for a housing program.
There are two ways to create different Intake processes, using Intake Checklists and record types.
- Use Intake Checklists to provide Case Managers with a list of steps tailored to different Intake processes. For example, create one Intake Checklist for your job readiness program and another Intake Checklist for your housing program. Each Intake Checklist would include tasks customized for their respective program. The housing program Intake Checklist would include housing history, housing status, and housing needs assessment, while the job readiness Intake Checklist would include collecting a resume, job history, and a skills assessment. With Intake Checklists, you don’t need to modify the Intake page layout.
- Use record types when you want to modify the fields or page layout on an Intake based on different processes, or if you have different support or approval processes. For example, if your housing program requires a housing assessment but your emergency assistance program doesn't require any assessments, create a Record Type named Housing and associate it to a page layout with Assessments. Then create a Record Type named Emergency Assistance and associate it to a page layout without Assessments.
- Follow the instructions in Create Record Types in Salesforce Help, and select Intake as the object. If you want to assign different page layouts for different record types, configure those first.
-
You may also want to create Intake Checklists for your different Record Types. You can create an Intake Checklist to match each Record Type, for example, an Intake Checklist for the housing program with steps that match the page layout for the housing program. If you use the same Record Type for multiple programs, you can create different Intake Checklists customized for each program.
-
If your organization uses Inbound Referrals and you want users to create Intakes from Inbound Referrals, also complete the steps in Create Intakes from Inbound Referrals using Record Types.
Create Intakes from Inbound Referrals using Record Types
If your organization uses Inbound Referrals and Intake record types, and you want users to create Intakes from Inbound Referrals, complete these setup steps.
First, update the Referral to Intake flow to include Intake record types. For more information about using the Flow Builder, see Flow Builder in Salesforce Help.
- Click , then click Setup.
-
Enter Flows in the Quick Find box, then click Flows.
-
Click Referral to Intake.
-
Click the Flow connector between Has Intake Id? and Set Intake Defaults, then press Delete on your keyboard to delete it.
-
Drag the Select Intake Record Type element to the left of Set Intake Defaults.
-
Drag the connector node from Has Intake Id? to Select Intake Record Type.
-
Drag the connector node from Select Intake Record Type to Set Intake Defaults.
-
Double-click Set Intake Defaults, then:
-
Click Add Assignment.
-
From Variable, select varIntake.RecordTypeId. Be sure to select the one with the period in it.
-
From Operator, select Equals.
-
From Value, select varIntakeRecordTypeId.
-
Click Done.
-
-
Click Save As.
-
Enter a Flow Label.
-
Note the Flow API Name—you’ll need it in the next section!
-
Click Save. You can ignore warnings that Lightning Runtime is required.
-
-
Click Activate.
Next, create a custom button to replace the Create Intake button on Inbound Referrals.
- Click , then click Setup.
-
Click the Object Manager tab.
-
Click Case.
-
Click Buttons, Links, and Actions.
-
Click New Button or Link.
-
Enter a label for the button. The default label is Create Intake, so use a label that will make sense to users in the context of your Intake process. The Name will be created automatically.
-
Optionally enter a Description.
-
From Display Type, select Detail Page Button.
-
From Behavior, select Display in existing window without sidebar or header.
-
From Content Source, select URL.
- In the large text field, enter the following, but replace ENTER_FLOW_API_NAME with the Flow API Name that you noted in the previous section.
/lightning/cmp/caseman__flowNavigator?c__caseId={!Case.Id}&c__flowApiName=ENTER_FLOW_API_NAME
-
Click Save.
-
Click OK.
Then, replace the Create Intake button on Inbound Referrals with the custom button you created.
- Click , then click Setup.
-
Click the Object Manager tab.
-
Click Case.
-
Click Case Page Layouts.
-
Click Inbound Referral.
-
Under Salesforce Mobile and Lightning Experience Actions, drag Create Intake from the page layout back to the palette.
-
In the palette, click Mobile & Lightning Actions.
-
Drag the custom button you created to the Salesforce Mobile and Lightning Experience Actions section.
-
Click Save.
Configure Intake Stages
Edit, remove, or add new Intake Stages.
Intake Stages are used to track the stage of an Intake. The default Intake Stages are: Not Started, In Progress, Awaiting Client Input, In Review, Not Approved, and Approved. You can edit, remove, or add new Intake Stages.
- Click , then click Setup.
-
Click the Object Manager tab.
-
Click Intake.
-
Click Fields & Relationships.
-
Click Stage.
-
Scroll to Values.
-
To create a new Intake Stage: Click New. If you have custom Record Types, select the Record Types to add the Stage to. Click Save.
-
To edit or delete an Intake Stage: Click Edit or Del next to the Intake Stage.
-
Configure Intake Results
Edit, remove, or add new Intake Results values.
Intake Results are used to track the outcome of an Intake. The default Intake Results are: Approved, Not Approved: Client Declined Services, Not Approved: Referred Elsewhere, Not Approved: Rejected, and Pending. You can edit, remove, or add new Intake Results.
- Click , then click Setup.
-
Click the Object Manager tab.
-
Click Intake.
-
Click Fields & Relationships.
-
Click Result.
-
Scroll to Values.
-
To create a new Intake Result: Click New. If you have custom Record Types, select the Record Types to add the Result to. Click Save.
-
To edit or delete an Intake Result: Click Edit or Del next the Intake Result.
-
Customize Intake Fields on Intakes
Customize Intake-specific fields on the Intake Layout.
You can customize Intake-specific fields on the Intake Layout. For example, customize Intake Results and Stage. To customize Client Information fields that display on the Intake, including Demographic Information, Contact Information, and Emergency Contact Information, see Customize Client Information on Intake Record Pages.
Customize the Look of Intake Record Pages
The Intake Record Page includes commonly-used components like Intake Source, Client Information, Assessments, Documents, Intake Results, and Program Engagements. You can edit the page to move these components around, and within the Client Information component, you can modify the visibility of the client photo, badge, pronouns, watchlist, and Client ID elements.
-
Click the Intakes tab.
-
Click an Intake name.
-
Click
, then click Edit Page. -
Add, remove, or edit sections and components.
-
When you're done, click Save.
-
Click Activate. You have a few options for activating the Intake record page.
- Make the page the org default for the object.
- Make the page the default object record page for specific Lightning apps.
- Assign the page to a combination of Lightning apps, record types, and profiles.
- Assign the page to a form factor, such as a desktop or phone.
- On the activation screen, click the tab for the option you've chosen, and follow the steps to activate the page.
For more information, see Activate Lightning Experience Record Pages in Salesforce Help.
Customize Client Information on Intake Record Pages
Customize Client Information fields that display on Intakes, including Demographic Information, Contact Information, and Emergency Contact Information.
To customize Intake-specific fields on the Intake Layout, for example, to customize Intake Results and Intake Stage, see Customize Intake fields on Intakes.
- Click , then click Setup.
-
Click the Object Manager tab.
-
Click Contact.
-
Click Buttons, Links, and Actions.
-
Click the name of the section you want to update, for example, Demographic Information.
-
Click Edit Layout.
-
Drag fields from the palette to the page layout. You can also hover over an existing field and click the minus button to remove a field.
-
Click Save.
Add Client Information Sections to Intake Record Pages
You can create an entirely new Client Information section on the Intake Record Page, in addition to Demographic Information, Contact Information, and Emergency Contact Information.
- Click , then click Setup.
-
Click the Object Manager tab.
-
Click Contact.
-
Click Buttons, Links, and Actions.
-
Click New Action.
-
From Action Type, select Update a Record.
-
Enter a label for the section you want to create, for example, Housing Information. Then, click Save.
-
Drag the Contact fields from the palette to the section layout, then click Save.
-
Go to the Intakes tab and find an Intake with a Contact associated with it. Click the Intake Name.
-
Click
, then click Edit Page. - In the left panel, find the Related Record component and drag it to where you want it to appear on the Intake Record Page.
-
In the right panel:
-
In Header Label, enter the name you want users to see. For example, Housing Information.
-
Click Edit Lookup Field.
-
For First Lookup, select Contact. For Second Lookup, select Use This Contact. Then click Done.
-
From Update Action, select the name of the section you created in step 7.
-
-
Click Save.
-
Click Activate. You have a few options for activating the Intake record page.
- Make the page the org default for the object.
- Make the page the default object record page for specific Lightning apps.
- Assign the page to a combination of Lightning apps, record types, and profiles.
- Assign the page to a form factor, such as a desktop or phone.
- On the activation screen, click the tab for the option you've chosen, and follow the steps to activate the page.
For more information, see Activate Lightning Experience Record Pages in Salesforce Help.
Edit Referral Related Lists on Intakes
Edit the fields in custom related lists for Inbound Referrals and Outbound Referrals.
Intakes include custom related lists for Inbound Referrals and Outbound Referrals to show inbound and outbound referrals related to an Intake. You can edit the fields in these custom related lists, just be sure that the fields you want to add are already created in Fields & Relationships on the Case object.