
You are here:
Create Services and Service Deliveries
Create services, create bulk service deliveries, schedule services, see recent service sessions, and track attendance.
- Work with Services
Services are provided to your community or individuals as part of your programs. - Create Services
Create Services as part of your Programs. - Create Bulk Service Deliveries
Use Bulk Service Deliveries to create multiple Service Deliveries at once, either by group or by individual. - Schedule Services
Create Service Schedules for one-time or recurring events for groups or individuals, such as classes, mentoring sessions, support groups, or community events. - See Recent Service Sessions
Review the Recent Sessions section on the Home tab to see all completed and pending Service Sessions from the current and previous week. - Track Attendance at Service Sessions
Use Track Attendance on a Service Session to create Service Deliveries for everyone who attended or was absent from that session. Track Attendance is an efficient way to create Service Deliveries for all participants from a single interface.
Work with Services
Services are provided to your community or individuals as part of your programs.
Services are different for each nonprofit but can include activities like delivering meals, teaching a course, or cleaning up a neighborhood. Programs often include multiple services. Every Service has a Unit of Measurement that quantifies the activity. For example, Services can be measured in minutes, a number of items, or another metric that's meaningful to your organization.
A Service Delivery is a record of providing a Service to a recipient. A Service Delivery shows who received the service, how much was delivered, and when it happened. For example, Robin received 30 minutes of financial counseling on April 4th.
Service Schedules are one-time or recurring events for groups or individuals. For example, classes, mentoring sessions, support groups, or community events.
Create Services
Create Services as part of your Programs.
-
Click the Programs tab.
-
Click a Program name.
-
In the Services related list, click New.
-
Enter a Service Name. For example, Meal Delivery.
-
Enter a Description.
-
Enter a Unit of Measurement. For example, Number of Meals.
-
Select a Status.
-
Click Save.
Create Bulk Service Deliveries
Use Bulk Service Deliveries to create multiple Service Deliveries at once, either by group or by individual.
For example, you might enter service deliveries for drop-ins at a workshop, or hygiene kits given to an individual client. When you make entries for a group, the same Service, Delivery Date, and Quantity is applied to the entire group, and you can then edit as needed.
Create a Single Service Delivery
There are times when you may want to create a single Service Delivery. For example, if you want to track a one-time delivery of meals to a household.
-
Click the Service Deliveries tab.
-
Click New.
-
Name the Service Delivery. This name gets replaced by the automated naming configured for your org unless you select Auto-Name Override.
-
Select the related Service.
-
Optionally:
-
Select the Client to whom the service was delivered.
-
Select a related Program Engagement.
-
Select a Service Provider.
-
Enter the Delivery Date.
-
Enter the Quantity of the service that was delivered.
-
Select an Attendance Status, for example, Present.
-
Select a related Household Account. This automatically selects Household Benefit on the Service Delivery record.
-
-
Click Save.
Create Service Deliveries for a Group
Instead of adding participants to a service one by one, you can add them all at once, cutting down on your data entry time.
-
Click the Bulk Service Deliveries tab, then click Create by Group.
-
Search for and select a Service.
-
Enter the Delivery Date.
-
Enter the Quantity of the service that was delivered.
-
Click Next.
-
Click Add for any Contacts that received the service, or click Add All. You can also filter by Program Cohort. The Contacts you see have a Program Engagement—with the Status set to Active or Enrolled—for the Program that the Service rolls up to.
-
If you don't see the participant you're looking for, that means that they aren't yet related to this Program. Click New to create a Program Engagement.
-
Search for and select the Contact. If the Contact doesn't exist in Salesforce yet, click New Contact and enter the Contact name and other details. If the Contact is a client, be sure to select Client.
 Note You can associate a Contact with an existing Account. If you want to create a new Account for the Contact, enter a search term in the Account Name field and press enter. On the results page, click in the Account Name field again and select +New Account. You can always add the account at a later time, too.
 -
Enter Program Engagement details, making sure that the Program Engagement Stare is Enrolled or Active.
-
Save your work. You'll see the Program Engagement you just created in the Selected column.
-
-
Click Next.
- Click + Add Entry to add another Service Delivery for the same, or a different, Client. You can also make edits to any group member.
-
Click Save .
 Important Don't forget to save your work! The Bulk Service Delivery Tool doesn't auto-save.
Create Service Deliveries for an Individual
Enter Service Deliveries for multiple individuals or enter Service Deliveries for the same individual but for different Program Engagements.
-
Click the Bulk Service Deliveries tab, then click Create by Individual.
-
Search for and select a Client.
-
Select a Program Engagement or select +New Program Engagement.
-
Select the related Service. The page saves your data and creates a new Service Delivery record.
-
Enter the Delivery Date.
-
Enter the Quantity of the service that was delivered.
-
Click +Add Entry to add another Service Delivery for the same Client, or for a different Client.
-
Click Save.
Important Don't forget to save your work! The Bulk Service Delivery Tool doesn't auto-save.
Schedule Services
Create Service Schedules for one-time or recurring events for groups or individuals, such as classes, mentoring sessions, support groups, or community events.
Service Schedules can be on a single day or span multiple days. When you create a Service Schedule, Service Session records are created for individual event sessions and Service Participant records are created for people who are scheduled to attend the Service Sessions.
Create Service Schedules from the Service Schedules tab or a Service record on the Services tab.
-
Click the Service Schedules tab.
-
Click New.
-
Enter a Service Schedule Name. For example, the name of the class or event.
-
Search for and select the related Service.
-
If you have service providers, enter their names.
-
If you have a participant capacity, enter it. This is for your internal planning and doesn't limit the number of Service Participants you can add.
-
To set a default quantity to be assigned to all Service Participants, enter a Default Service Quantity. For example, enter 2 for a two-hour Service Session to automatically populate 2 hours for all Service Participants. You can edit the quantity when taking attendance.
-
Enter the First Session Start and First Session End Date and Time, which default to the current date and time rounded to the next 30 minutes. For a recurring schedule, the same start and end times are applied to all Service Sessions, although you can change this information later.
Note The time zone is determined by the time zone specified in the Salesforce user account of the person who creates the event. Changes in this time zone may affect timing for other participants. For example, if Daylight Saving Time moves ahead one hour in your time zone, the session time might change for users in time zones not affected by Daylight Saving Time. - The Service Schedule defaults to a One Time frequency. To make it recurring, click Daily, Weekly, or Monthly.
- For a Weekly schedule: Select the days of the week. The day defaults to the day of the First Session Start Date. To create a schedule for weekdays, select Weekly and then choose from Monday through Friday only.
- For a Monthly schedule: Select one of the recurrence options, which are based on the First Session Start Date. For example, on Day 21, on the Third Monday, or on the Last Day.
- For all recurring schedules: Enter a recurrence, for example, Every 2 Months. Select when the Service Schedule ends, either on a date or after a number of Service Sessions. A Service Schedule can have up to 500 sessions. A record is created for each session in the recurring schedule unless you deselect Create Service Sessions.
-
You'll see the Program Engagement you created in the Selected column.
-
Click Next.
-
Review the Service Sessions and click Next. You can also add or delete sessions, or click Back to make additional edits. If you add or delete sessions before you click Back, those edits will be lost.
-
Select clients to add as Service Participants, then click Add Service Participants. The available participants are clients with Program Engagements on the Program related to the Service you selected. To filter the list, select a Cohort from Filter by Program Cohort.
-
If you don't see the participant you're looking for, that means they aren't yet related to this Program. Click New to create a Program Engagement.
-
Search for and select the Contact. If the Contact doesn't exist in Salesforce yet, click New Contact and enter the Contact name and other details. If the Contact is a client, be sure to select Client.
Note You can associate a Contact with an existing Account. If you want to create a new Account for the Contact, enter a search term in the Account Name field and press enter. On the results page, click in the Account Name field again and select + New Account. Or you can add the Account at a later time. -
Enter the Program Engagement details.
-
Save your work. You'll see the Program Engagement you just created in the Selected column.
-
-
Click Next.
-
Click Save, or Save and New to create another Service Schedule.
This creates the Service Schedule, Service Session, and Service Participant records.
Manage Service Sessions
Edit Service Sessions on a Service Schedule to change details of an individual event, such as the time or service provider. Service Sessions can be assigned the Status of Pending, Complete, or Canceled. You can also add sessions, delete sessions, or delete sessions after a date that you specify.
Editing Service Sessions doesn't change the information on the Service Schedule, nor does editing a Service Schedule change the information on its Service Sessions.
-
Click the Service Schedules tab.
-
Click a Service Schedule name, then:
-
To add a new Service Session, click New in the Service Sessions list. Enter the information and Save your changes. You can also add Service Sessions by clicking Add More Sessions.
- To edit a Service Session, click the Service Session Name in the Service Sessions list. Edit information or track attendance, then Save your changes.
- To delete future Service Sessions, click Delete Future Service Sessions at the top of the Service Schedule. Specify a date after which all Service Sessions will be deleted, then click Delete.
-
To change the status of the session, select Pending, Complete, or Canceled. When attendance is tracked for a Service Session, the status changes to Complete.
-
Manage Service Participants
Edit or add Service Participants—the people who will attend your Service Sessions—on a Service Schedule. Unlike Program Engagements, which show all of a person’s activity in a program (including their Service Participant records), a Service Participant record only shows a person’s activity in one Service Schedule or Service. Service Participants can be assigned the Status of Waitlisted, Enrolled, or Withdrawn.
In addition to adding Service Participants from the Service Schedules tab as described here, you can also add a Service Participant to a Service Schedule from their Contact or Program Engagement record, or from a Service record if you’re not sure which Service Schedule will work for them yet.
-
Click the Service Schedules tab.
-
Click a Service Schedule name, then:
-
To add multiple Service Participants from existing Contacts, click Add More Participants at the top of the Service Schedule. Optionally filter by Program Cohort, select the Contacts to add, click Add Service Participants, then Save your changes.
Note If you can't find the Contact you're looking for, click New to create a Program engagement for that contact so you can add them to the Service Schedule. -
To add a single Service Participant, either new or from an existing Contact, click New in the Service Participants list. Enter the information and Save your changes.
-
To edit a Service Participant, click the Service Participant Name in the Service Participants list. Edit information or add files and Save your changes.
-
See Recent Service Sessions
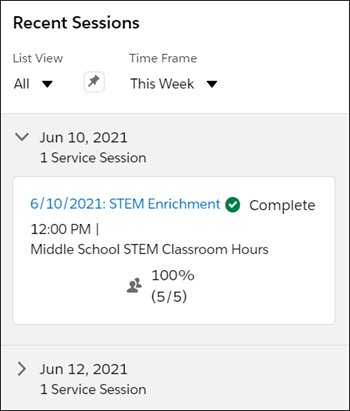
Review the Recent Sessions section on the Home tab to see all completed and pending Service Sessions from the current and previous week.
The Recent Sessions section on the Home tab shows you all completed and pending Service Sessions from the current and previous week. By default, the Service Sessions shown are those from the All list view on the Service Session tab, but you can select other list views.
-
From the App Manager, find and select Case Management.
-
Click the Home tab.
-
Under Recent Sessions, select a List View. Optionally, click the pin to make this your default view.
-
Select a Time Frame, either This Week or Last Week.
-
Expand a date to see sessions on that day. If Attendance has already been tracked for this session, you'll also see the Attendance Summary which shows a percentage of how many participants were Present out of the total participants Present and Absent. For example, if eight participants were marked present and two were marked absent, you would see 80% (8/10).
-
Click the name of a session to go to its record page.
You can also configure additional Recent Sessions list views, for example, to see sessions for Programs you’re involved with, or to see sessions for which you’re the Service Provider.
-
From the App Launcher, find and select Service Sessions.
-
From the List View Controls menu, select New.
-
Give the list view a name. The List API Name populates automatically.
-
Select Only I can see this list view.
-
Click Save.
-
Add filters and save your changes.
Track Attendance at Service Sessions
Use Track Attendance on a Service Session to create Service Deliveries for everyone who attended or was absent from that session. Track Attendance is an efficient way to create Service Deliveries for all participants from a single interface.
When you submit attendance, a Service Delivery is created for all Service Participants, even if you don't enter or change any information. The Service Delivery includes the following details from the Service Schedule and the Service Session: the Client, Service, Service Session, Program Engagement, Service Provider, Delivery Date (the date of the Service Session), Quantity, and Attendance Status.
All Service Participants on a Service Schedule appear in Track Attendance, provided that they have an associated Contact record. Add all Service Participants—with an associated Contact—to the related Service Schedule before tracking attendance.
Navigate to a Service Session from the Recent Sessions component on the Home tab or from the Service Schedules tab.
In Track Attendance:
For those who weren't present, select an Attendance Status such as Unexcused Absence or Excused Absence.
Enter a quantity, which is based on the Unit of Measurement for the Service associated with the Service Schedule. For example, you may see Hours if the related Service is measured in hours. If a Default Service Quantity was specified when the Service Schedule was created, you’ll see that value for all participants, though you can still edit it.
- If you don't want to create a Service Delivery for a participant, click
 Don't track attendance for this participant. For example, if you have a drop-in class and you don't expect everyone to attend each session.
Click Submit. The Status of the Service Session changes to Complete and Service Deliveries are created for each Service Participant.
 Tip If you see an insufficient access error, ask your Salesforce admin to review your sharing settings to make sure you have Contact record access.
Refresh the page to see the new Service Deliveries.
You can make changes to attendance at any time. Just click Update to make your changes, then click Save. The Service Deliveries automatically update.
You can also click Printable View to see, update, and print an Attendance list. For example, you may want to print an attendance list to use at an in-person session.
- Service Delivery Summary Fields
There are a number of Service Delivery summary fields that are automatically calculated and updated based on the Attendance Status and Last Service Date on Service Deliveries. These fields help you see trends and evaluate how clients are engaging with your organization. By tracking Consecutive Absences, for example, you may notice that a client is routinely missing service sessions and know that it’s time to reach out.
Service Delivery Summary Fields
There are a number of Service Delivery summary fields that are automatically calculated and updated based on the Attendance Status and Last Service Date on Service Deliveries. These fields help you see trends and evaluate how clients are engaging with your organization. By tracking Consecutive Absences, for example, you may notice that a client is routinely missing service sessions and know that it’s time to reach out.
By default, you see an Attendance Summary field on the Recent Service Sessions component on the Home page, and on the Program Engagement snapshot on Contact records. An admin can also add other summary fields to Contacts, Program Engagements, Services, and Service Sessions.
-
Attendance Rate: Shows the percentage of participants marked as Present out of all participants marked as either Absent or Present. This field is particularly useful in reports because it is a Percent field that you can sort.
-
Attendance Summary: Shows the attendance rate percentage alongside the number of participants marked as Present out of all participants marked as either Absent or Present. For example, if eight participants were marked Present and two were marked Absent, you would see 80% (8/10).
-
Consecutive Absences: Shows sessions in a row that a client didn’t attend (up to the current date). As soon as the client attends a session, this field resets to zero.
-
Last Service Date: The date of the last Service Delivery that has a Delivery Date and a Quantity greater than 0.
-
Number of Absent Service Deliveries: The number of times a client has been marked Absent for a Service Session.
-
Number of Present Service Deliveries: The number of times a client has been marked Present for a Service Session.