
You are here:
Create and Manage Levels
NPSP Levels give you a way to track a constituent's level of commitment and engagement based on criteria such as total gifts or number of hours volunteered. Create and manage NPSP Levels based on your organization's practices.

Watch the Nonprofit Salesforce How-To Series videos about Levels and Levels With Engagement Plans.
- Overview
NPSP Levels give you a way to track a constituent's level of commitment and engagement based on criteria such as total gifts or number of hours volunteered. - Create a Level Structure
Create Level records to set up a Level structure to track constituent engagement. - Manually Recalculate Levels
Due to the processing involved, Level values are not applied instantly to Contacts, Accounts, and other objects for which Levels have been configured to display. Instead, Level values are updated as part of a nightly batch process.
Overview
NPSP Levels give you a way to track a constituent's level of commitment and engagement based on criteria such as total gifts or number of hours volunteered.
For example, you could define Levels for donors based on the total gifts they've donated over time. A donor who's donated $0 to $100 dollars would be at the Bronze Level, $101 - $1000 at the Silver Level, $1001 - $10,000 at the Gold Level, and so on.
This information is important for helping to recognize milestones and determine how to continue building on and fostering the relationship.
In addition, Levels work with Engagement Plans so nonprofits are able to outline what, who, how, and how often to communicate with the constituent and keep them moving up the ladder of engagement.
Here's an example of a Level structure for Accounts:
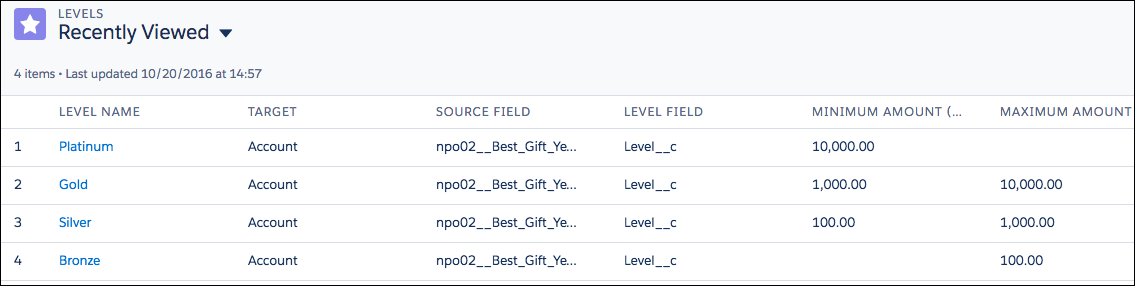
Once the Level structure is in place, a nightly batch job updates the Level values on records for any objects you've configured to display Level data.
For more information on configuring level data to display on Accounts, Contacts, or other objects, see Configure Levels.
Create a Level Structure
Create Level records to set up a Level structure to track constituent engagement.
- Click the Levels tab. (If you don't see it, click
 , then search for Levels.)
 - Click New.
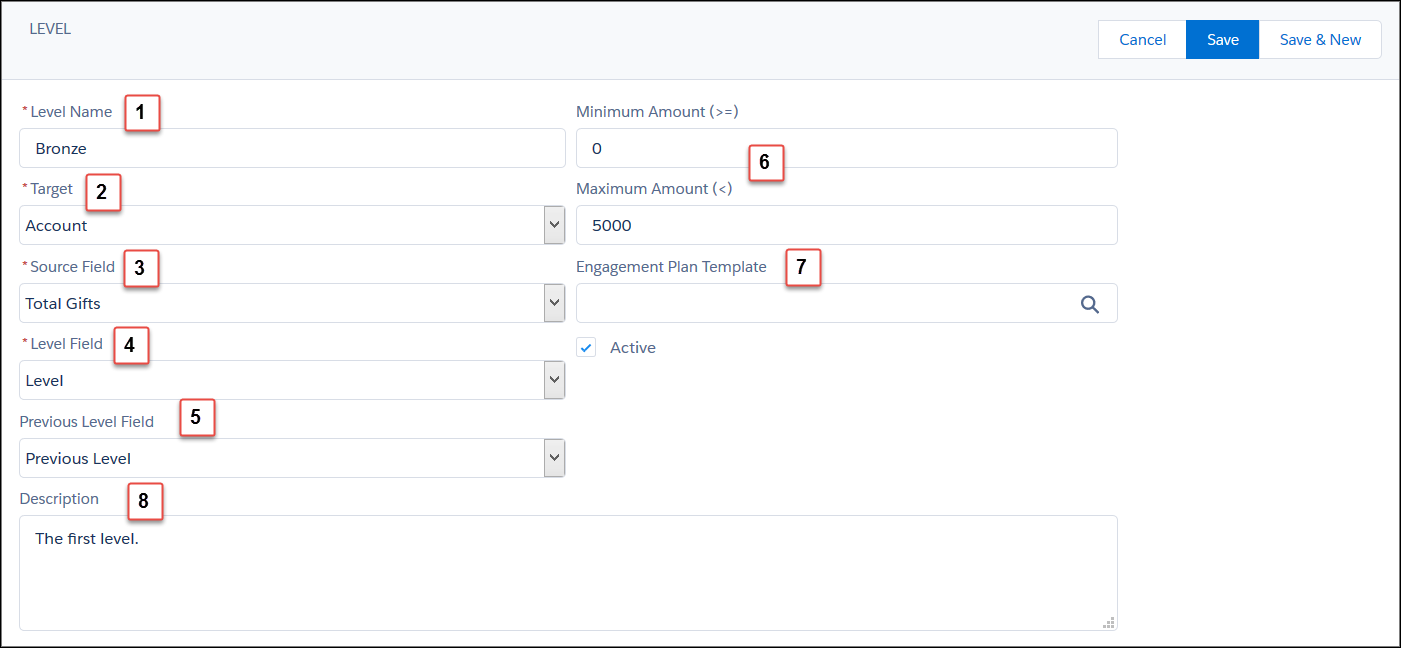
Level Name (1)—The Name that will appear in the Level field on the Account, Contact, or other object you choose. You must type in a name before you can enter any other fields.
Note If you select the Target object before entering a name, you won't see values in any of the other drop-down fields. To fix this issue, clear all of the fields and enter the Level Name. You'll then be able to select a Target object and other values.Target (2)—The object that this Level applies to. Select Account, Contact, or another object for which Level values have been configured to display.
Note By default, the available Target values are Account and Contact. See Configure Levels for information on configuring Levels for other objects.Source Field (3)—The field that will be totaled across all records to determine what Level the Contact or Account is in. For our example, we selected Total Gifts (a currency field), however, you can select any currency or number field.
Level Field (4)—The custom field where you want the Level stored. Check with your administrator if you're not sure what to select here.
Previous Level Field (5)—This field is optional. It stores the previous Level value if the Level changes. Check with your administrator if you're not sure what to select here.
Minimum and Maximum Amount (6)—This defines the range of this Level. You can leave Minimum blank to cover all up to (but not including) the Maximum Amount. Likewise, you can leave Maximum Amount blank to cover all amounts over (and including) the Minimum Amount (such as your very top level). Remember, Amount is not necessarily currency.
Engagement Plan Template (7)—If you want to have a series of Task Activities that are automatically generated when a Contact or Account reach a certain Level, this is where you would select that Engagement Plan. See Create and Manage Engagement Plans for information on configuring and using Engagement Plans.
Make sure Active is checked and give your Level an appropriate Description (8).
- If this is the first Level you're creating, click Save & New. This will automatically clone the existing Level and adjust the Maximum and Minimum values. Just give the new Level a name. You can very quickly set up a series of Levels this way. Click Save on the final Level.
Manually Recalculate Levels
Due to the processing involved, Level values are not applied instantly to Contacts, Accounts, and other objects for which Levels have been configured to display. Instead, Level values are updated as part of a nightly batch process.
To manually update Level values for all records, see Run Level Assignment Batch.
