
You are here:
Set Up Prospect Record Page
Configure the prospect record page for the account (person account) object in Education Cloud.
| Available in: Lightning Experience |
| Available in: Enterprise, Performance, Unlimited, and Developer Editions with Education Cloud |
| User Permissions Needed | |
|---|---|
| To set up the prospect record page: | Education Cloud Full Access AND OmniStudio Admin AND OmniStudio User |
- Create a Record Page
Create a record page for the account object in Lightning App Builder. - Add Components to the Record Page
Add and configure Lightning Web Components to the prospect record page. - Finish Page Setup
Finish configuring the record page, and then activate it.
Create a Record Page
Create a record page for the account object in Lightning App Builder.
See Create and Configure Lightning Experience Record Pages.
After you create the page, move on to the next section to add components.
Add Components to the Record Page
Add and configure Lightning Web Components to the prospect record page.
Add the components as shown in this template.
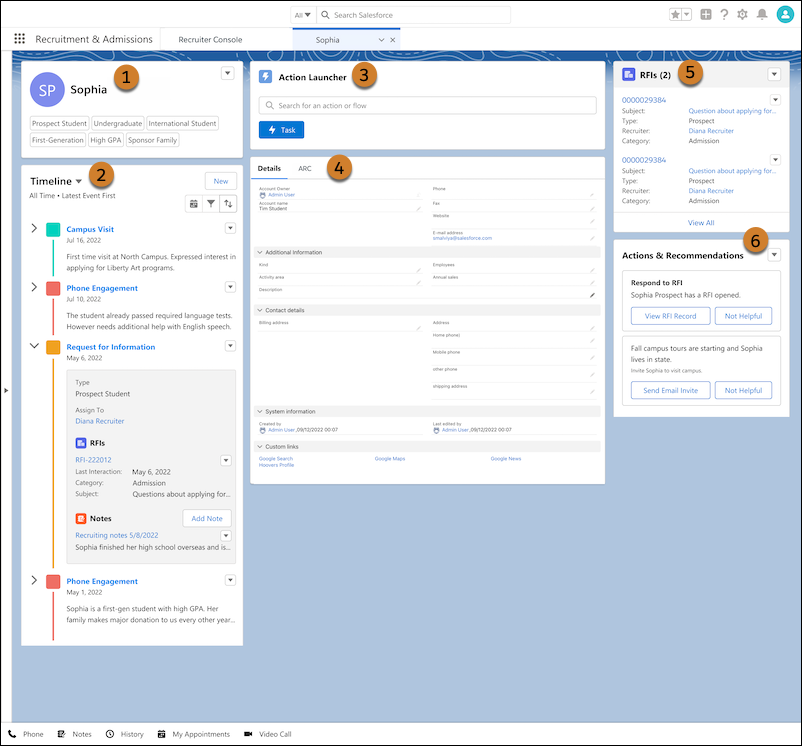

- Drag a Flexcard component (1) to the left and enter the Flexcard Name as EDUAdmissionsPersonProfileCard.
- Drag a Timeline component (2) to the left (below the flexcard). If you are unable to view the component, see Set Up a Timeline.
- Drag the Action Launcher component (3) to the top section. To configure this component, see Action Launcher.
- Drag the Tabs component (4) below the Action Launcher.
In the component properties to the right, create these tabs, and then configure them:
- Details: Add and configure the Record Detail component here. See Record Detail.
- Related: Add and configure the Related Lists component here. See Record Related List.
- Schedule Appointment: Add the Flexcard component here, and configure it with the Flexcard name as EDUSchedulerScheduleAppointment.
- Engage: Add and configure the Actionable List Engagement component here. See Actionable List Engagement.
- Drag a Flexcard component (5) to the right and enter the Flexcard Name as EDUAdmissionsRFIListFromAccountContainer.
- Drag the Actions & Recommendations component (6) to the right (below the flexcard).
After you add the components, save your changes and move on to the next section.
Finish Page Setup
Finish configuring the record page, and then activate it.
Activate the Record Page
After you configure your page, make it visible to your users. See Activate Lightning Experience Record Pages.
Edit Page Layout
To prevent duplication, we recommend that you remove Notes & Attachments from the Related Lists component.
-
From Setup, click Object Manager.
-
Select Account.
-
Click Page Layouts and click Account Layout.
-
Click Related Lists under Account Layout and remove Notes & Attachments.
-
Save your changes.
