
You are here:
Set Up the Admissions Console
Create a home page for the Recruitment & Admissions app that shows admissions data, reviews, and tasks.
| Available in: Lightning Experience |
| Available in: Enterprise, Performance, Unlimited, and Developer Editions with Education Cloud |
| User Permissions Needed | |
|---|---|
| To set up the Admissions Console: | Education Cloud Full Access |
The admissions console is where you can see high-level data insights related to the status of applicants for your institution. You can also see the reviews assigned to you, along with your daily and upcoming tasks and events.
- Create a Home Page
Use Lightning App Builder to create an admissions console home page for the Recruitment & Admissions app. - Add Components to the Home Page
Configure Lightning web components on your Admissions Console home page. - Activate the Home Page
Activate your home page and assign it to the profiles that you want to have access.
Create a Home Page
Use Lightning App Builder to create an admissions console home page for the Recruitment & Admissions app.
- From Setup, in the Quick Find box, enter App Builder, and then select Lightning App Builder.
- Click New.
- Select Home Page and then click Next.
- In the Label field, enter Admissions Console and then click Next.
- Select Standard Home Page and click Finish.
Now that you created your home page, add components to the console.
Add Components to the Home Page
Configure Lightning web components on your Admissions Console home page.
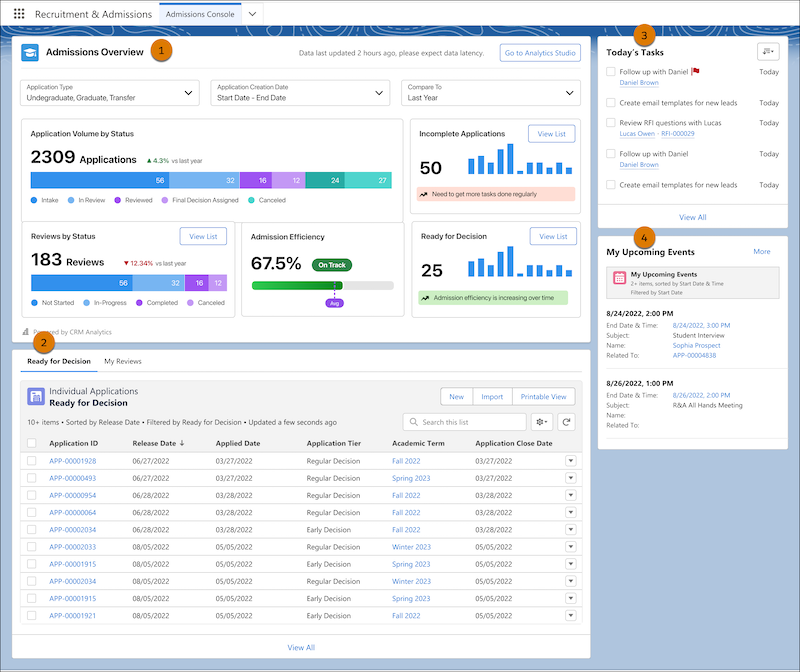
- Drag the Education Analytics Dashboard component to the top section (1).
- In the component properties to the right, for Dashboard, select Recruitment and Admissions Insights. If you can't select a dashboard, make sure that Education Analytics is set up. See Set Up the Education Analytics App.
- Drag the Tabs component to the section just below Education Analytics Dashboard. Change the tab names to Ready for Decision and My Reviews (2).
- Click Ready for Decision, add the List View component, and set these fields (3):
- For the Object field, select Individual Application.
- For the Filter field, select Ready for Decision.
- Click My Reviews, add the List View component, and set these fields (4):
- For the Object field, select Application Review.
- For the Filter field, select My Reviews.
 Tip To keep the home page within the window and to avoid scrolling, we recommend that you set the number of records to be shown in the Ready for Decision and My Reviews List View components to a value between 10–15.
- Drag the Today's Tasks component to the right column (5).
- Drag the List View component to the right column, just below Today's Tasks, and set these items (6):
- For the Object field, select Event.
- For the Filter field, select My Upcoming Events.
- For the Number of Records to Display field, enter 2.
After you add the components, save your changes and move on to the next section.
Activate the Home Page
Activate your home page and assign it to the profiles that you want to have access.
- Click Activate.
- Select App and Profile.
- Click Assign to Apps and Profiles.
- For Lightning Apps, select Recruitment & Admissions and click Next.
- For Profiles, select the profiles that you want to have access to the home page and click Next.