
You are here:
Verify Applications
When you verify an application, you look at the data and documents that the applicant has provided and check them for completeness.
| User Permissions Needed | |
|---|---|
| To verify applications: | Education Cloud Full Access OR Education Cloud Limited Access |
| Available in: Lightning Experience |
| Available in: Enterprise, Performance, Unlimited, and Developer Editions with Education Cloud |
The items that an applicant submits depend on your institution's requirements and can include transcripts, letters of recommendation, and more. Use the Admissions Console or Reviewer Console as your starting point, then open individual application records.
- Get Oriented with the Verification Page
The verification page neatly organizes application materials for your review. - Accept, Reject, or Update a Requirement
Review a required item for an individual application, set the item's approval status, and manage files and records attached to the item. - Add Documents to an Application
If an applicant sends you a last-minute letter of recommendation, or another essay that they want to include with their materials, you can add the document to their individual application record. - Add Examination Records to an Application
If you get test results from an applicant, you can add them to the individual application record.
Get Oriented with the Verification Page
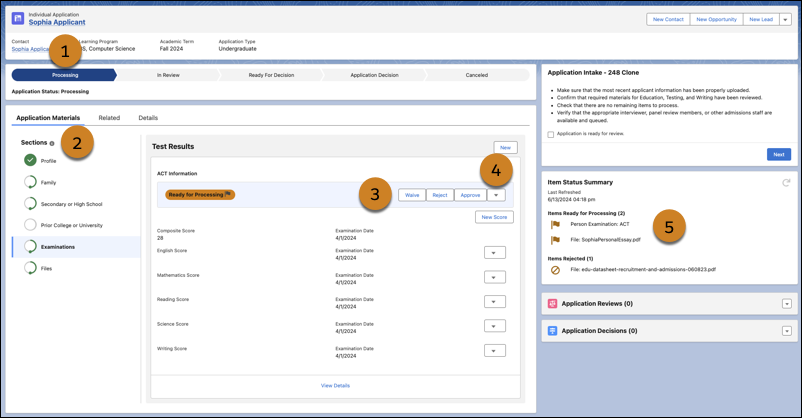
The verification page neatly organizes application materials for your review.
-
See the status of the application review process (1).
-
See the overall progress in the navigation region. Each item shows a status icon. Click a requirement to jump to it in the main viewer (2).
-
Set the approval status of an item (3).
-
Edit the approval status of an item (4).
-
See the number of records that still need verification (5).
Accept, Reject, or Update a Requirement
Review a required item for an individual application, set the item's approval status, and manage files and records attached to the item.
-
Click a requirement in the navigation region to verify the data and documents that the applicant has provided. Items for you to verify have the label Ready for Processing along with action buttons to mark their approval status.
-
Mark the approval status for documents or data in the individual application record. To open a document in a preview window, click the name of a checklist item. Some details, such as test scores, don't open in a separate preview window. You verify the information in the application record.
-
To edit a record, click
 and select Edit. Make and save your changes.
 -
After you review the item, click Waive, Reject, or Approve. Clicking Approve or Reject updates the status field for the document's Document Checklist Item record, which stores the attachment. To change the status, click Edit Status, select a new status, and save your changes.
-
To change the status of a requirement, click Edit Status, select a new status, and save your changes.
-
To delete a file or record from an application:
-
Next to the item, click
and select Delete. -
Click Delete.
-
Add Documents to an Application
If an applicant sends you a last-minute letter of recommendation, or another essay that they want to include with their materials, you can add the document to their individual application record.
-
From the app, open an individual application record.
-
Click Files and then click New.
-
Enter all relevant information about the new item.
-
Click Upload Files, select the file that you want to upload, and then click Done.
 Note Closing the window without deleting the uploaded file removes the file from the individual application record, but not from Salesforce.
 -
Save your changes.
View the new document on the application review page and the list of Document Checklist Items.
Add Examination Records to an Application
If you get test results from an applicant, you can add them to the individual application record.
-
From the Recruitment & Admissions app, open an individual application record.
-
Click Test Results and then click New.
-
Enter the relevant information for the test result and save your changes.
-
To add subject-specific scores to a test record, click New Score on the record, enter the relevant information, and save your changes.