
You are here:
Marketing Cloud Engagement for Nonprofits - NPSP
Use Marketing Cloud Engagement for Industries to its fullest potential and synchronize your Nonprofit Success Pack data with Marketing Cloud.
- Create an NPSP Synchronized Data Source
Create synchronized data sources to bring key stakeholder information from Salesforce to Marketing Cloud. - Populate NPSP Data Extensions with Automation Studio
Use Automation Studio to automatically refresh your Data Extension when your Data Source receives new data from Salesforce - Create an Elevate Email with a Donate Now Button
Add a Donate Now button to emails to take donors to your Giving page. - Marketing Cloud Engagement for Nonprofits License Information
Learn about the licensing differences between Marketing Cloud Engagement for Industries and Marketing Cloud Pro Edition.
Create an NPSP Synchronized Data Source
Create synchronized data sources to bring key stakeholder information from Salesforce to Marketing Cloud.
A synchronized data source automatically adds stakeholder information that you define to Marketing Cloud. Create a synchronized data source that adds new and updated contact data from Salesforce to Marketing Cloud so you'll always have the most up-to-date information available for your marketing efforts.
To create a synchronized data source for contacts:
- Log into Marketing Cloud.
- Under Audience Builder, click Contact Builder.
- Click Data Sources.
- Click Synchronized.
- Click the available data source tile.
- Click + Set Up New Object.
- Locate the Contact tile and click the Synchronize button for that tile.
- Select the fields to synchronize. Salesforce for Nonprofits users select the following fields:
- First Name
- Last Name
- Mailing Street
- Mailing City
- Mailing State/Province
- Mailing Zip/Postal Code
- npo02__FirstCloseDate__c
- npo02__LargestAmount__c
- npo02__LastOppAmount__c
- npo02__LastCloseDate__c
 Note Some required fields are already selected for you such as Id, Email, and HasOptedOutOfEmail.
 - npo02__NumberOfClosedOpps__c
- npo02__TotalOppAmount__c
- Click Next.
- In Records Collection, choose how to filter the synchronized data. Consider Marketing Cloud utilization limits and filter your data accordingly. For information about those limits or increasing them, contact your account executive. Alternatively, manage your subscriptions.
- In Poll Schedule, choose how often you wish to synchronize data. We recommend 15 minutes.
- Click Save & Synchronize.
- Salesforce for Nonprofits users should repeat steps 6-12 for the Recurring Donation object. Synchronize the Next Donation Date field npe03__Next_Payment_Date__c.
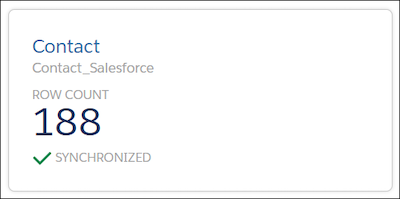
The synchronization process may take several minutes to complete depending on the number of records. The synchronization process is successful when you see a tile for each of the entities you synchronized, including a row count and a synchronized status. Here's an example of the tile for the synchronized Contact entity.
Populate NPSP Data Extensions with Automation Studio
Use Automation Studio to automatically refresh your Data Extension when your Data Source receives new data from Salesforce
Use Automation Studio to automatically refresh your Data Extension when your Data Source receives new data from Salesforce. We created some automations for you, but you need to run them to retrieve the data. The Salesforce for Nonprofits automations for are:
-
Recurring Donor Automation
-
General Thank You Automation
-
Urgent Appeal Automation
-
General Donor Newsletter Automation
-
Soon To Lapse Automation
-
Welcome Series Automation
-
Log into Marketing Cloud.
-
Under Journey Builder, click Automation Studio.
-
Go to My Automations.
-
Open an automation and click Run.
-
In the next window, click Run Now.
-
Repeat until you have run all the automations.
Create an Elevate Email with a Donate Now Button
Add a Donate Now button to emails to take donors to your Giving page.
Salesforce for Nonprofits users can combine the powers of Marketing Cloud Engagement for Industries and Elevate to boost your donations. Create emails that include a Donate Now button that takes donors to your Giving Page.
-
Open the Elevate email template.
-
In the body of the email, find the Donate Now button.
-
Modify the following URL sections:
-
Replace your-subdomain with the correct subdomain name.
-
Replace giving-page-name? with the name of your Giving page.
-
-
Save your work.
Marketing Cloud Engagement for Nonprofits License Information
Learn about the licensing differences between Marketing Cloud Engagement for Industries and Marketing Cloud Pro Edition.
Salesforce for Nonprofits packages Marketing Cloud Engagement for Industries (MCNGO) with a balance of price and features. Our goal is to provide Marketing Cloud to as many nonprofits as possible. The MCNGO edition closely matches the features and functionality in the Marketing Cloud Pro edition, with the following exceptions:
| Item | Pro Edition Total | MCNGO Edition Total |
|---|---|---|
| API Calls | 2,000,000 | 100,000 |
| Automations | 15,000 | 10,000 |
| Contacts | 15,000 | 10,000 |
| Data Storage | 15 | 5 |
| Super Messages | 2,500,000 | 750,000 |
| Users | 15 | 5 |
Learn more about Marketing Cloud editions in How to Select the Right Marketing Cloud Edition.
SEE ALSO