You are here:
Add Experience Cloud Components to Your Donor Portal
If you have an Experience Cloud site, you can add components built for the Nonprofit Success Pack right to your pages.
New to Experience Cloud? Check out this documentation and this trail for information and guidance.

Set Up Permissions for Donor Portal Components
Give your donor portal users access to the Donor Portal components by setting them up with the Partner license and necessary permissions. To grant the permissions, edit or create a profile, adjust a couple things in your Experience Cloud site, and then edit or create a Sharing Set. Let’s go through it step by step.
After installing the NPSP package, customize an existing profile or create a new one for your donor portal users.
-
In Setup, enter Profiles in the Quick Find box, then click Profiles.
-
Click the name of an existing donor portal profile to edit it. Alternatively, click New Profile, choose a profile to clone, and save.
-
Click Apex Class Access, then click Edit, enable these Apex classes, and save:
-
npsp.DonationHistoryController
-
npsp.DonationHistorySelector
-
npsp.DonationHistoryService
-
npsp.PS_GatewayManagement
-
npsp.RD2_ETableController
-
npsp.RD2_ElevateInformation_CTRL
-
npsp.RD2_EntryFormController
-
npsp.RD2_QueryService
-
npsp.UTIL_AuraEnabledCommon
-
-
In the profile, switch to Object Settings, and assign Read access to the following objects and fields:
Objects Fields Account Primary Contact Campaign N/A Contacts Email, Total Gifts, Total Gifts Last Year, Total Gifts This Year Opportunities Amount, Primary Contact Payments Paid, Payment Method Recurring Donations ACH Last 4, Card Expiration Month, Card Expiration Year, Card Last 4, Number of Paid Installments, Last Donation Date, Next Donation Date, Elevate Recurring Id -
Assign Read and Edit access to the following object and fields:
Object Field Recurring Donations Account, Amount, Campaign, Status Reason, Contact, Date Established, Day of Month, Effective Date, Installment Frequency, Installment Period, Number of Planned Installments, Payment Method, Recurring Type, Status
Next, adjust your Experience Cloud site settings.
-
In Setup, enter Digital Experiences in the Quick Find box, then click All Sites.
-
Click Workspaces next to your site name.
-
Click Administration.
-
Click Members.
-
In the Select Profiles section of the Members tab, select the profile you use for donor portal users.
-
Save your work.
Last, edit an existing or create a new sharing set.
-
In Setup, enter Digital Experiences in the Quick Find box, then click Settings.
-
Under Sharing Sets, click Edit next to an existing sharing set or New.
-
If you create a new sharing set, name it. For example, name it something like Donor Portal Sharing Set.
-
Under Select Profiles, select the profile you use for donor portal users.
-
Under Select Objects, select the Opportunity object.
-
To add the Donor History and Giving Summary components, select the Opportunity object.
-
To add the Recurring Donation object, select Recurring Donation.
-
-
Under Configure Access, add the following settings to your Sharing Set:
-
Select npsp__Primary_contact__c as the Target Opportunity.
-
Opportunity object:
-
Select Contact as the User.
-
Select Primary_contact_c as the Target Opportunity.
-
Select Read Only as the access level.
-
Save your work.
-
-
Recurring Donations object:
-
Select Contact as the User.
-
Select npe3__Contact__c as the Target Recurring Donation.
-
Select Read/Write as the access level.
-
Save your work.
-
-
And you’re done! Nice job. To check your work, log in as a donor portal user and view the components you added.
Donation History Component
The Donation History component gives your donors one place to view details about when and how much they’ve donated, saving them the effort of having to dig through emails for receipts. 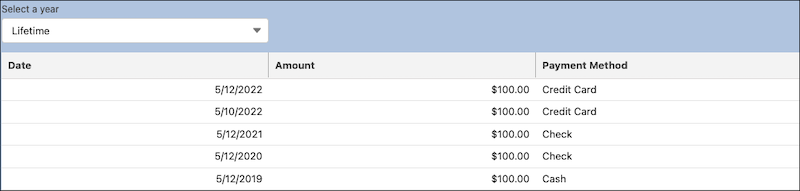
Giving Summary Component
The Giving Summary component lets donors see how much they’ve donated over time. The component includes three totals: lifetime donations, this year’s donations, and last year’s donations. 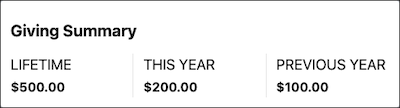
Recurring Donation Component
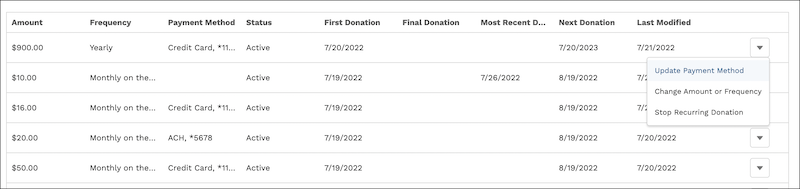
Allow donors to view and update their Recurring Donations. Donors can change the amount or frequency, stop their Recurring Donations, and if the donation was initiated through Elevate, update their payment method.
If you're using Elevate, customize the component table headers to show all Recurring Donations or limit it to only show Recurring Donations connected or not connected to Elevate.