
You are here:
Configure Batch Data Import
Find out more about configuring batch data import.
- About Batch Data Import
The NPSP Data Import tool allows you to import your data and translate it into Salesforce objects. The NPSP Batch Data Import feature is an advanced import feature that allows you to import data in batches. You can have different groups of data import records that you want to process differently, using their own set of unique configuration options. - Set Permissions For Data Import Objects and Pages
There are two Data Import objects and one Data Import page to set security for: the NPSP Data Import Batch and NPSP Data Import objects, and the BDI_BatchOverride Visualforce page. Enable the NPSP Data Import Batches object and field for any profiles that need to create batches. - Edit Page Layouts
Follow these steps to edit page layouts. - Set Button Overrides
On the NPSP Data Import Batch object, set the Clone, Edit, and New buttons to point to the BDI_BatchOverride page. - Verify Scheduled Jobs
Follow these steps to verify scheduled jobs.
About Batch Data Import
The NPSP Data Import tool allows you to import your data and translate it into Salesforce objects. The NPSP Batch Data Import feature is an advanced import feature that allows you to import data in batches. You can have different groups of data import records that you want to process differently, using their own set of unique configuration options.
If you set up and activated a batch number format, all Opportunities and Payments associated with this batch will include the batch number in the Batch Number field. Learn more in Configure Batch Numbers for Donations.
Set Permissions For Data Import Objects and Pages
There are two Data Import objects and one Data Import page to set security for: the NPSP Data Import Batch and NPSP Data Import objects, and the BDI_BatchOverride Visualforce page. Enable the NPSP Data Import Batches object and field for any profiles that need to create batches.
- Click
 , then click Setup.
 - From Setup, enter Profiles in the Quick Find box, then select Profiles.
- Click the name of the Profile you want to set field-level Security for. (For example, click System Administrator. Do not click the Edit button to the left of the profile name.)
-
For the NPSP Data Import object:
- In the Tab Settings section, set the NPSP Data Imports tab to Default On.
- In the Object Permissions section, select Read, Create, Edit, and Delete. This gives all users with this profile full access to use NPSP Data Import. Depending on the profile, you may want to grant different access.
- In the Field Level Security section, select the Edit Access and Read Access checkboxes for all fields.
- For the NPSP Data
Import Batch object:
- In the Custom Tab Settings section, set the NPSP Data Import Batch tab setting to Default On to include it in the list of tabs, or Default Off to make it accessible in App Launcher.
- In the Object Permissions section, select Read, Create, Edit, and Delete. This gives all users with this profile full access to use Batch Data Import. Depending on the profile, you may want to grant different access.
- In the Field Level Security section, click View next to NPSP Data Import Batch and select Read Access and Edit Access for all fields.
- Click Back to Profile.
-
If you have non-System Admin users who import data, ensure that they have access to the
BDI_BatchOverrideVisualforce page.- In the Enabled Visualforce Pages related list, click Edit.
-
Add
BDI_BatchOverrideto the Enabled Visualforce Pages list. - Click Save.
Alternatively, you could grant Visualforce page access to multiple profiles at a time. Simply search for and select Visualforce Pages in Setup, then click Security next to the page name.
Edit Page Layouts
Follow these steps to edit page layouts.
- From Setup, click the Object Manager tab.
- In the list of objects, click NPSP Data Import Batch.
- Click Page Layouts.
- Click NPSP Data Import Batch Layout.
- Drag all available fields onto the layout.
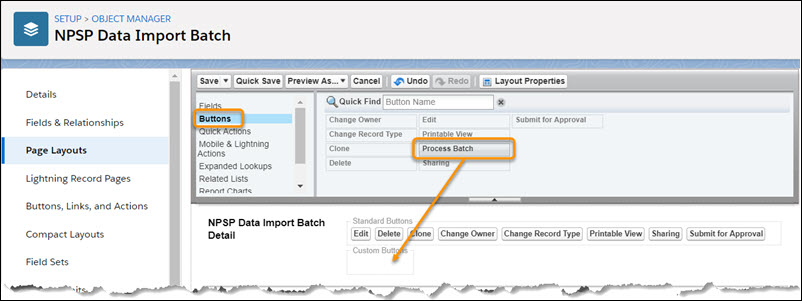
- In the palette, click Buttons.
- Drag the Process Batch button to the Custom Buttons section on the layout.
- Click Save.
Now, edit the NPSP Data Import page layout to include the NPSP Data Import Batch field.
- Click the Object Manager tab.
- In the list of objects, click NPSP Data Import.
- Click Page Layouts.
- Click NPSP Data Import Layout.
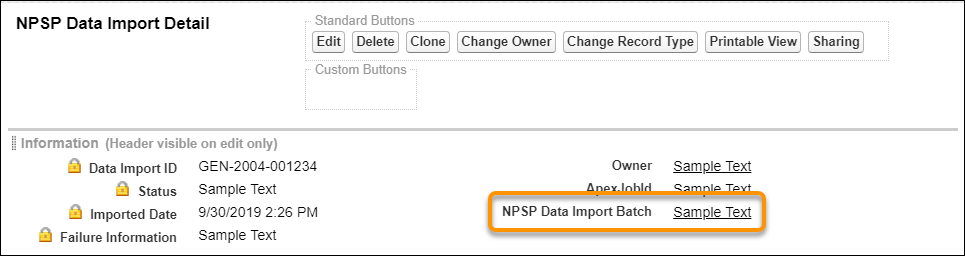
- Drag the NPSP Data Import Batch field onto the page layout.
- Click Save.
For more information on adding fields and buttons to page layouts, see Configure Page Layouts.
Set Button Overrides
On the NPSP Data Import Batch object, set the Clone, Edit, and New buttons to point to the BDI_BatchOverride page.
- From Setup, click the Object Manager tab.
- In the list of objects, click NPSP Data Import Batch.
- Click Buttons, Links, and Actions.
- In the Clone row, click
 , then click Edit.
 - Choose BDI_BatchOverride Visualforce page.
- Click Save.
- Repeat this process for the Edit and New buttons.
Verify Scheduled Jobs
Follow these steps to verify scheduled jobs.
- From Setup, enter Scheduled Jobs in the Quick Find box, then click Scheduled Jobs.
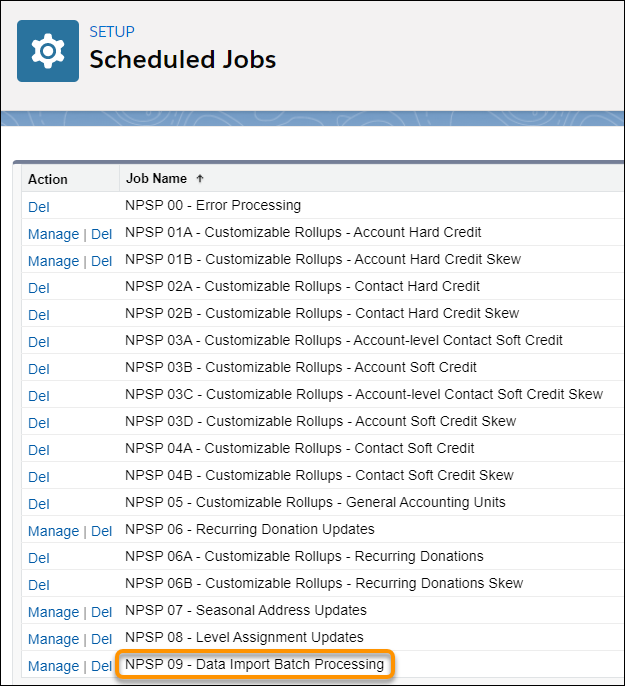
- Verify that you see NPSP 09 - Data Import Batch Processing in the list of Scheduled Jobs.
- If you don't see the scheduled job, check NPSP Settings.
-
Click the NPSP Settings tab. If you don't see the tab, find it in the App Launcher (
 ).
). - Click (doing this recreates all the default jobs), and make sure Don't Auto Schedule Default NPSP Jobs is not selected.
For more information on Scheduled Jobs, see Edit or Reschedule NPSP Scheduled Jobs.
