
You are here:
Configure In-Kind Gifts
Find out more about configuring in-kind gifts.
- About In-Kind Gifts
The NPSP In-Kind Gifts feature lets you track non-monetary gifts to your organization such as computers, food, clothing, equipment or professional expertise. Keep In-Kind Gifts separate from cash donations for accurate reporting. - Create In-Kind Opportunity Stages
Create Opportunity stages for In-Kind Gifts. (If you already have these stages configured, you don't need to recreate them.) - Create an In-Kind Sales Process
Follow the steps to create a sales process for in-kind gifts. - Create In-Kind Record Type
Follow the steps to create a record type for in-kind gifts. - Choose Picklist Values for In-Kind Record Type
Follow the steps to add picklist values to the in-kind record type. - Set Field-Level Security
Follow the steps to set access to Opportunity fields. - Assign Page Layout to Record Type
If you selected the In-Kind Gift Layout when you created the In-Kind Record Type, you can skip this step. Otherwise, assign the In-Kind Gift page layout to the In-Kind Gift Record Type. - Add a Lightning Action to Contacts
Add a Lightning Action to Contacts to easily create a new In-Kind Gift from a Contact record. - Configure In-Kind Gift Settings
There are in-kind gift settings related to payments and rollups that you may want to configure. - (Optional) Activate In-Kind Workflow Rule
NPSP provides a Fair Market Value field on the In-Kind Gift Layout. You may want the Fair Market Value amount reflected as the "Amount" of the In-Kind Gift. This is useful if you want to see the Fair Market Value of an In-Kind Gift included in the automatic rollup statistics on the Contact or Account.
About In-Kind Gifts
The NPSP In-Kind Gifts feature lets you track non-monetary gifts to your organization such as computers, food, clothing, equipment or professional expertise. Keep In-Kind Gifts separate from cash donations for accurate reporting.
NPSP In-Kind Gifts uses the following object:
-
Opportunity (standard object): Use an In-Kind Gift record type on Opportunity, and In-Kind sales process, to track In-Kind Gifts.
Create In-Kind Opportunity Stages
Create Opportunity stages for In-Kind Gifts. (If you already have these stages configured, you don't need to recreate them.)
| Stage Name | API Name | Type | Probability | Forecast Category |
|---|---|---|---|---|
| In-Kind Not Yet Received | In-Kind Not Yet Received | Open | 50% | Omitted |
| In-Kind Received | In-Kind Received | Closed/Won | 100% | Omitted |
| Prospecting | Prospecting | Open | 10% | Pipeline |
| Withdrawn | Withdrawn | Closed/Lost | 0% | Omitted |
To add Opportunity stages:
- Click
 , then click Setup.
 - Click the Object Manager tab.
- In the list of objects, click Opportunity.
- Click Fields & Relationships.
- Click the Stage field.
- In the Opportunity Stages Picklist Values related list, click New.
- Enter the Stage Name, API Name, Type, Probability, a Forecast Category as shown in the table.
- Click Save.
For more information on how to create Opportunity stages, see Understand and Customize Sales Processes and Paths.
Create an In-Kind Sales Process
Follow the steps to create a sales process for in-kind gifts.
- From Setup, enter Sales Processes in the Quick Find box, then click Sales Processes.
- Click New to create an In-Kind Gift sales process.
- Sales Process Name: In-Kind Gift
- Selected Values: Prospecting, In-Kind Not Yet Received, In-Kind Received, Withdrawn
- Click Save.

For more information on configuring Sales Processes, see Understand and Customize Sales Processes and Paths.
Create In-Kind Record Type
Follow the steps to create a record type for in-kind gifts.
- From Setup, click the Object Manager tab.
- In the list of objects, click Opportunity.
- Click Record Types.
- If the In-Kind Gift record type does not already exist, create one with the following details:
- Existing Record Type: Master
- Record Type Label: In-Kind Gift
- Sales Process: In-Kind Gift
- Description: Use this record type to track In-Kind Gifts such as office supplies, etc.
- Active: selected
- Next to each profile that can select this Record Type, check the Enable for Profile box.
- Click Next.
- Select Apply one layout to all profiles, then select the In-Kind Gift Layout.
- Click Save.
For more information on creating record types, see Create Record Types.
Choose Picklist Values for In-Kind Record Type
Follow the steps to add picklist values to the in-kind record type.
Once you’ve created the new record type, verify that the In-Kind Type picklist field has the two values, Goods and Services, selected for the In-Kind record type. Also verify that the Matching Gift Status field has Potential, Received, and Submitted selected.
To edit picklists for record types:
- From Setup, click the Object Manager tab.
- In the list of objects, click Opportunity.
- Click Record Types.
- Click In-Kind Gift.
- In the Picklists Available for Editing section, click Edit next to In-Kind Type.
- Make sure that Goods and Services are listed as Selected Values.
- Click Save.
- Click Edit next to Matching Gift Status.
- Make sure that Potential, Received, and Submitted are listed as Selected Values.
- Click Save.
Set Field-Level Security
Follow the steps to set access to Opportunity fields.
Check that the relevant profiles and permission sets have access to the following Opportunity fields:
- Fair Market Value
- In-Kind Description
- In-Kind Donor Declared Value
- In-Kind Type
To set field access:
- From Setup, enter Profiles in the Quick Find box, then click Profiles.
- Click the name of the Profile you want to set field-level security for.
- In the Field-Level Security section, click View next to Opportunity.
- Make sure the profile has the correct level of access to each of the In-Kind Gift fields. If not, click Edit and select the checkbox, then click Save.
For more information on setting field-level security, see Verify Access for a Particular Field.
Assign Page Layout to Record Type
If you selected the In-Kind Gift Layout when you created the In-Kind Record Type, you can skip this step. Otherwise, assign the In-Kind Gift page layout to the In-Kind Gift Record Type.
- From Setup, click the Object Manager tab.
- In the list of objects, click Opportunity.
- Click Record Types.
- Click Page Layout Assignment.
- Click Edit Assignment.
- In the In-Kind Gift column, make sure the In-Kind Gift Layout is selected for the appropriate profiles.
- Click Save.
Add a Lightning Action to Contacts
Add a Lightning Action to Contacts to easily create a new In-Kind Gift from a Contact record.
- From Setup, click the Object Manager tab.
- In the list of objects, click Contact.
- Click Buttons, Links, and Actions.
- Click New Action.
- Fill in the following details:
- Action Type: Create a Record
- Target Object: Opportunity
- Relationship Field: Primary Contact
- Record Type: In-Kind Gift
- Standard Label Type: New [Record Type]
- Name: NewInKind
- Deselect Create Feed Item (unless you want a Chatter post each time a user creates an In-Kind Gift with this Action).
- Click Save.
- In the Page Layout editor, add the following fields to the New In-Kind Gift quick action layout:
- Opportunity Name
- Close Date
- Stage
- In-Kind Type
- In-Kind Description
- Optionally, remove the Next Step field
- Click Save. Next, set default values for the Close Date, Opportunity Name, and Stage fields.
- In the Predefined Field Values list, click New, and enter these values:
- Field: Close Date
- Value: Today()
- Click Save.
- In the Predefined Field Values list, click New, and enter these values:
- Field: Opportunity Name
- Value: Contact.FirstName & " " & Contact.LastName & " In-Kind " & TEXT(MONTH(TODAY())) & "/" & TEXT(DAY(TODAY())) & "/" & TEXT(YEAR(TODAY()))
- Click Save.
- In the Predefined Field Values list, click New, and enter these values:
- Field: Stage
- Specific Value: In-Kind Received
- Click Save.
Finally, add the Lightning Action to the Contact Lightning page layout:
- From Setup, click the Object Manager tab.
- In the list of objects, click Contact.
- Click Page Layouts.
- Click the Contact Lightning Layout.
- In the palette, click Mobile & Lightning Actions.
- Drag the New In-Kind Gift Lightning Action to the Salesforce Mobile and Lightning Experience Actions section of the page layout.
- Click Save.
Configure In-Kind Gift Settings
There are in-kind gift settings related to payments and rollups that you may want to configure.
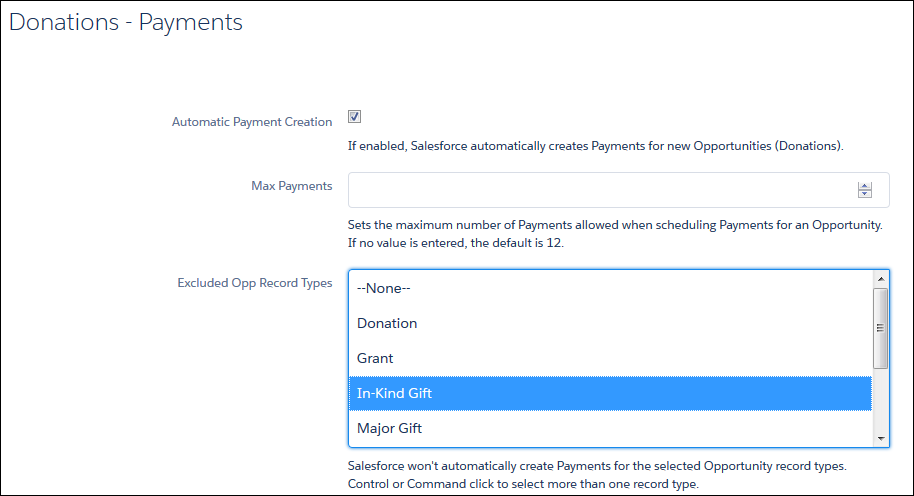
Disable Payments for In-Kind Gifts
Since there is no payment of actual funds for an In-Kind Gift, we recommend enabling a setting that prevents the automatic creation of Payment records for In-Kind Gifts. If you started with an NPSP Trial after August 25, 2020, this is already done for you.
In-Kind Gifts in Account and Contact Rollups
If needed, you can set up your rollups to exclude In-Kind Gifts.
If you're using Customizable Rollups and don't want In-Kind giving reflected in rollups:
-
Click the NPSP Settings tab. If you don't see the tab, find it in the App Launcher (
 ).
). - Click .
- Click Configure Customizable Rollups.
- Click View Filter Groups.
- Either click New Filter Group or click
 then click Edit to modify an existing filter group.
 - Add a filter rule with these values:
- Object = Opportunity
- Field = Record Type ID
- Operator = Not In List
- Value = In-Kind Gift
- Click Save, then Save the filter group. You can now apply this filter group to Customizable Rollups that shouldn't include In-Kind Gift Opportunities.
If you're not using Customizable Rollups and don't want In-Kind giving reflected in Contact and Account rollups:
-
Click the NPSP Settings tab. If you don't see the tab, find it in the App Launcher (
). - Click .
- Click Edit.
- Select In-Kind Gift in the Opp RecTypes Excluded for Account Rollup and/or Opp RecTypes Excluded for Contact Rollup sections.
- Click Save.
If you do want In-Kind giving reflected in Contact and Account rollups, check the out-of-box filter groups that mention record types and make sure that they don't include filter rules that exclude In-Kind Gifts. Additionally, make sure the Amount and Fair Market Value fields are populated on In-Kind opportunities.
Activate the Opportunity Copy FMV to Amount workflow rule to automatically copy the Fair Market Value to the Amount field.
(Optional) Activate In-Kind Workflow Rule
NPSP provides a Fair Market Value field on the In-Kind Gift Layout. You may want the Fair Market Value amount reflected as the "Amount" of the In-Kind Gift. This is useful if you want to see the Fair Market Value of an In-Kind Gift included in the automatic rollup statistics on the Contact or Account.
You can activate a workflow rule that automatically copies the Fair Market Value to the Amount field if the Amount field is left blank.
To activate this workflow rule:
- From Setup, enter Workflow Rules in the Quick Find box, then click Workflow Rules.
- Click Activate next to the Opportunity Copy FMV to Amount workflow rule.