
You are here:
Configure NPSP Data Importer Options
Customize and configure your NPSP Data Importer options for batch size and duplicate record matching.
- Access Global Matching Settings
Here's how to access the global batch size and matching settings for the NPSP Data Importer. - Batch Process Size
This setting determines the number of records processed in each batch. The default is 50 records. For example, if your import file has 200 records, NPSP Data Importer processes four batches of 50 records each. - Contact & Account Matching Options
Before you begin matching, make sure that you have a minimum of read access to the records and field level access to the fields referenced in the matching and duplicate rules. - Donation Matching Options
You should only use donation matching to update an open Opportunity when a Payment comes in. - Important Information about Unique IDs
If Contacts or Accounts in your org have unique, external IDs that reference the same Contacts or Accounts in another database, you can reference these external IDs when using NPSP Data Importer.
Access Global Matching Settings
Here's how to access the global batch size and matching settings for the NPSP Data Importer.
- Open the App Launcher (
 ).
). - Find and select NPSP Data Imports.
- Select the To Be Imported list view.
- Click Import All Data Import Records.
Batch Process Size
This setting determines the number of records processed in each batch. The default is 50 records. For example, if your import file has 200 records, NPSP Data Importer processes four batches of 50 records each.
If NPSP Data Import records fail because of system errors like too much CPU time, reduce the batch process size and try again.
Contact & Account Matching Options
Before you begin matching, make sure that you have a minimum of read access to the records and field level access to the fields referenced in the matching and duplicate rules.
For more information, go to the Impact of User Access on Rules section in Things to Know About Duplicate Rules.
These configuration options are for matching Accounts or Contacts:
-
Contact Matching Rules—Specifies how to match Contacts in NPSP Data Import records against existing Contacts. The rules specify which set of Contact fields to use to find matches. For example: First Name, Last Name, and Email or First Name, Last Name, and Phone. Some specific things to keep in mind:
-
The matching rules attempt to match on any NPSP phone or email field.
-
Name matching uses exact string matching, but is case insensitive. For example, "Tom Smith" would not match to "Thomas Smith", but "thomas smith" would match.
-
Phone number matching uses exact match only. For example, if the phone number's format is 123-345-4567, then you must use that format, not 123.345.4567 or 1233454567.
-
-
Contact Duplicate Rules—Matches based on the active Duplicate Rules for the Contact object, in the order set by your Admin in . For help setting up duplicate rules, go to Customize Duplicate Rules. Some things to keep in mind:
-
The logic uses the highest ranked match out of all returned matches for all active rules.
-
Set up your Contact Duplicate Rules to only use Contact fields that are mapped to Contact 1, Contact 2 or Home Address (which maps to the Mailing Address fields on the Contact object).
-
Perform a dry run of the import to determine if your rules are sufficiently strict and working as expected.
-
If you enabled state and country/territory picklists AND you wish to use state or country as part of one of your Contact Duplicate Rules, make sure to use the full name in the Home State/Province and Home Country fields on the Data Import record.
-
-
Contact Custom Unique ID—Optional ID field used for matching Contacts. This field can be any custom text or numeric field that uniquely identifies a Contact, and is used for matching Contacts in addition to the method specified in Contact Matching Rule. This option is useful if your external data source had a unique identifier for each Contact record. For example, you could add a custom field on Contact, such as MyOldID, and matching fields for Contacts in the NPSP Data Import object (Contact1_MyOldID, Contact2_MyOldID).
-
Account Custom Unique ID—Optional ID field used for matching Accounts. This field can be any custom text or numeric field that uniquely identifies an Account, and is used for matching Accounts in addition to matching by Account Name. This option is useful if your external data source had a unique identifier for each Account record. For example, you could add a custom field on Account, such as MyOldID, and matching fields for Accounts in the NPSP Data Import object (Account1_MyOldID, Account2_MyOldID).
Donation Matching Options
You should only use donation matching to update an open Opportunity when a Payment comes in.
These configuration options are for matching Donations (Opportunities) or Payments:
- Update the Stage of an Opportunity to Closed/Won
- Mark an open Payment as Paid
- Donation Matching Rule—Specifies the set of Donation fields to use for
matching against existing Opportunities and/or Payments. If no fields are selected,
the Donation Date and Donation Amount fields are used. The Donation fields specified
must map to either Opportunity fields or Payment fields (with the exception of
Donation Amount, which maps to both
Opportunity.Amount and Payment.Payment
Amount, and Donation Date which maps to
Opportunity.CloseDate and Payment.Scheduled
Date). If the Data Import record has the Donation
Imported field or Payment Imported field
populated, those fields will always be used for the match.
 Note If you're using multiple currencies in your org and you want to match Opportunities, be sure to select the CurrencyIsoCode field as one of the Donation Matching Rule fields. This ensures that the proper currency is used when attempting to match Opportunities. If you created your own custom field and set up a mapping for multiple currencies, select that field instead.
 - Donation Matching Behavior—Defines how the Data Importer should handle
matching Opportunities and Payments. Must be one of the following values:
- Do Not Match—No matching is attempted; new records are created.
- No Match—Only import a record if it doesn't match an existing record.
- Single Match—Only import a record if it matches a single existing record.
- Single Match or Create—Import a record if it matches a single existing record; create a new record if no single match found
- Best Match—Only import a record when it matches at least one existing record, and update the best matched record.
- Best Match or Create—Import a record if it matches an existing record; create a new record if no match found.
 Important If you choose No Match, Single Match, or Best Match and the Data Importer can't match against an existing Opportunity or Payment, the status of the Data Import will show "Failed." However, any associated Account or Contact from the Data Import will still be created. You can evaluate the Opportunity or Payment that failed and rerun the Data Importer.
 - Number of Days from Donation Date—Specifies the number of days to consider (from the Donation date) when looking for a matching Opportunity or Payment. The Data Importer will use the matching Opportunity or Payment that falls within the number of days specified AND is closest to the Donation Date.
- Donation Matching Implementing Class—The full developer name of an Apex class that implements the BDI_IMatchDonations interface, in case you are working with a developer who would like to alter this behavior. When left empty, the NPSP default implementation is used.
- Calculate Donation Rollups with Batch—When checked, NPSP calculates donor statistics when donations are processed as part of an NPSP Data Import Batch. If unchecked (the default), donor statistics are only calculated during the default nightly Scheduled Job. Note that selecting this checkbox may slow down processing of the batch.
Important Information about Unique IDs
If Contacts or Accounts in your org have unique, external IDs that reference the same Contacts or Accounts in another database, you can reference these external IDs when using NPSP Data Importer.
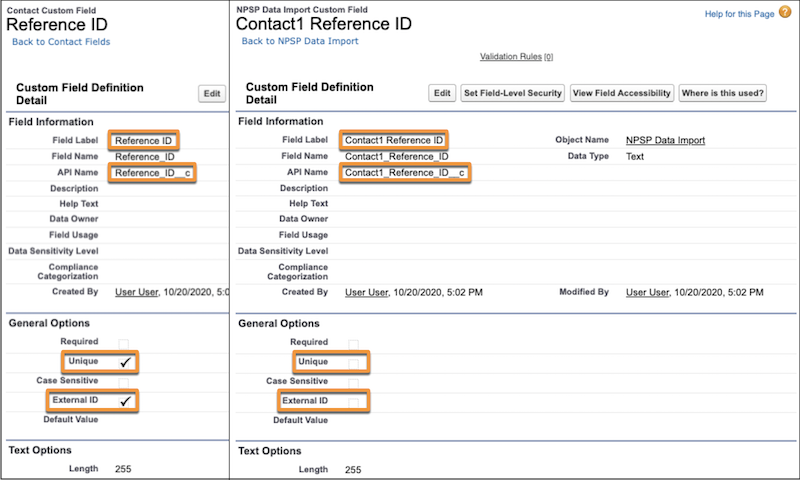
Field naming is critical when you're creating corresponding Unique ID fields. In order to see any values in the Contact Custom Unique ID or Account Custom Unique ID fields in the Data Importer Configuration options, the field you want to map must be marked as Unique and External ID. Additionally, for Unique ID fields, you must create two corresponding fields, one for Contact1 and one for Contact2 (or Account1 and Account2) and you must name them properly. The corresponding fields in the NPSP Data Import object should NOT be marked as Unique and External ID.
For example, say you've created a custom Unique ID field on Contacts called Reference ID with an API name of Reference_ID__c that you want to use for matching Contacts during data import. You'll need to create two corresponding NPSP Data Import fields using this exact format :
- Field for Contact1, the primary Contact
-
Field Label: Contact1 <Fieldname> (Example: Contact1 Reference ID)
Field Name: Contact1_<Fieldname> (Example: Contact1_Reference_ID)
API Name: Contact1_<FieldName>__c (Example: Contact1_Reference_ID__c)
- Field for Contact2, the secondary Contact
-
Field Label: Contact2 <Fieldname> (Example: Contact2 Reference ID)
Field Name: Contact2_<Fieldname> (Example: Contact2_Reference_ID)
API Name: Contact2_<FieldName>__c (Example: Contact2_Reference_ID__c)
Here is an image showing the custom Contact field, Reference ID, and the corresponding NPSP Data Import field, Contact1 Reference ID, with correct Field Label and API Name. The image also shows the Contact field Reference ID is marked as a Unique, External ID field, but the NPSP Data Import field isn't set as a Unique, External ID field.
When processing a record, NPSP Data Importer first attempts to match on the External ID. If a match isn't found, NPSP Data Importer tries to match on a Contact's Last Name. For Accounts without a matching External ID, NPSP Data Importer tries to match on Account Name.