
You are here:
Create Filter Groups
Find out more about creating filter groups.
- Create a Filter Group
Customizable Rollups come with a set of default filter groups. These filter groups work like reports. You set up criteria (filter rules) within the filter group that determines what data to include in your rollup. Filter groups make sure you only roll up the data you really need! - Delete a Filter Rule or Filter Group
You can delete a filter rule even if it's used in a filter group with an associated rollup. But, keep in mind that deleting that filter rule will affect that rollup's calculations. - Clone a Filter Group
To quickly create a new filter group that is similar to one that already exists, simply clone it. The filter group and all of its filter rules are copied to a new filter group. The new filter group will have the same name as the original, but the word (Clone) is appended to the end.
Create a Filter Group
Customizable Rollups come with a set of default filter groups. These filter groups work like reports. You set up criteria (filter rules) within the filter group that determines what data to include in your rollup. Filter groups make sure you only roll up the data you really need!
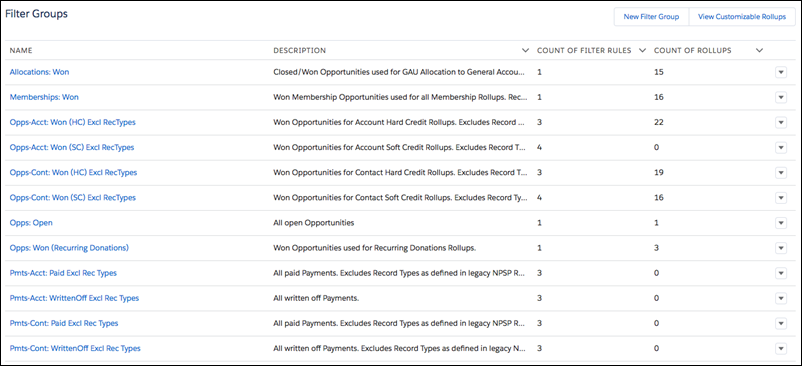
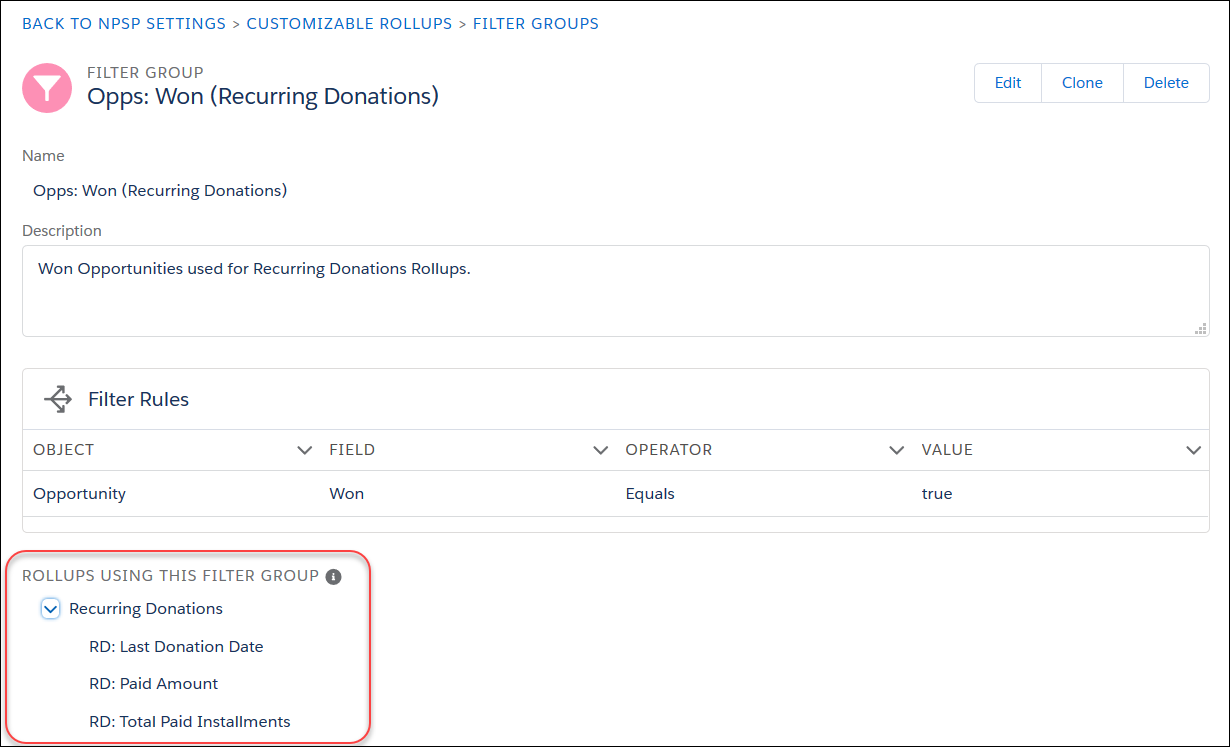
You can create new filter groups or modify the defaults if you need to. You can also delete unused filter groups, but keep in mind that you won't be able to delete any filter group that has been applied to a rollup. You can see which rollups are using a filter group by visiting the filter group detail page.
A note about filter rules . . .
The filter rules set the criteria that determines what data to include, so that you only get the data you need. You can include as many as you want, but keep in mind that filter rules use AND criteria only (there is no OR). So, if there is more than one filter rule within a filter group, data will only be included if it matches criteria for all of the rules.
However, filter rules only apply if the object used in the filter rule is the same as the object in the rollup's Rollup Type field. If the filter rule is for an object not listed for a particular rollup type, that rule simply won't apply, but the rest of the rules in the group will. This lets you use a filter group with a soft credit filter on a hard credit rollup, and that soft credit rule doesn't apply but the rest do.
| If the Rollup Type is... | Filter rules using these objects will apply |
|---|---|
Opportunity > Account (Hard Credit) Opportunity > Contact (Hard Credit) |
Opportunity |
Opportunity > Contact (Soft Credit) Opportunity > Account (Contact Soft Credit) |
Opportunity, Contact Soft Credit |
| Opportunity > Account (Account Soft Credit) | Opportunity, Account Soft Credit |
Payment > Account (Hard Credit) Payment > Contact (Hard Credit) |
Payment, Opportunity |
| Opportunity > Recurring Donations | Opportunity |
| GAU Allocation > General Accounting Unit | Opportunity, GAU Allocation |
-
Click the NPSP Settings tab. If you don't see the tab, find it in the App Launcher (
 ).
). - Click .
- Click Configure Customizable Rollups.
 Important If you see an error when you click the Configure Customizable Rollups button, your profile may not have access to the CRLP_RollupUI_SVC Apex class. For more information, see Configure Customizable Rollups.
 - Click View Filter Groups.
- Click New Filter Group. If you want to edit an existing filter group, click the filter group name, then click Edit.
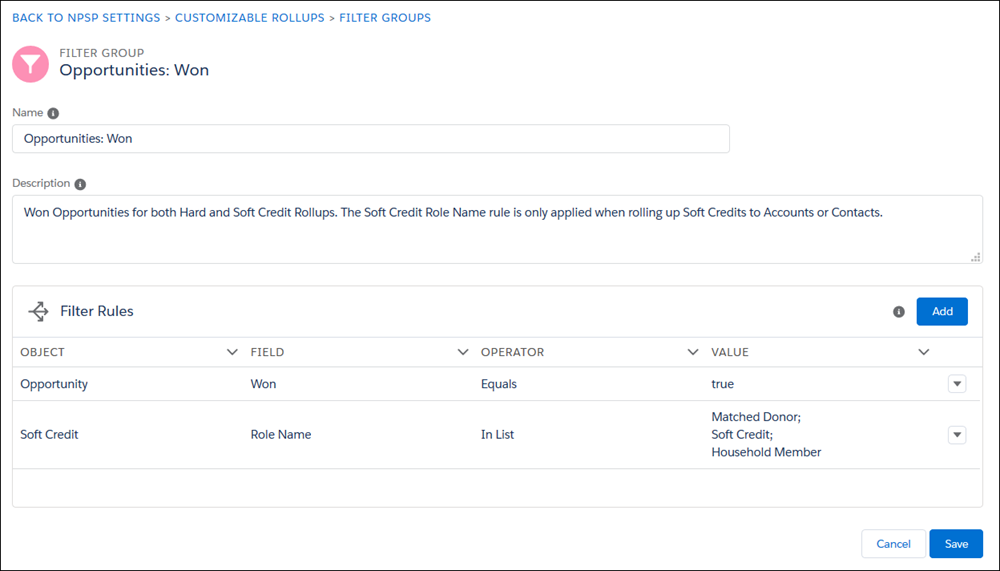
- Enter a name for the filter group.
- Enter a detailed description of this filter group. We recommend that you write out exactly how the filter rules within this filter group work. That way, it will be easy for others in your org to understand if this filter group is right for their rollup.
- Create the filter rules for this group. For each rule:
- Select the Object. The available values are Account Soft Credit, Contact Soft Credit, GAU Allocation, Opportunity, and Payment.
- Select the specific Field on that object.
- Select the Operator. The available options are determined by the type of the selected Field. You'll only see operators that are valid for the field type.
 Note The In List or Not in List operators can be used for fields other than picklists—even for text fields! If the Operator is In List or Not in List and you don't see a picklist, enter values separated by semi-colons.
 - Enter the value. What you can enter in this field is determined by the Operator you choose.
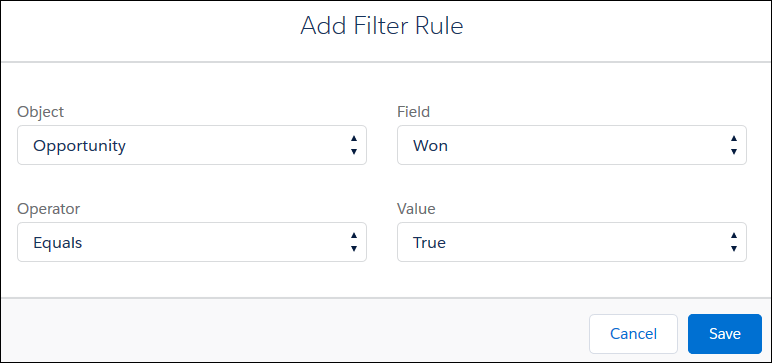
- Click Add to add another filter rule.
- Click Save.
You can now select your filter group when creating or editing a Customizable Rollup.
Delete a Filter Rule or Filter Group
You can delete a filter rule even if it's used in a filter group with an associated rollup. But, keep in mind that deleting that filter rule will affect that rollup's calculations.
You can delete a filter group only if it's not used by any active or inactive rollups. If the filter group has associated rollups, they will be listed on the filter group detail page. Before you can delete, you'll need to remove the filter group from the rollups.
- Go to the NPSP Settings tab. If you don't see the tab in your org, you can find it from the App Launcher.
- Click .
- Click Configure Customizable Rollups .
- Click View Filter Groups.
- Click the name of the filter group.
-
To delete a filter rule:
- Click Edit.
- In the row for the rule, click the down arrow, then click Delete.
- Click Delete again to confirm the deletion.
- To delete a filter group, click Delete, then click Delete again to confirm.
Clone a Filter Group
To quickly create a new filter group that is similar to one that already exists, simply clone it. The filter group and all of its filter rules are copied to a new filter group. The new filter group will have the same name as the original, but the word (Clone) is appended to the end.
-
Click the NPSP Settings tab. If you don't see the tab, find it in the App Launcher (
). - Click .
- Click Configure Customizable Rollups.
- Click View Filter Groups.
- Click the name of the filter group you want to clone.
- Click Clone.
- Edit the filter group name and any other details as needed, then click Save.