
You are here:
Create or Edit a Gift Entry Template
Learn how to create or customize Gift Entry templates to fit your donation management needs.
- Overview of Gift Entry Templates
Create different Gift Entry Templates for different types of gifts. You can enter gifts in batches, rather than one at a time, to use multiple gift entry templates at once and streamline your workflow. - Template Info
Use the Template Info tab to name name the template and provide a description. The Template Name must be unique. - Form Fields and Field Bundles
In the Form Fields tab, define the template's sections and fields. The sidebar contains all possible fields and field bundles you can add to the form. - Batch Settings
If you're creating a template for gifts entered one at a time, you can skip this step.
Overview of Gift Entry Templates
Create different Gift Entry Templates for different types of gifts. You can enter gifts in batches, rather than one at a time, to use multiple gift entry templates at once and streamline your workflow.
Entering stacks of checks from individual donors? Tailor a template to include only essential fields such as Contact and Check information. And set default values for fields, such as Check as the Payment Type.
Perhaps you're a major gift officer who's running a capital campaign. Instead of manually entering complex gift information in an Opportunity, Payment, and GAU Allocation, create a template with fields from those related objects. Then you can use that template to accurately and efficiently enter gifts one at a time directly from the Account or Contact record.
The fields your users need for gift batches, such as a stack of checks from individual donors, are probably different than the fields needed to enter individual gifts for a Contact or Organization Account. Use Gift Entry Templates to handle these different use cases.
To create a new Gift Entry Template:
- Click the Gift Entry tab.
- Click the Templates subtab.
- Click Create Template.
When creating or editing Gift Entry Templates, set the details of these tabs.
- Template Info: Name your template and add a description.
- Form Fields: Add and customize donation-related fields and groups of fields you want to include in the Gift Entry form.
- Batch Settings: If this template is for entering batches of gifts, set up the columns to include in the batch gift table and customize the fields for your Batch Header.
Template Info
Use the Template Info tab to name name the template and provide a description. The Template Name must be unique.
Then click the Form Fields tab or the Next: Form Fields button.
Form Fields and Field Bundles
In the Form Fields tab, define the template's sections and fields. The sidebar contains all possible fields and field bundles you can add to the form.
The main screen, titled Configure Form Fields, contains the placement of the fields on the template. When you create a template, the form is pre-populated with recommended fields, but you can change them.
Field bundles are collections of fields that serve a shared purpose and generally have special layouts or automation. The available field bundles are:
- Donation Donor: Includes fields for selecting whether Account1 or Contact1 is the main donor.
- GAU Allocations: Includes fields for entering multiple GAU Allocations for a gift.
- Soft Credits: Includes fields for assigning Soft Credits.
The other field groups in the sidebar correspond to the Object Groups in Advanced Mapping. You can't add some NPSP fields to Gift Entry templates. See the full list of suppressed fields on GitHub. If you need to add custom fields or adjust existing Field Mappings, see Customize Advanced Mapping.
Here's some information about the Object Groups:
- Account 1
- Fields for Organization Accounts. Do not use these fields for Household Accounts. This organization can be the donor or have an Affiliation with Contact 1.
- Contact 1
-
Fields for the primary Contact in a Household Account. This Contact can be the donor or have an Affiliation with the organization in Account 1. If you create a new Contact with Gift Entry, NPSP automatically creates a Household Account for the Contact.
- Account 2
- Fields for Organization Accounts. Do not use these fields for Household Accounts. This organization can have an Affiliation with Contact 2.
- Contact 2
- Fields for the secondary Contact in Contact 1's Household Account. This Contact could also have an Affiliation with the organization in Account 2.
- Address
- Address fields associated with Contact 1's Household Account. NPSP automation can populate this address in Contact 1's Household and all Contacts within the same Household.
- Household
- Fields for Contact 1's Household Account.
- Opportunity
- Fields for creating or updating Opportunities.
- Payment
- Fields for Payment details.
- GAU Allocation 1 or 2
- Use when entering a single GAU Allocation and you have custom fields on GAU Allocations. If you don't have custom fields, use the GAU Allocations Field Bundle. Don't include the GAU Allocations Field Bundle and GAU Allocation 1 or 2 fields in the same template.
- Add or Remove Form Fields
Follow these steps to add or remove form fields. - Define Form Sections
Forms start with a single section, but you can add more. - Set Field Details
You can customize the appearance and configuration of your form's fields in many ways.
Add or Remove Form Fields
Follow these steps to add or remove form fields.
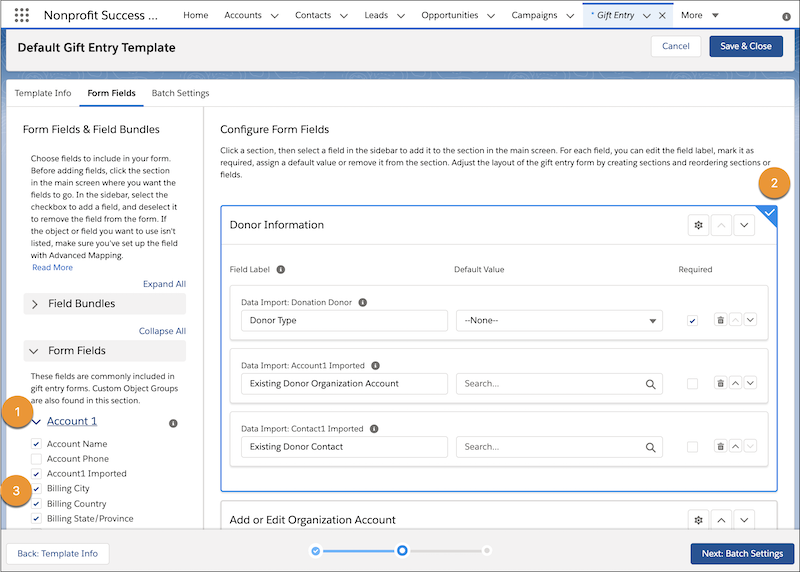
-
In the sidebar, click the Object Group name (1) to expand the fields in that group. For example, click Account1 to see all of the available fields for Account1.
-
In the main screen, click the section where you want to add the field. The selected section is highlighted in blue, with a white checkmark in the corner (2).
-
In the sidebar, select the field (3) to add it to the bottom of the selected section.
To remove a field from the form, either deselect it in the sidebar or click the trash button to the right of the field (in the section).
Define Form Sections
Forms start with a single section, but you can add more.
Simply click Add Section to add additional sections. Configure a section by clicking the gear button within that section.
In Section Settings, you can rename the section, set it to be expanded or collapsed by default, or delete it entirely.
Deleting a section from the form removes all of its fields. If any of those fields are required in all templates (such as Donation Donor), you must re-add them before you can save the template.
You can also move sections within the form by clicking the up or down arrows in the section header.
Set Field Details
You can customize the appearance and configuration of your form's fields in many ways.
- Update a field's label by changing its Field Label value. The default labels include the Object Group and the field label, which don't always translate into user-friendly field names. We highly recommend updating them! Having a friendly user interface is key to good user adoption.
- Set a default value that the field has upon loading the form.
- Select the Required box to make sure that users fill out that field on the form.
- Move fields up or down within their section by clicking the up or down arrows.
When you're done configuring fields, click the Batch Header tab or the Next: Batch Header button to add batch-specific information. If you don't need to configure a batch header, click Save & Close to finish.
Batch Settings
If you're creating a template for gifts entered one at a time, you can skip this step.
- Configure Batch Table Columns
The batch table appears at the bottom of the page when you enter gifts as a batch instead of one at a time. If you have many fields on your form and all of these fields are included in your batch table, the columns will be collapsed down to an unreadable width. - Configure Batch Header
This tab allows you to add information about a batch of gifts.
Configure Batch Table Columns
The batch table appears at the bottom of the page when you enter gifts as a batch instead of one at a time. If you have many fields on your form and all of these fields are included in your batch table, the columns will be collapsed down to an unreadable width.
A new template includes the recommended fields, and the fields included in your form are available to add. To add form fields to your batch table, move fields from Available Fields to Visible Fields and vice versa to remove fields from the table. Use the up and down arrows to reorder the Visible Fields.
Configure Batch Header
This tab allows you to add information about a batch of gifts.
The batch header fields included in NPSP are:
- Batch Name
- Batch Description
- Expected Count of Gifts
- Expected Total Batch Amount
- Require Expected Totals Match
Add additional fields in the NPSP Data Import Batches object. See Create Custom Fields in Salesforce help documentation for more information.
This tab is similar to the Form Fields tab. Select or deselect a field in the sidebar to add or remove it from the fields list on the right. You can override the field label, set a default value, make it required, or change its display order.
When you're done, click Save & Close.
SEE ALSO: