
You are here:
Manage Pledges
Track and manage pledges for gifts with multiple payments.
- What is a Pledge?
In the nonprofit world, a pledge is a promise to donate a set amount of money in installments over a period of time. This article explains how to track your pledges with Opportunities and Payments. - Enter a Pledge and Expected Payments
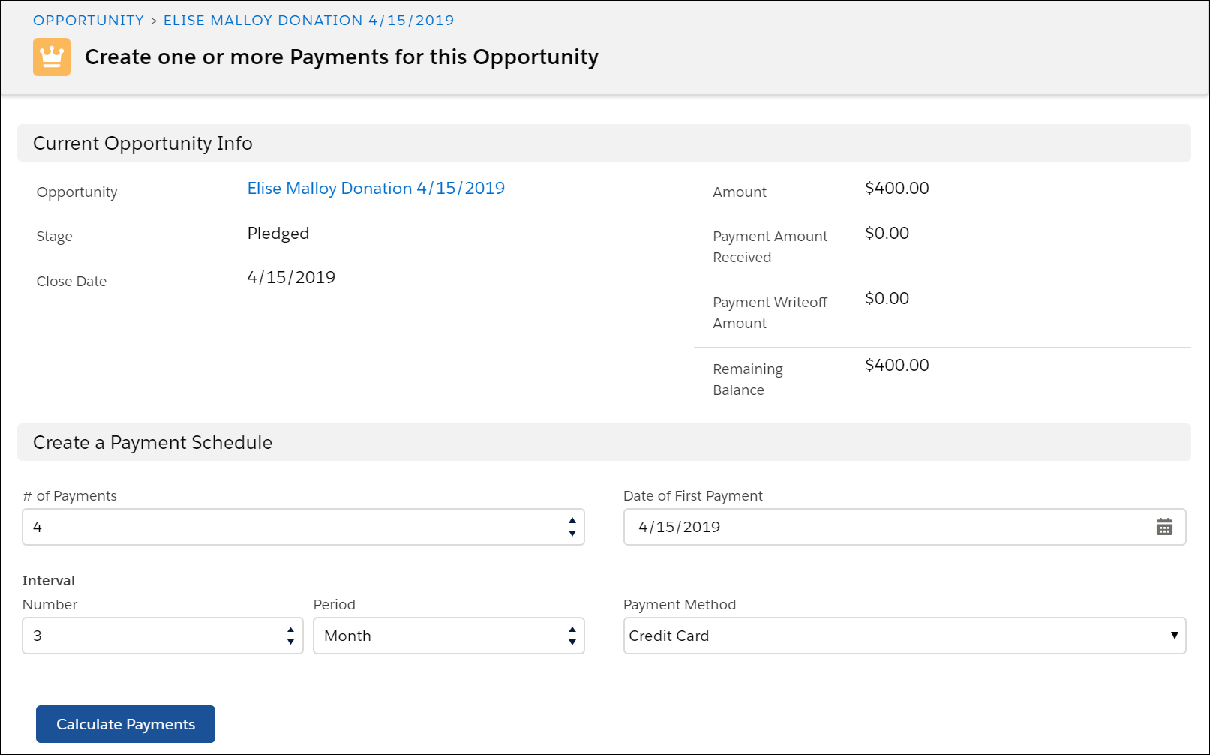
Let's see how you can use Opportunities and Payments to set up that $400 pledge from your donor, with a total of four $100 payments scheduled every three months. - Write Off One or More Scheduled Payments
When donors pledge a certain amount and cannot keep the payment schedule, or are unable to send in one or more payments, you can write off (i.e. "cancel") the payments you're expecting so that you can keep accurate donation records.
What is a Pledge?
In the nonprofit world, a pledge is a promise to donate a set amount of money in installments over a period of time. This article explains how to track your pledges with Opportunities and Payments.
In the nonprofit world, a pledge is a promise to donate a set amount of money in installments over a period of time. With a pledge, you know the total amount of the gift from your donor, along with their payment schedule. For example, a donor agrees to pledge a total of $400 to your organization, paid in $100 installments every 3 months.
This article explains how to track your pledges with Opportunities and Payments. This is the way to go if your organization uses accrual accounting, where all income is recorded when it's pledged rather than when it's received.
For information on tracking pledges based on other accounting methods, see Recurring Donations versus Opportunity Payments (Legacy).
Enter a Pledge and Expected Payments
Let's see how you can use Opportunities and Payments to set up that $400 pledge from your donor, with a total of four $100 payments scheduled every three months.
- Create an Opportunity for the total amount that the donor has pledged. In this example, $400. You can create a new Opportunity from the Opportunities tab or from a button on the Contact or Account record (recommended). When you do the latter, Salesforce automatically pre-populates the new Opportunity with related information.
- Set the Stage field to Pledged (or any appropriate open stage).
- Set the Close Date depending on your standard practices. For example, in our quarterly example, if the first donation comes in on 4/15/2019, we set the Close Date to 4/15/2019—the start of the pledge.
- Save the Opportunity record.
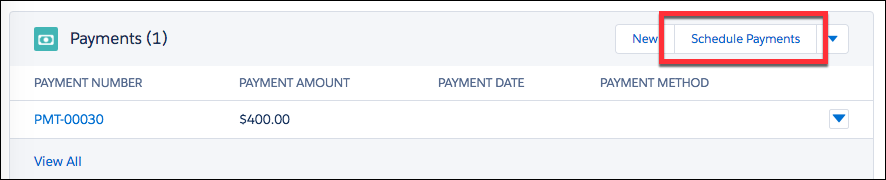
- On the new Opportunity record, click the Related tab, then scroll to the Payments section and click Schedule Payments.
- In the Create a Payment Schedule section:
- Set the # of Payments fields to 4 (quarterly). By default, you can schedule up to 12 payments for a single donation.
 Note Depending on the needs of your organization, you can change the maximum number of payments from the NPSP Settings page ().
 - Set the Date of First Payment to the starting date for your quarterly payments (the date when the first payment comes in).
- Set the payment Interval Number to the amount of time between scheduled payments and the Period to the unit of time you want to use. For quarterly payments, the Number is 3 and the Period is Month.
- Select Credit Card, Checks, or Cash as the default Payment Method depending on the mode of donation.
- Set the # of Payments fields to 4 (quarterly). By default, you can schedule up to 12 payments for a single donation.
- Click Calculate Payments.
Salesforce creates an editable list of scheduled payments. For our quarterly donation example, the payment calculator will create 4 payments with the first payment scheduled on 4/15/2019, the second one scheduled three months later (the payment interval) on 7/15/2019, and so on. At this point, you can adjust the payment amounts and dates on the payment schedule. This is helpful, for example, when you know that the final payment will be a different amount, or if the one of the payments will come in on different date.
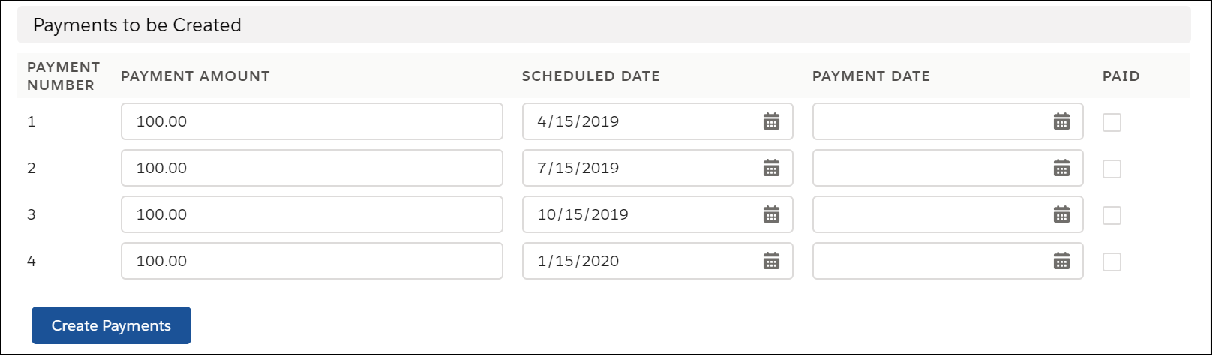
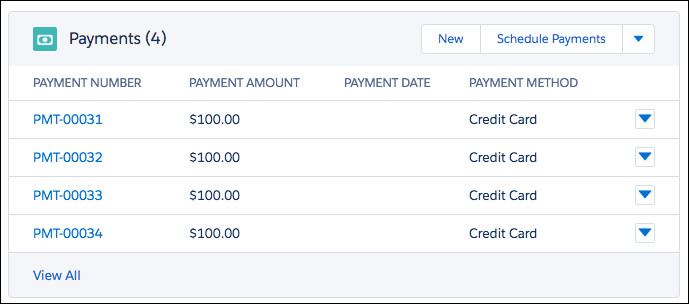
- Click Create Payments. On the Opportunity Related tab, the Payments related list shows the payment schedule.
- When a payment comes in, click Edit from the drop-down to the right of the Payment in the list, select Paid, and then save your changes.
- When the final payment comes in and the full donation amount has been paid, the Opportunity is automatically closed. Its Stage is set to the value selected in the Opportunity Stage for When Fully Paid field in NPSP Settings, under . Note Occasionally, you may receive a Payment whose amount is more than what was originally scheduled. If a Payment is marked as paid, and it pushes the total amount of Payments over the Opportunity Amount, the Opportunity will automatically be closed. According to the example above, Elise Malloy made a $400 donation that was scheduled to be paid out in four Payments. She paid the first and second as planned, and was scheduled to make her third Payment of $100 on 10/15/19 and her fourth Payment of $100 on 1/15/20. Let's say that instead, Elise pays $250 on 10/15/19. The 10/15/19 Payment will be marked as Paid and, since this Payment pushes the Opportunity Amount over the original $400 donation, the Opportunity will automatically be closed.
Write Off One or More Scheduled Payments
When donors pledge a certain amount and cannot keep the payment schedule, or are unable to send in one or more payments, you can write off (i.e. "cancel") the payments you're expecting so that you can keep accurate donation records.
- Search for the Opportunity that contains the payment you want to write off.
- On the Opportunity record, click the Related tab, then click Edit to the right of the payment.
- Select Written Off.
- Click Save.
If, unfortunately, a donor discontinues their payments entirely, write off all of their scheduled future payments to keep your donation records accurate.
- Search for the Opportunity that contains the payments you want to write off.
- On the Related tab, scroll to the Payments related list.
- Click
 , then click Write Off Payments.
 - On the Write Off Remaining Balance page, look at the date in the Write Off Payments section. By default Salesforce shows you the current date, and will write off all remaining payments. If you want to choose a later date after which you want to write off payments, you can enter it.
- Click Write Off Payments. Back on the Opportunity record, you'll see that Salesforce has automatically summed up the remaining unpaid payments and displayed them as a single unpaid write off.
- Change the Opportunity Stage to Posted to close out the donation.