
You are here:
Manage Trigger Handlers for NPSP
Learn about trigger handlers that are used in Table-Driven Trigger Management (TDTM).
- Manage Trigger Handlers
Trigger Handler records are a fundamental part of Table-Driven Trigger Management (TDTM). The Trigger Handler object is a Salesforce object like any other (Accounts, Contacts, etc.). Fields on the object manage the behavior of the triggers built within the TDTM framework. With just a few clicks, you can change the way your code behaves. - Prerequisites for Managing Trigger Handlers
Before you can manage Trigger Handlers, make sure they are set up correctly in your org and are ready to use. - View Trigger Handlers
Trigger Handlers are records just like any other, so you can create list views to filter and sort the records. Access the Trigger Handler records via the Trigger Handlers tab. - Edit a Trigger Handler
An administrator can edit Trigger Handler records to deactivate them, change their load order, change which users will execute the Apex class, and so on. A common reason to edit a Trigger Handler is to disable it. - Create a New Trigger Handler
Review the steps to add a custom Apex class to the TDTM architecture. - Monitor TDTM Framework Changes
If you've created custom triggers, stay current with product releases to identify any changes to our TDTM framework that might require changes to your custom triggers.
Manage Trigger Handlers
Trigger Handler records are a fundamental part of Table-Driven Trigger Management (TDTM). The Trigger Handler object is a Salesforce object like any other (Accounts, Contacts, etc.). Fields on the object manage the behavior of the triggers built within the TDTM framework. With just a few clicks, you can change the way your code behaves.
For example, the Active field specifies if a piece of code, an Apex class, runs when it's called by the trigger. Load Order controls the sequence in which Apex classes for the same object run. Usernames to Exclude deactivates an Apex class, but only for the users you specify. These and other settings are controlled through fields on Trigger Handler records.
Your NPSP package includes a Trigger Handler record for each of the package's Apex classes; you don't have to create them when you install NPSP. For any custom Apex class that you plan to include in the TDTM framework, create a Trigger Handler record that references it so that you can accurately control the behavior of your code. We won't go into the details of how to create Apex classes for TDTM here—just remember that when you do, Trigger Handlers are part of the deployment process.
To prevent duplication of the automation caused by reentrancy, maintain one trigger per object.
- Load the NPSP Settings page.
- Create a record in one of the objects managed by TDTM such as a Contact, Account, Opportunity, etc.
For more information, see Table-Driven Trigger Management (TDTM) .
Prerequisites for Managing Trigger Handlers
Before you can manage Trigger Handlers, make sure they are set up correctly in your org and are ready to use.
- Enable Administrator Access to Trigger Handler Fields
- Verify Fields on Trigger Handler Layout
- Create a Tab
- Edit List View
Enable Administrator Access to Trigger Handler Fields
Confirm that the System Administrator profile has Read and Edit access to all Trigger Handler fields. (If you're not sure how to adjust access to fields, read Set Field Permissions in Permission Sets and Profiles in the Salesforce Help.)
- Active
- Asynchronous After Events
- Class
- Load Order
- Object
- Trigger Action
- Trigger Handler Name
- User Managed
- Usernames to Exclude
Verify Fields on Trigger Handler Layout
Confirm that all the Trigger Handler fields are present on the Trigger Handler Layout. (If you're not sure how to adjust page layouts, read Page Layouts in the Salesforce Help.)
Create a Trigger Handler Tab
Create a Tab for the Trigger Handler object so you can edit Trigger Handler records. (If you're not sure how to create Tabs, refer to Create a Custom Object Tab in the Salesforce Help.)
Add Columns to the Trigger Handler List View
The first time you access the Trigger Handler tab, you can only see the Trigger Handler Name column. Make it easier to see what's going on by adding more columns to the view.
- Go to the Trigger Handler tab and change the list view to All.
- Click List View Controls
 and click Select Fields to Display.
 - You can choose which fields to include here, but we recommend these fields in this order:
- Trigger Handler Name
- Object
- Class
- Load Order
- Trigger Action
- Active
- User Managed
- Usernames to Exclude
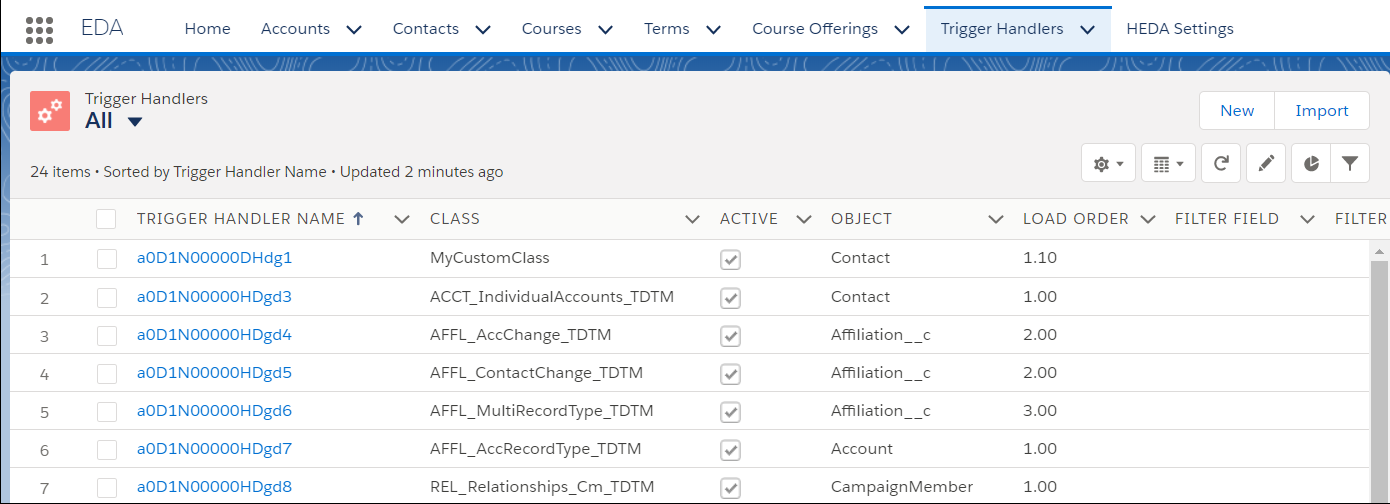
View Trigger Handlers
Trigger Handlers are records just like any other, so you can create list views to filter and sort the records. Access the Trigger Handler records via the Trigger Handlers tab.
- Click the Trigger Handlers tab.
 Note Sometimes the Trigger Handler tab isn't visible by default. If you don't see it, click the More tab. If you still don't see it, from the App Launcher, find and select Trigger Handlers. (Items are listed alphabetically.) Only System Administrators should have access to the Trigger Handler tab. As a best practice, remove access for all other Profiles.
 - Select the All list view to see the full list of Trigger Handler records.
Edit a Trigger Handler
An administrator can edit Trigger Handler records to deactivate them, change their load order, change which users will execute the Apex class, and so on. A common reason to edit a Trigger Handler is to disable it.
For more information, read Disable Table-Driven Trigger Management .
-
Click the Trigger Handler Tab.
-
Click the name of the Trigger Handler you want to edit.
-
Click Edit.

You can edit these Trigger Handler details:
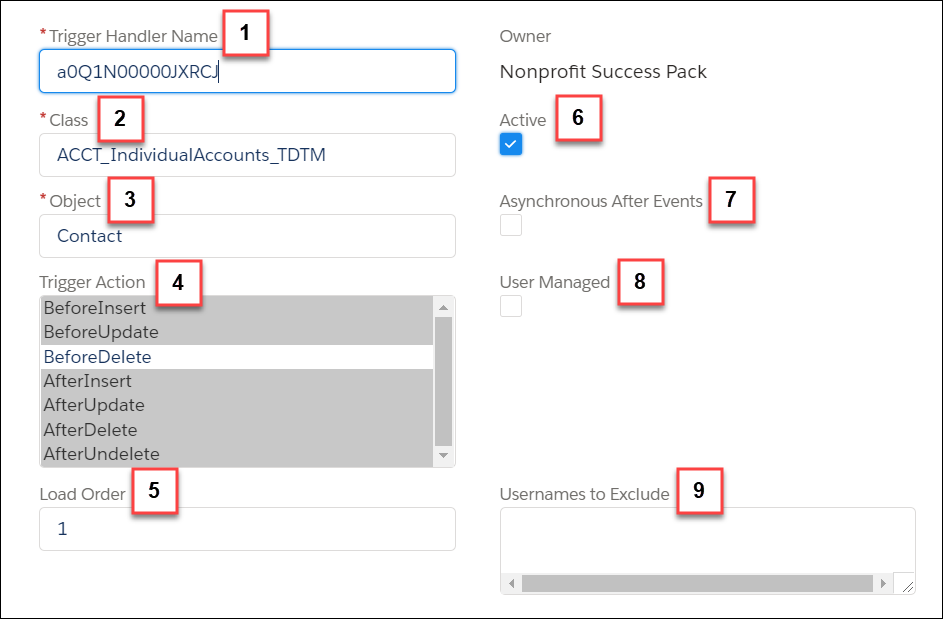
Trigger Handler Name (1)—Trigger Handlers provided with NPSP use a record ID for the record name. If you create new Trigger Handler records via NPSP Settings, they will also use a record ID for the name. If you create them through the Trigger Handler tab, you can follow your own naming convention.
Class (2)—Name of the Apex class this Trigger Handler manages. If the class exists within a managed package you created, include the namespace prefix.
Object (3)—Name of the object, that when modified, runs the Apex class. For NPSP custom objects, omit the namespace prefix (that is, use Address__c, not npsp__Address__c).
Trigger Action (4)—Trigger actions that this Apex class runs on. Before Insert, After Update, and so on.
Load Order (5)—Order in which Apex classes for the same object run. Use sequential whole numbers starting with 0.
Active (6)—Indicates whether the Trigger Handler is active or not.
Asynchronous After Events (7)—Allows this Apex class to run asynchronously. Requires that your Apex class supports asynchronous processing. NPSP classes are not designed to run asynchronously. Test thoroughly if you enable this option.
User Managed (8)—Indicates that your org has customized this Trigger Handler and prevents it from reverting to default settings during a package upgrade. Enable User Managed on any packaged Trigger Handlers that you have modified to preserve your changes.
Usernames to Exclude (9)—A list of semicolon-separated Salesforce usernames that this Apex class should NOT run for. Leave this field blank to allow the class to run for all users.

-
Remember to Save your changes.

Create a New Trigger Handler
Review the steps to add a custom Apex class to the TDTM architecture.
-
Coding your custom Apex class.
-
Writing a test Apex class.
-
Creating a Trigger Handler for your custom Apex class.
-
Testing in a sandbox environment.
-
Deploying to production.
Creating custom Apex classes is beyond the scope of this article. For a detailed walk-through, see Deploy a Custom Apex Class in the TDTM Framework for NPSP.
Monitor TDTM Framework Changes
If you've created custom triggers, stay current with product releases to identify any changes to our TDTM framework that might require changes to your custom triggers.
For example, if we release Trigger Handlers for objects for which you had previously created custom triggers, we recommend deleting your custom triggers. Maintaining one trigger for each object helps avoid re-entrancy issues.