
You are here:
Required Configuration
If you installed Nonprofit Success Pack (NPSP) from the installer, perform these configuration steps to make NPSP function as intended.
- Update Opportunity Stages, Sales Processes, and Record Types
You can use Salesforce to track your organization's fundraising processes such as donations, matching gifts, grants, and membership management. To take full advantage of this functionality, configure Opportunity stages and record types. You also need to create additional sales processes. - Assign the Organization Record Type to Profiles
NPSP installs two Account record types: Household Account and Organization. Household accounts are for individuals and families. Organization Accounts are for foundations that fund your work, other nonprofits that you partner with, corporations that sponsor your work, or companies that employ your donors and constituents. - Assign Page Layouts
Maybe you already carefully tailored your page layouts to the way your users work, making sure the right fields are visible and grouped in a way that makes sense, and that all related information is easily accessible on each record. If so, congratulations! If not, take advantage of the NPSP custom page layouts. We designed them with typical nonprofit users in mind. You can customize them to meet your users' needs. - Restore the Standard New Button on the Opportunity Related List
The New Account Donation button on the Opportunity related list of an Account record doesn't work correctly in Lightning Experience. We recommend that you remove this button and restore the standard New button on the related list. - Override Lead Convert Button
Even if your org isn't using Leads at this point, it's worth a few minutes to get the Lead Conversion page set up, so that you'll be ready to go if you decide to use Leads sometime down the road. - Add or Edit a New Opportunity Button on Contacts
You can add new Quick Actions on Contacts that let you create Opportunities directly from the Contact record. If you started using NPSP from a trial instance after November 15, 2016, you should have these buttons on Contacts. - Override Contact Delete Button
The NPSP Contact Delete page alerts you if the Contact you're trying to delete is the only member of their Household. If so, you get the option of deleting that Household Account record along with the Contact, so that you don't have orphaned Households cluttering up your org. - Enable the Manage Household Button
If you don't see the Manage Household button on your Household Account page, enable the button in Salesforce Setup. - Create Opportunity Contact Roles
Opportunity Contact Role records link a person (Contact) to a donation (Opportunity), and show what role the person played in getting you the donation. Some typical roles are Donor, Soft Credit, Household Member, and Solicitor, but you can create whatever roles make sense for your organization. - Configure Relationship Reciprocal Settings
With NPSP, you can create Relationship records that show a connection between any two people. For example, you can track parent/child relationships, sibling relationships, mentor/mentee relationships, and more. - Activate Workflow Rules
NPSP comes with a handful of useful workflow rules to manage emails and phone numbers, and to automatically send acknowledgment emails. The workflow rules are inactive by default.
Update Opportunity Stages, Sales Processes, and Record Types
You can use Salesforce to track your organization's fundraising processes such as donations, matching gifts, grants, and membership management. To take full advantage of this functionality, configure Opportunity stages and record types. You also need to create additional sales processes.
If you’re not familiar with these terms, don’t worry, we’ll walk you through it all! To get started, here’s a brief explanation:
- Stage: A picklist field on Opportunity records. The stage indicates which step of the sales process an Opportunity is in. Typical stages for a donation might include Prospecting, Pledged, Closed Won, or Closed Lost.
- Sales Processes: A collection of stages that a business process moves through.
- Record Type: The kind of Opportunity you’re tracking, for example, Donation, Grant, or Membership. Each record type is assigned a sales process.
Create Opportunity Stage Values
We'll walk you through an example to get you started. Let's create a stage called "Application Received." (We'll use this stage in a later step for the Grant Sales Process.)From Setup, click the Object Manager
- From Setup, click the Object Manager
- From Setup, click the Object Manager tab.
- In the list of objects, click Opportunity.
- Click Fields & Relationships.
- Click the Stage field.
- Under the Opportunity Stages Picklist Values, click New.
- Enter the following details:
- Stage Name: Application Received
- Type: Open
- Probability: 30%
- Forecast Category: Pipeline
- Description: Our organization has been notified that the grant application was received.
- Save your changes.
Now create the rest of the stages you need for your organization.
Configure each of these stage values (if they don't already exist in your org).
| Stage Name | API Name | Type | Probability | Forecast Category |
|---|---|---|---|---|
| Application Submitted | Application Submitted | Open | 30% | Pipeline |
| Awarded | Awarded | Closed/Won | 100% | Closed |
| Cultivation | Cultivation | Open | 30% | Pipeline |
| Declined | Declined | Closed/Lost | 0% | Omitted |
| Identification | Identification | Open | 10% | Pipeline |
| In-Kind Not Yet Received | In-Kind Not Yet Received | Open | 50% | Omitted |
| In-Kind Received | In-Kind Received | Closed/Won | 100% | Omitted |
| LOI Submitted | LOI Submitted | Open | 20% | Pipeline |
| Pledged | Pledged | Open | 50% | Pipeline |
| Proposal/Review | Proposal/Review | Open | 60% | Best Case |
| Solicitation | Solicitation | Open | 40% | Pipeline |
| Verbal Commitment | Verbal Commitment | Open | 80% | Commit |
| Withdrawn | Withdrawn | Closed/Lost | 0% | Omitted |
Create Sales Processes to Match Your Business Processes
A sales process in Salesforce is a collection of stages that an Opportunity could potentially move through. For example, a Donation sales process might include the stages Pledged, Closed Won, Closed Lost, and Declined.
Create and configure a Donation sales process:
- From Setup, in the Quick Find box, enter Sales Processes and select Sales Processes.
- Click New.
- In the Existing Sales Process field, choose Master.
- In the Sales Process name field, enter Donation.
- Click Save.
- Move the following values to the Selected Value list:
- Pledged
- Closed Won
- Declined
- Closed Lost
- If there are values other than those listed in step 6 in the Selected Values list, move them to the Available Values list.

- Save your changes.
- Now create and configure sales processes for Grants, In-Kind Gifts, and Major Gifts as described in steps 2—7 with the values listed in this table.
The NPSP Trial comes with these sales processes:
If you don't see some of the selected values in your org, you need to add them to the Opportunity Stage field first. Learn more in Create Opportunity Stage Values.
| Sales Process | Selected Values |
|---|---|
| Donation | Pledged, Closed/Lost, Closed/Won, Declined |
| Grant | Prospecting, LOI Submitted, Application Submitted, Withdrawn, Awarded, Declined |
| In-Kind Gift | Prospecting, In-Kind Not Yet Received, In-Kind Received, Withdrawn |
| Major Gift | Identification, Qualification, Cultivation, Solicitation, Proposal/Review, Verbal Commitment, Awarded, Closed/Won, Withdrawn, Declined |
Create Opportunity Record Types
Create these Opportunity record types to track different kinds of Opportunities in NPSP.
- Donation
- Grant
- In-Kind Gift
- Major Gift
- Matching Gift
- Membership
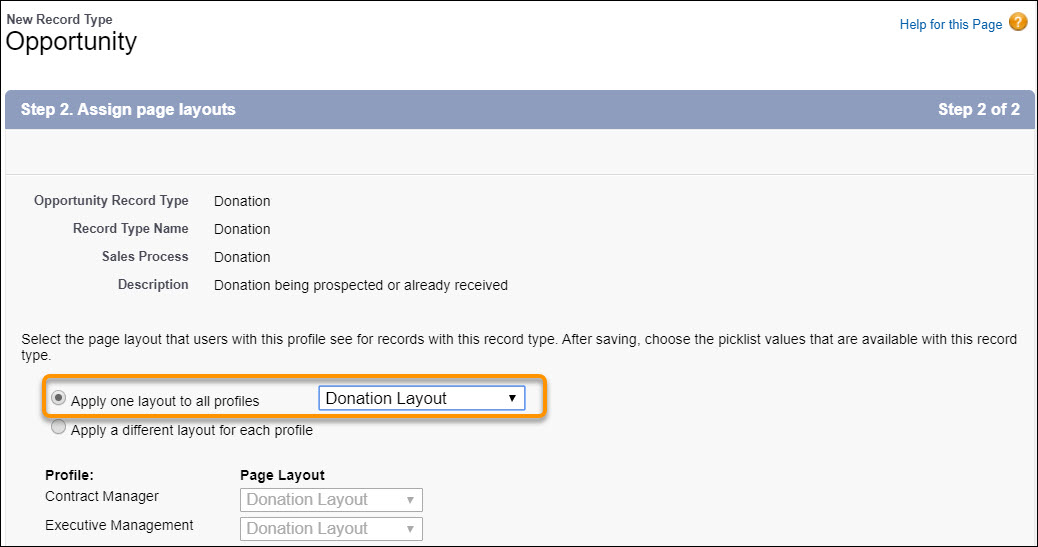
Record types let you offer different business processes, picklist values, and page layouts to different users. We’ll walk you through how to create the Donation record type.
- From Setup, click the Object Manager tab.
- In the list of objects, click Opportunity.
- Click Record Types.
- Click New.
- Enter the following information:
- Existing Record Type: Master (the default value)
- Record Type Label: Donation
- Record Type Name: Donation
- Sales Process: Donation
- Description: Donation being prospected or already received
- Select the Active checkbox.

- Select Make Available for profiles that should have access to the Donation record type.
- For enabled profiles, select Make Default to make it the default record type for users of that profile.
- Click Next.
- To apply one layout to all profiles, select Donation Layout.
- Save your changes.
- Repeat these steps for each of the other five record types. Use these values:
Record Type Enter these values Grant - Record Type label: Grant
- Record Type Name: Grant
- Sales Process: Grant
- Page Layout: Grant Layout
In-Kind Gift - Record Type label: In-Kind Gift
- Record Type Name: InKindGift
- Sales Process: In-Kind Gift
- Page Layout: In-Kind Gift Layout
Major Gift - Record Type label: Major Gift
- Record Type Name: MajorGift
- Sales Process: Major Gift
- Page Layout: Major Gift Layout
Matching Gift - Record Type label: Matching Gift
- Record Type Name: MatchingGift
- Sales Process: Donation
- Page Layout: Matching Gift Layout
Membership - Record Type label: Membership
- Record Type Name: Membership
- Sales Process: Donation
- Page Layout: Membership Layout
Assign the Organization Record Type to Profiles
NPSP installs two Account record types: Household Account and Organization. Household accounts are for individuals and families. Organization Accounts are for foundations that fund your work, other nonprofits that you partner with, corporations that sponsor your work, or companies that employ your donors and constituents.
NPSP automatically uses the Household Account record type to create Accounts when a Contact is created (and the Account Name is left blank). Because NPSP creates Household Accounts automatically, we recommend that you don't include the Household Account record type assignment for all your profiles. That way, users won't accidentally create an empty Household Account when intending to add an Organization Account.
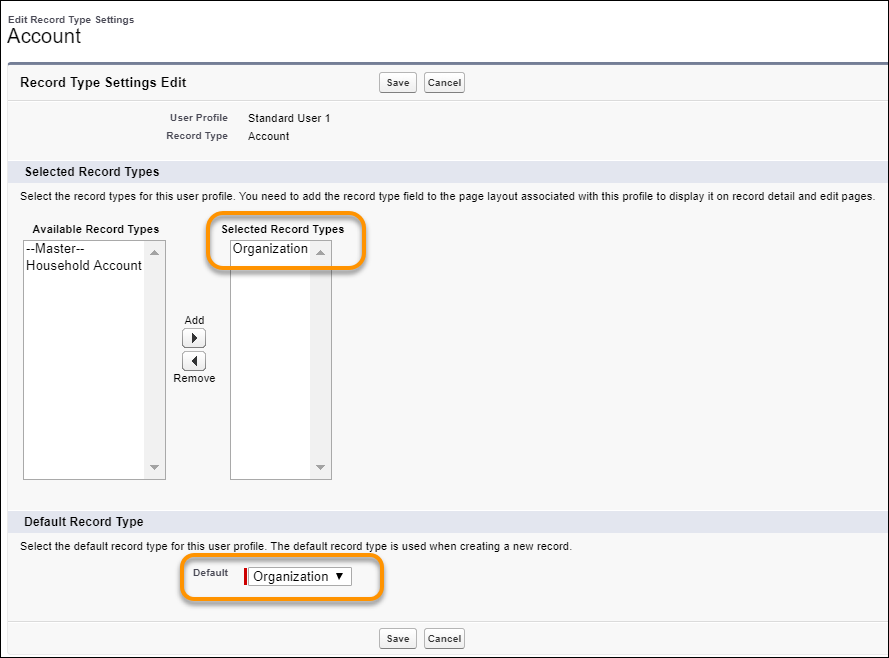
Assign the Organization record type and set it as the default:
- From Setup, in the Quick Find box, enter Profiles, then click Profiles.
- Click the Profile that you want to edit so that it can create Organization accounts.
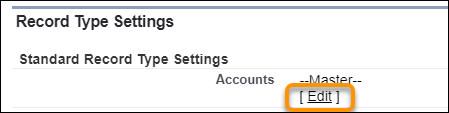
- Scroll to the Record Type Settings section, and next to Accounts, click Edit.
- Move Organization to Selected Record Types.
- Select Organization as the Default Record Type.
- Save your changes.
Repeat the above steps for every profile that you want to create Organization Accounts.
Assign Page Layouts
Maybe you already carefully tailored your page layouts to the way your users work, making sure the right fields are visible and grouped in a way that makes sense, and that all related information is easily accessible on each record. If so, congratulations! If not, take advantage of the NPSP custom page layouts. We designed them with typical nonprofit users in mind. You can customize them to meet your users' needs.
You can assign different page layouts for different profiles. For example, you could assign a Contact layout with fields related to giving totals for your Fund Development team, but a different layout without those fields for the rest of your staff.
You can also assign page layouts by record type. For example, you can assign a layout that includes the Number of Household Members field for the Household Account record type, but a different layout for the Organization Account record type.
In this example, we’ll assign the Household Layout to the Household Account record type for all Profiles.
- From Setup, click the Object Manager tab.
- In the list of objects, click Account.
- Click Page Layouts.
- Click Page Layout Assignment.
- Click Edit Assignment.
- Click the Household Account record type column header to select all profiles under it.
- In the Page Layout to Use field, select Household Lightning Layout or Household Layout (depending on how you installed NPSP).
- Save your changes.
Change the Page Layout Assignment for each object as described below:
Account:
Opportunity:
| Record Type | Page Layout |
|---|---|
| Master | Organization Layout |
| Household | Household Lightning Layout or Household Layout |
| Organization | Organization Lightning Layout or Household Layout |
Campaign:
| Record Type | Page Layout |
|---|---|
| Master | NPSP Campaign Layout |
| Default | NPSP Campaign Layout |
| Record Type | Page Layout |
|---|---|
| Master | Donation Layout |
| Donation | Donation Layout |
| Grant | Grant Layout |
| In-Kind Gift | In-Kind Gift Layout |
| Major Gift | Major Gift Layout |
| Matching Gift | Matching Gift Layout |
| Membership | Membership Layout |
Restore the Standard New Button on the Opportunity Related List
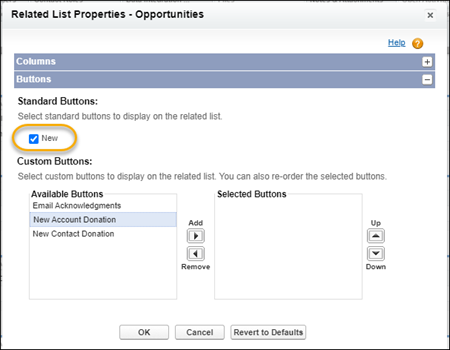
The New Account Donation button on the Opportunity related list of an Account record doesn't work correctly in Lightning Experience. We recommend that you remove this button and restore the standard New button on the related list.
- From Setup, click the Object Manager tab.
- In the list of objects, click Account.
- Click Page Layouts.
- Click Organization Layout.
- Scroll to the Opportunities related list and click
 .
. - In the Buttons section, click
 to expand the section.
 - Under Standard Buttons, select New.
- Under Custom Buttons, move New Account Donation from Selected Buttons to Available Buttons.
- Save your changes.
Override Lead Convert Button
Even if your org isn't using Leads at this point, it's worth a few minutes to get the Lead Conversion page set up, so that you'll be ready to go if you decide to use Leads sometime down the road.
If you’re not familiar with Leads, see Why and How to Use Leads.
The Lead conversion page lets you define how to map certain fields, and handles properly creating a Household Account under the right circumstances. For more information on how NPSP Lead Conversion works, see Convert a Lead to a Contact.
Before you convert leads, override the Lead Conversion button so that it appears on the Lead conversion page.
- From Setup, click the Object Manager tab.
- In the list of objects, click Lead.
- Click Buttons, Links and Actions.
- In the Convert row, click
 , then click Edit.
 - Select Visualforce page, and choose LD_LeadConvertOverride [npsp__LD_LeadConvertOverride].
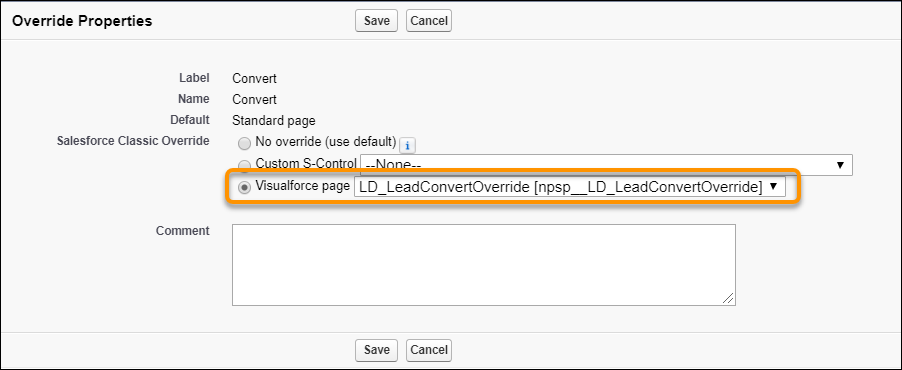
- Save your changes.
Add or Edit a New Opportunity Button on Contacts
You can add new Quick Actions on Contacts that let you create Opportunities directly from the Contact record. If you started using NPSP from a trial instance after November 15, 2016, you should have these buttons on Contacts.
- New Donation
- New In-Kind Gift
- New Major Gift
- New Membership
If you don't have these buttons, we recommend that you create Quick Actions for each Opportunity record type and add them to your Contact page layout.
Create an Opportunity Action Button
Based on how you set up your Contact Opportunity Action buttons, all the data, such as the Opportunity Name and Close Date, is correctly populated for you. We'll show you how to create a New Donation action, similar to the one in the NPSP trial.
To learn more about Quick Actions, see Create Global Quick Actions.
- From Setup, click the Object Manager tab.
- In the list of objects, click Contact.
- Click Buttons, Links, and Actions.
- Click New Action.
- Complete the record:
- For Action Type, select Create a Record.
- For Target Object, select Opportunity.
- For the Relationship Field, select the Primary Contact field.
- Select the Record Type that will be automatically assigned for the Opportunity. In this case, we're creating an Action for the Donation record type.
- The Standard Label Type determines how the Action will appear on a record. We recommend selecting New [Record Type]. For example, since we chose the Donation record type, the Contact record will have an action called New Donation.
- Give the Action a name. This name isn't visible to users.
- We recommend leaving Create Feed Item deselected. This setting creates a Chatter post for every new Opportunity created with the action.
- Save your changes.
- Next, choose the fields that will appear in the pop up when the button is pushed. Drag any field to the preview area to include it; click
 to remove a field. Fields marked with a * are required. Hover over the field and select the wrench icon, to set a field as Read-only or Required.
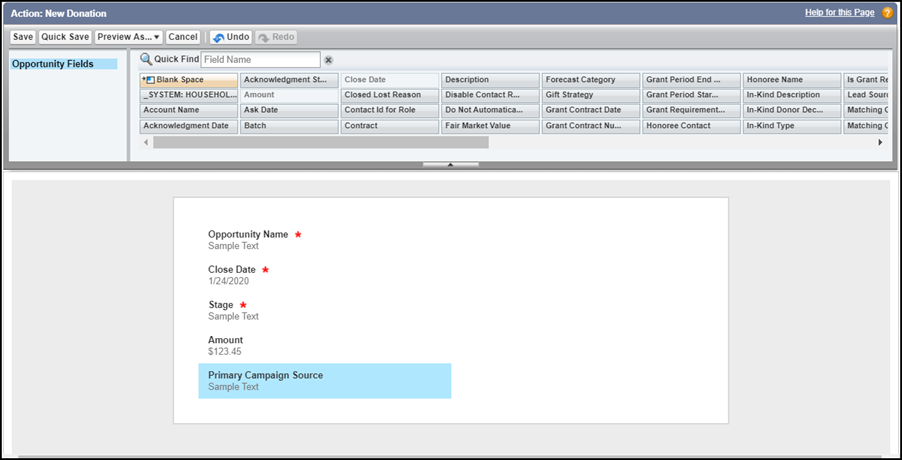
- Save your work.
- Next, set up predefined values that automatically populate fields on the new Opportunity record that is created from the action. For each new Opportunity, we want to set the Close Date to today, the Stage to Closed Won, and the Opportunity Name to autopopulate using this format: "Jasmine Klein Donation 1/24/2020." This makes creating Opportunities so much faster.
- In the Predefined Field Values section, click New.
 Note You can choose to automatically populate fields, even if they don't appear on the above layout. For example, automatically populate default values for required fields, so users don't have to enter values each time.
 - From the Field Name list, select the Opportunity Name field.
This is the field you want to populate automatically.
- In the Formula Value field, enter:
Contact.FirstName & " " & Contact.LastName & " Donation " & TEXT(MONTH(TODAY())) & "/" & TEXT(DAY(TODAY())) & "/" & TEXT(YEAR(TODAY())) - Save your changes.
- In the Predefined Field Values section, click New.
- Next, create the predefined value for the Close Date field.
- In the Predefined Field Values section, click New.
- From the Field Name list, select Close Date.
- In Formula Value, enter TODAY().
- Save your changes.
-
Last, we'll create the predefined value for the Stage field.
-
In the Predefined Field Values section, click New.
-
From the Field Name list, select Stage.
-
In the Specific Value field, select Closed Won.
-
Save your changes.
-
Now that you created the new Action, make sure it appears by adding it to your Contact page layout.
- In the Object Manager, make sure you're still viewing the Contact object, then click Page Layouts.
- Click the name of your Contact layout.
- In the left pane of the top panel, click Mobile & Lightning Actions.
- On the right side, you'll see the new Action(s) you created. Drag the Action(s) into the Salesforce Mobile and Lightning Experience Actions section. Be sure to put the actions in the order you want to see them in the UI.
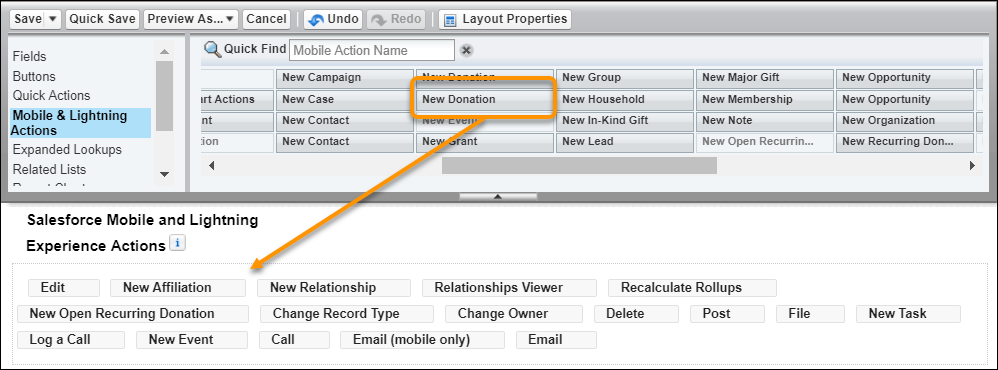
- Save your change.
Don't forget to create an Action for each of the Opportunity record types (and add them to the page layout).
Override Contact Delete Button
The NPSP Contact Delete page alerts you if the Contact you're trying to delete is the only member of their Household. If so, you get the option of deleting that Household Account record along with the Contact, so that you don't have orphaned Households cluttering up your org.
Override the Contact Delete button, so that the alert and options described above are available.
- From Setup, click the Object Manager tab.
- In the list of objects, click Contact.
- Click Buttons, Links and Actions.
- In the Delete row, click , then click Edit.
- Select Visualforce page and choose CON_DeleteContactOverride [npsp__CON_DeleteContactOverride].
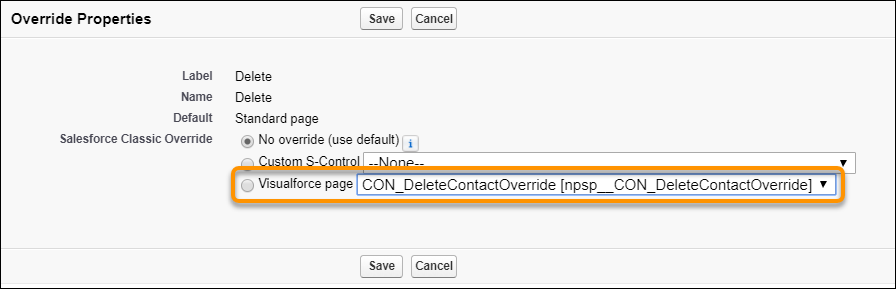
- Save your changes.
Enable the Manage Household Button
If you don't see the Manage Household button on your Household Account page, enable the button in Salesforce Setup.
To enable the button in Lightning Experience:
- Click
 , then click Setup.
 - Click the Object Managertab and click Account from the list of objects.
- Click Page Layouts .
- Click Household Layout.
- Select Mobile & Lightning Actions from the palette.
- Drag the Manage Household button from the palette to the “Mobile and Lightning Experience Actions” area of the Account Detail section. Note The buttons you see in your org's Mobile and Lightning Experience Actions area may vary from what's shown here.
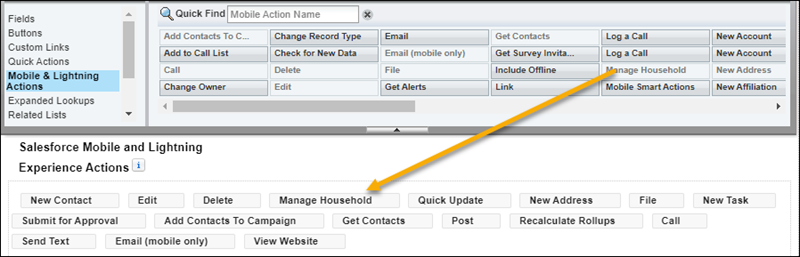
- Click Save.
To enable the Manage Households button for Salesforce Classic:
- On the Manage Household page layout for Account, select Buttons from the palette.
-
Drag the Manage Household button from the list of buttons to the Custom Buttons area.
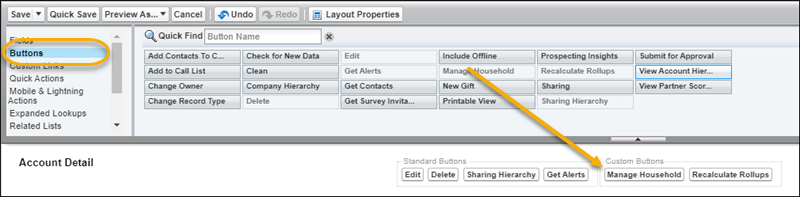
- Click Save.
Create Opportunity Contact Roles
Opportunity Contact Role records link a person (Contact) to a donation (Opportunity), and show what role the person played in getting you the donation. Some typical roles are Donor, Soft Credit, Household Member, and Solicitor, but you can create whatever roles make sense for your organization.
- From Setup, in the Quick Find box, enter Contact Roles, then click Contact Roles on Opportunities.Note Double check the Inactive Values list to ensure that these values don’t already exist in your org. If you find one, simply click Activate.
- Click New.
- Enter the following Roles if they aren't already listed:
- Donor
- Household Member
- Soft Credit
- Matched Donor
- Honoree
- Notification Recipient
- Grant Manager
- Decision Maker
- Influencer
- Solicitor
- Workplace Giving
- Other
- Save your changes.
Configure Relationship Reciprocal Settings
With NPSP, you can create Relationship records that show a connection between any two people. For example, you can track parent/child relationships, sibling relationships, mentor/mentee relationships, and more.
For a detailed explanation of all the Relationship Settings, read Manage Relationship Settings.
Configure Settings
Here's where you create those Relationship Reciprocal records—the ones that tell NPSP what kind of reciprocal record to auto create whenever you create a relationship record.
-
Click the NPSP Settings tab. If you don't see the tab, find it in the App Launcher (
 ).
). - Click Relationships, then click Relationship Reciprocal Settings.
- Click New Reciprocal Relationship.
- Enter values for Name and Neutral, for example, Parent and Child. If you’re tracking your constituents' genders, either through a custom field on Contact or with salutations, include values for Male (like Son), Female (like Daughter), and Neutral (like Child).
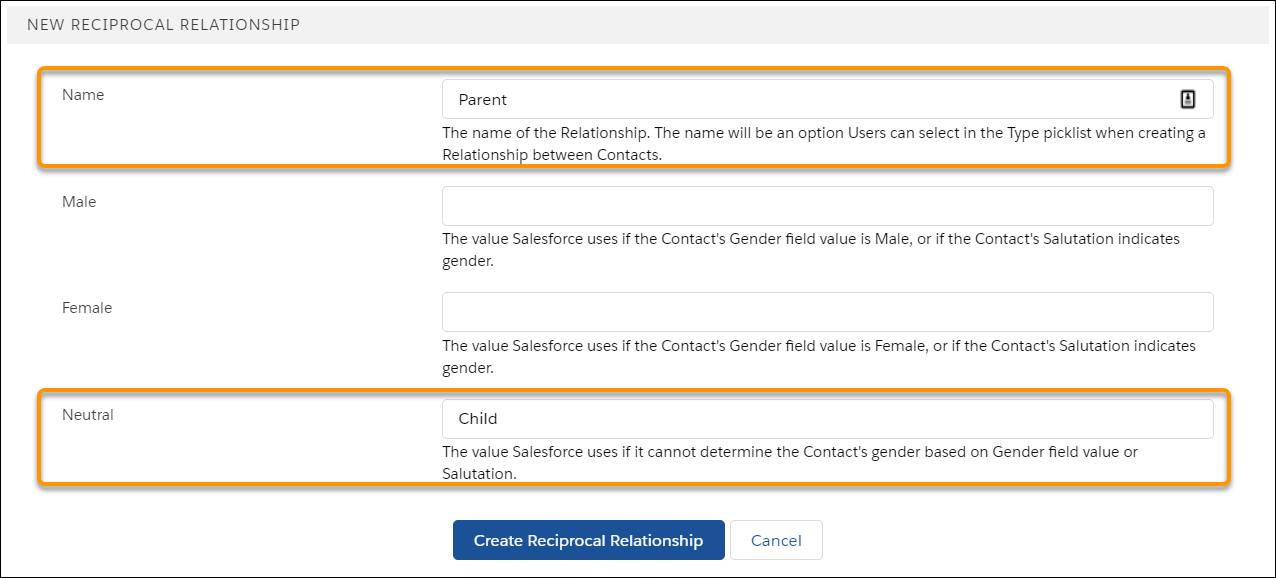
- Click Create Reciprocal Relationship.
Create any additional relationship types that would be useful for your organization.
To get you started, here are the Reciprocal Relationship records that come with the NPSP trial. Choose from these or create your own.
| NAME | MALE | FEMALE | NEUTRAL |
|---|---|---|---|
| Aunt | Nephew | Niece | Sibling's Child |
| Child | Father | Mother | Parent |
| Cousin | Cousin | Cousin | Cousin |
| Daughter | Father | Mother | Parent |
| Employee | Employer | Employer | Employer |
| Employer | Employee | Employee | Employee |
| Father | Son | Daughter | Child |
| Grandchild | Grandfather | Grandmother | Grandparent |
| Granddaughter | Grandfather | Grandmother | Grandparent |
| Grandfather | Grandson | Granddaughter | Grandchild |
| Grandmother | Grandson | Granddaughter | Grandchild |
| Grandparent | Grandson | Granddaughter | Grandchild |
| Grandson | Grandfather | Grandmother | Grandparent |
| Husband | Husband | Wife | Spouse |
| Mother | Son | Daughter | Child |
| Parent | Son | Daughter | Child |
| Partner | Partner | Partner | Partner |
| Son | Father | Mother | Parent |
| Spouse | Spouse | Spouse | Spouse |
| Uncle | Nephew | Niece | Sibling's Child |
| Wife | Husband | Wife | Spouse |
(Optional) Create a Custom Gender Field on Contact
If you have a valid reason to track your constituent's gender, create a custom picklist field on the Contact object.
Recommended picklist values:
- Male
- Female
- Non-Binary
- Prefer Not To Say
To create your custom field:
- Click the Object Manager tab.
- In the list of objects, click Contact.
- Click Fields & Relationships.
- Click New.
- Under Data Type, select Picklist, then click Next.
- Enter Gender as the Field Label.
- Select Enter values, with each value separated by a new line.
- For values, enter Male, Female, Non-Binary, Prefer Not To Say.
- Click Next.
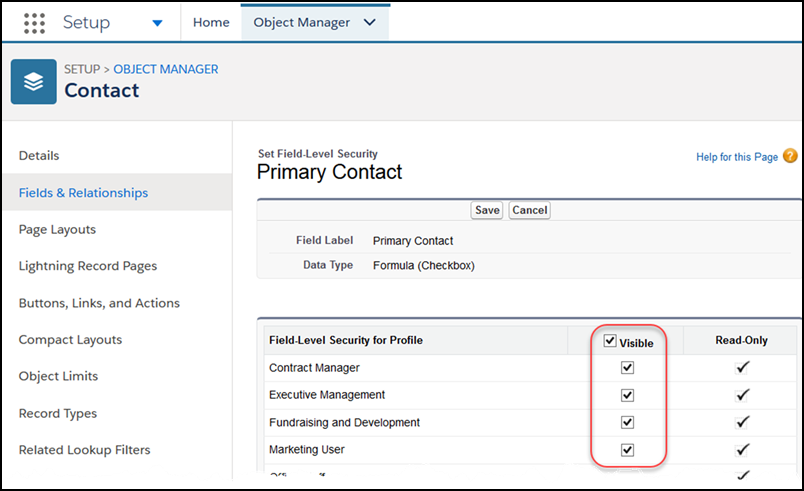
- Select field-level security for each profile, then click Next.
- Select the Contact page layouts that should include the new field, then click Save.
-
Now that the custom gender field is created, use the steps in the Configure Relationship Reciprocal Settings section to configure the reciprocal relationship for it, so that it can be applied when you create relationships. For more information on gender and reciprocal relationship settings, read Manage Relationships Settings.
Activate Workflow Rules
NPSP comes with a handful of useful workflow rules to manage emails and phone numbers, and to automatically send acknowledgment emails. The workflow rules are inactive by default.
- From Setup, in the Quick Find box, enter Workflow Rules, then click Workflow Rules.
- Click Activate next to each rule.
We recommend activating all except
.Contact.Preferred_Phone__c WithHousehold