
You are here:
Uninstall NPSP
This article provides instructions for uninstalling a default version of NPSP from your Salesforce organization.
- Overview
To uninstall the Nonprofit Success Pack (NPSP) you must uninstall all of its related packages. NPSP version 3.0 or later includes these packages. - Back Up Your Data
When you uninstall a package, all of its components, custom fields and data are deleted from your Salesforce organization. Be sure you understand the impact uninstalling NPSP will have on your org! - Remove Profile Access to the NPSP App
For the System Administrator profile and each custom profile, make sure that NPSP isn't the default app. - Delete NPSP Page Layouts for Standard Objects
Delete the NPSP page layouts before you can uninstall. In some cases you need to assign or create a non-NPSP page layout so that your standard objects still have an active page layout. - Remove NPSP Elements from Non-NPSP Custom Page Layouts
If you included any NPSP page elements (such as buttons or related lists) on non-NPSP page layouts, you must remove them. Note that these are just some of the most common customizations that are possible. - Remove NPSP Lightning Record Pages as Defaults
Remove the Lightning record pages as the org default. - Revert Button Overrides to Default
NPSP changes the behavior of these standard Salesforce buttons. - Delete NPSP Custom Metadata
Delete NPSP custom metadata types before you uninstall NPSP. - Remove NPSP Home Visualforce Page
The NPSP Home Visualforce page was included in some versions of the NPSP trial. If you find you have this page, you should remove it. - Remove Level Components
Remove NPSP picklist values from the Target field and replace with non-NPSP value. - Uninstall NPSP Packages in the Correct Order
Now you should be able to uninstall the six NPSP Packages. You must uninstall the NPSP Packages in this exact order.
Overview
To uninstall the Nonprofit Success Pack (NPSP) you must uninstall all of its related packages. NPSP version 3.0 or later includes these packages.
-
Affiliations
-
Contacts & Organizations
-
Households
-
Nonprofit Success Pack
-
Recurring Donations
-
Relationships
Only a system administrator or implementation partner should uninstall NPSP. The uninstall process can take several hours or even longer to complete. Your users should not access Salesforce while you're uninstalling NPSP.
If you want to remove NPSP, you must uninstall all six packages following the step-by-step instructions below. When you uninstall a package, wait until you receive an email confirmation that the package has uninstalled before proceeding with the next one. Failure to follow the steps in the correct order prevents packages from being removed successfully.
If you uninstall only the Nonprofit Success Pack package without removing the others, your org may be left in an unstable state, as there is code and functionality in the Nonprofit Success Pack packages that the other packages rely on.
Alternatives to Uninstalling
Because NPSP contains so many components, it can be difficult to uninstall especially if your organization has been using NPSP for a while or you've extended NPSP with your own customizations. Instead of uninstalling, you might consider moving to a new Salesforce org. In this scenario, you're starting over with a new Salesforce implementation, so you'll be re-building from the ground up. Contact your Account Executive or implementation partner to discuss options.
Back Up Your Data
When you uninstall a package, all of its components, custom fields and data are deleted from your Salesforce organization. Be sure you understand the impact uninstalling NPSP will have on your org!
Learn how to back up your data in Export Backup Data from Salesforce.
Remove Profile Access to the NPSP App
For the System Administrator profile and each custom profile, make sure that NPSP isn't the default app.
- Click
 , then click Setup.
 - From Setup, enter Profiles in the Quick Find box, then select Profiles.
- Click System Administrator, then click Assigned Apps.
- For the Nonprofit Success Pack rows, make sure that Default is not selected. If it is, click Edit and select a different default app. You can leave the Nonprofit Success Pack rows Visible.
- Click Save.
-
Repeat these steps for all custom profiles, even profiles that you aren't actively using.
Delete NPSP Page Layouts for Standard Objects
Delete the NPSP page layouts before you can uninstall. In some cases you need to assign or create a non-NPSP page layout so that your standard objects still have an active page layout.
Delete and replace these NPSP page layouts:
- From Setup, click the Object Manager tab.
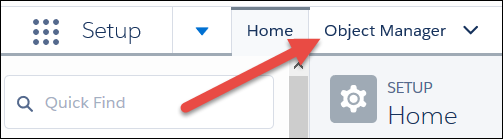
- In the list of objects, click the name of one of the objects listed above.
- Click Page Layouts.
- In the row for the page layout you want to delete, click
 , then click Delete.
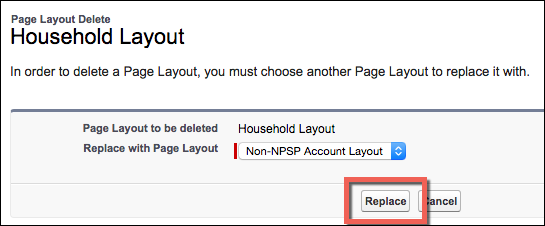
 - To replace the layout you're deleting, select a non-NPSP Page Layout. If there isn't another page layout listed in the Replace with Page Layout menu, you may need to create one. If you need to create a new layout, don't copy the layout from an existing NPSP layout. In some cases you may need to create a page layout from scratch.
- Click Replace.
- Repeat these steps for each page layout listed above.
Remove NPSP Elements from Non-NPSP Custom Page Layouts
If you included any NPSP page elements (such as buttons or related lists) on non-NPSP page layouts, you must remove them. Note that these are just some of the most common customizations that are possible.
Account
Remove the New Account Donation button.
- In Setup, click the Object Manager tab.
- In the list of objects, click Account.
- Click Page Layouts.
- Click the page layout name.
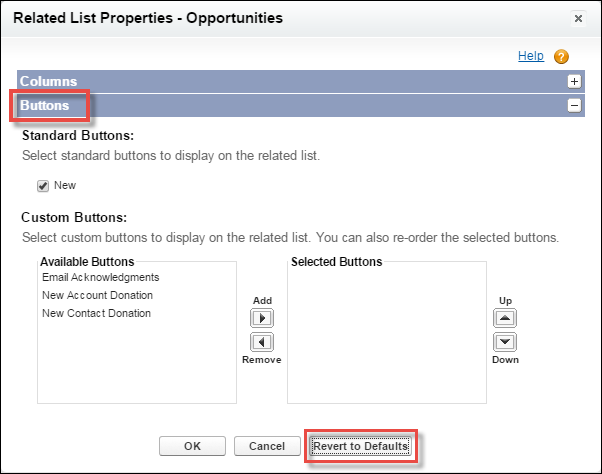
- On the Opportunities related list, click the wrench icon.
- In the Buttons section, click Revert to Defaults to remove the custom New Account Donation button and enable the standard New button.
- Click OK.
- Click Save.
Campaign
Remove the Household Mailing List button and the GAU Allocations related list.
- In Setup, click the Object Manager tab.
- In the list of objects, click Campaign.
- Click Page Layouts.
- Click the page layout name.
- Drag the Household Mailing List button from the Custom Button section to the field section at the top of the page.
- Remove the GAU Allocations related list by clicking
 on its title bar.
 - Click Save.
Contact
Remove the Relationships Viewer, Recalculate Rollups and New Contact Donation buttons.
- In Setup, click the Object Manager tab.
- In the list of objects, click Contact.
- Click Page Layouts.
- Click the page layout name.
- Drag the Relationships Viewer button from the Custom Button section to the field section at the top of the page.
-
Drag the Recalculate Rollups button from the Custom Button section to the field section at the top of the page.
-
Drag the Recalculate Rollups button from the Salesforce Mobile and Lightning Experience Actions section to the field section at the top of the page.
- On the Opportunities related list, click the wrench icon.
- In the Buttons section, click Revert to Defaults to remove the New Contact Donation button and enable the standard New button.
- Click OK.
- Click Save.
Delete the New Donation, New Membership, New Major Gift, and New In-Kind Gift actions:
Opportunities
Remove the Matching Donation, Email Acknowledgment, Manage Soft Credits, and Refresh Name buttons and GAU Allocations, Partial Soft Credits, and Payments related lists.
- In Setup, click the Object Manager tab.
- In the list of objects, click Opportunity.
- Click Page Layouts.
- Click the page layout name.
- Drag the Matching Donation, Email Acknowledgment, Manage Soft Credits, and Refresh Name buttons from the Custom Button section to the field section at the top of the page.
-
Drag the Manage Soft Credits button from the Salesforce Mobile and Lightning Experience Actions section to the field section at the top of the page.
- Remove the GAU Allocations, Partial Soft Credits, and Payments related lists by clicking on their title bars.
- Click Save.
Remove the Email Acknowledgment button from the Opportunities Search layouts.
- In Setup, click the Object Manager tab.
- In the list of objects, click Opportunity.
- Click Search Layouts.
- In the row for the Default Layout, click , then click Edit.
- Click the left arrow to remove Email Acknowledgments from the Selected Buttons.
- Click Save.
Remove the Email Acknowledgment button from Search Layouts for Salesforce Classic:
-
In Setup, click the Object Manager tab.
-
In the list of objects, click Opportunity.
-
Click Search Layouts for Salesforce Classic.
-
In the row for List view, click the arrow, then click Edit.
- Click the left arrow to remove Email Acknowledgments from the Selected Buttons.
- Click Save.
Remove the Partial Soft Credits related list from Opportunity page layouts:
-
In Setup, click the Object Manager tab.
-
In the list of objects, click Opportunity.
-
Click Page Layouts, then click Donation Layout.
-
Scroll down to the Related Lists section.
-
Click Remove Related List in the Partial Soft Credits related list.
-
Click Save.
-
Repeat these steps for all other Opportunity page layouts.
Delete the New Deliverable action:
Recurring Donations
Remove the Recalculate Rollups, and Refresh Opportunities buttons and the GAU Allocations related list:
- In Setup, click the Object Manager tab.
- In the list of objects, click Recurring Donation.
- Click Page Layouts.
- Click the page layout name.
- Drag the Recalculate Rollups, and Refresh Opportunities buttons from the Custom Button section to the field section at the top of the page.
- Remove the GAU Allocations related list by clicking on its title bar.
- Click Save.
Remove the Active Schedules and Upcoming Installments Lightning components from Lightning record pages.
-
In Setup, click the Object Manager tab.
-
In the list of objects, click Recurring Donation.
-
Click Lightning Record Pages.
-
Click the page layout name.
-
Click Edit.
-
Find the Active Schedules component on the layout and click remove.

-
Find the Upcoming Installment component on the layout and click remove.
-
Click Save.
Remove NPSP Lightning Record Pages as Defaults
Remove the Lightning record pages as the org default.
-
NPSP Account Record Page
-
NPSP Contact Record Page
-
NPSP Campaign Record Page
-
NPSP Lead Record Page
-
NPSP Opportunity Record Page
-
NPSP GAU Allocation
-
NPSP General Accounting Unit
To remove a Lightning record page as the org default:
-
From Setup, enter Lightning App Builder in the Quick Find box, then click Lightning App Builder.
-
Click Edit next to the record page name.
-
Click Activation.
-
Click Remove as Org Default.
-
Click Next. Select System Default (or any non-NPSP Lightning record page).
-
Click Save.
-
Repeat these steps for all NPSP Lightning record pages listed above.
Revert Button Overrides to Default
NPSP changes the behavior of these standard Salesforce buttons.
| Object Name | Button Name |
|---|---|
| Contact | Delete |
| Lead | Convert |
Before uninstalling , you must restore the behavior to use default pages.
- In Setup, click the Object Manager tab.
- In the list of objects, click the name of one of the objects listed above.
- Click Buttons, Links, and Actions.
- In the row with the button to be deleted, click , then click Edit.
- Select No Override (use default).
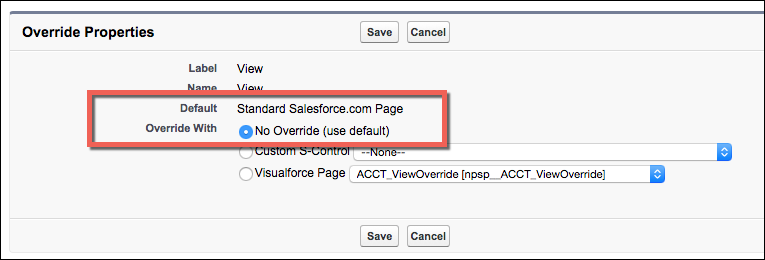
- Click Save.
- Repeat these steps for each button listed above.
Delete NPSP Custom Metadata
Delete NPSP custom metadata types before you uninstall NPSP.
Delete records for these NPSP Custom Metadata Types:
-
Data Import Field Mapping
-
Data Import Field Mapping Sets
-
Data Import Object Mapping
-
Data Import Object Mapping Set
-
Filter Group
-
Filter Rule
-
Opportunity Stage to State Mapping
-
Recurring Donation Status Mapping
-
Rollup
To delete Custom Metadata Type records:
-
In NPSP Settings, click . Click the toggle to disable Customizable Rollups.
-
Click . Click the toggle to disable Advanced Mapping.
-
In Setup, enter Custom Metadata Types in the Quick Find and click Custom Metadata Types.
-
Click Manage Records next to Data Import Field Mapping.
-
Click Del next to each record until you've deleted all records.
-
Repeat steps 3 - 5 for the remaining Custom Metadata Types listed above.
Remove NPSP Home Visualforce Page
The NPSP Home Visualforce page was included in some versions of the NPSP trial. If you find you have this page, you should remove it.
- In Setup, search for Visualforce.
- Click on Visualforce Pages.
- Click N on the alphabet bar to navigate to pages that begin with N.
- Click Del to the left of the NPSP_Home page.

Remove Level Components
Remove NPSP picklist values from the Target field and replace with non-NPSP value.
-
In Setup, click Object Manager.
-
Click Level.
-
Click Fields & Relationships.
-
Click Target.
-
In the Values section, click New.
-
Enter Placeholder, then click Save. This step is necessary because a picklist must have at least one active value.
-
In the Values section, click Del next to Account. Click Ok in the pop-up window.
-
Select Replace value on records with blank value.
-
Click Save.
-
Repeat steps 7 - 9 for the Contact picklist value.
Delete and erase the Level and Previous Level fields on the Account object.
-
In Setup, click Object Manager.
-
Click Account.
-
Click Fields & Relationships.
-
In the row for Level, click the arrow and click Delete.
-
Click Delete in the pop-up window.
-
In the row for Previous Level, click the arrow and click Delete.
-
Click Delete in the pop-up window.
-
Click your profile picture and click Switch to Salesforce Classic.
-
Click Setup.
-
Enter Accounts in the Quick Find box.
-
Click Fields.
-
Scroll to the bottom of the Account Custom Fields & Relationships section.
-
Click Deleted Fields.
-
In the row for Level, click Erase.
-
Select Yes, I want to permanently delete the custom field, and click Delete.
-
In the row for Previous Level, click Erase.
-
Select Yes, I want to permanently delete the custom field, and click Delete.
-
Click Switch to Lightning Experience.
Uninstall NPSP Packages in the Correct Order
Now you should be able to uninstall the six NPSP Packages. You must uninstall the NPSP Packages in this exact order.
- Nonprofit Starter Pack/Nonprofit Success Pack
- Affiliations
- Relationships
- Recurring Donations
- Households
- Contacts & Organizations
To uninstall a package:
- From Setup, enter Installed Packages in the Quick Find box, then click Installed Packages.
- Click Uninstall next to the package name.

- Check the box next to Yes, I want to uninstall this package and permanently delete all associated components. You can also select the option to save object data for 48 hours.
- Click Uninstall.
- Wait for an email that confirms that the uninstall was successful before moving on to the next package.
Congratulations! You survived the uninstall experience.