You are here:
Create Approval Processes
An approval process automates how records are approved. You can create an approval process for a task, email alert, field update, or outbound message.
See Add Automated Actions to an Approval Process.
- What is Your Approval Process?
Before you create an approval process, we recommend mapping out your process. - (Optional) Consider Your Fields
Consider what fields you want to use in your approval process and make adjustments, if needed. For example, to assign a reviewed Funding Request to the Funding Program Manager for approval, you'll need to add a user lookup field to the Funding Request object. - Build the Approval Process
Define the criteria for moving a record through an approval process such as the funding status. - Define Approval Steps
Approval steps are milestones within your process that determine where the record moves next. - Add Workflow Actions
Adding a workflow action is the last step to create an approval process. You can create an action for approvals as well as rejections. - Activate the Approval Process
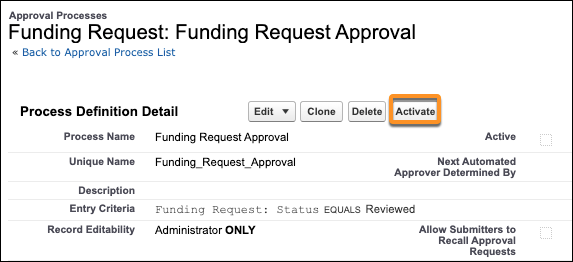
When you are ready to activate the approval process, click Activate. There can only be one active version of each approval process at a time. If you need to change anything in the approval process in the future, it must be deactivated.
What is Your Approval Process?
Before you create an approval process, we recommend mapping out your process.
A few things to consider:
-
Who submits the record for approval?
-
When should a record be submitted for approval?
-
How should an approver be notified there is a pending approval?
-
Who needs to be included in the approval process?
-
What are the approval steps?
-
What are the criteria for each approval step?
-
What needs to happen when the record is approved or rejected?
In our example, let's say you want to create an approval process for all reviewed Funding Requests to go to the Funding Program Manager for approval. We'll walk through how to set this up.
(Optional) Consider Your Fields
Consider what fields you want to use in your approval process and make adjustments, if needed. For example, to assign a reviewed Funding Request to the Funding Program Manager for approval, you'll need to add a user lookup field to the Funding Request object.
Make sure to add the new field to the Funding Request page layout, then use Lightning Process Builder to populate the User field on the Funding Request object with the Funding Program Manager from the related Funding Program record. See Lightning Process Builder in Salesforce Help for more information.
-
Click
 , then click Setup.
 -
Click Object Manager.
-
Select Funding Request from the list of objects.
-
Click Fields & Relationships.
-
Click New.
-
Select Lookup Relationship.
-
Click Next.
-
Select User from Related To.
-
Click Next.
-
Field Label and Field Name are auto-populated, but update them if you want another name for this field.
-
Optionally, enter a Description.
-
Optionally, enter Help Text.
-
Click Next.
-
Select the profiles that have edit access to the new field.
-
Click Next, then Save.
Build the Approval Process
Define the criteria for moving a record through an approval process such as the funding status.
-
Click
, then click Setup. -
From Setup, enter Approval in the Quick Find box, then select Approval Processes.
-
Select an object from Manage Approval Process For. For this example, select Funding Request.
-
Click Create New Approval Process, then select Use Standard Setup Wizard.
-
Enter a name in the Process Name field. For example, Funding Request Approval.
-
Press tab to autofill the Unique Name field.
-
Enter a description in the Description field, then click Next.
-
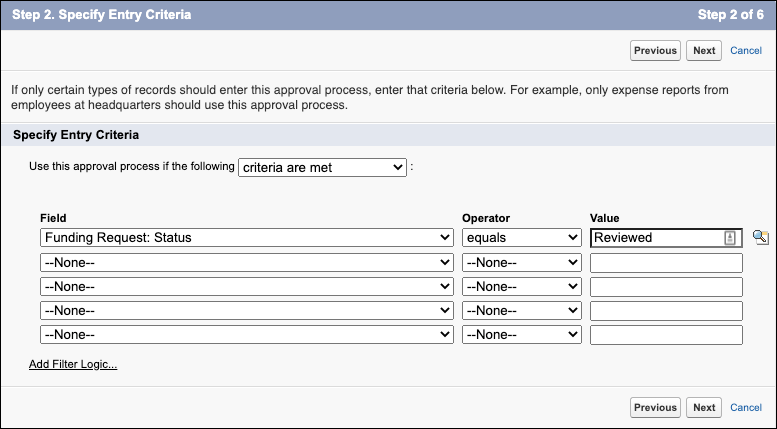
Specify the criteria a record must meet to be submitted for review and approval in Specify Entry Criteria. In this example, the Funding Request needs to be in a Reviewed status to continue to the Funding Program Manager for approval.
-
Select Funding Request: Status from Field.
-
Select equals from the Operator field.
-
Enter Reviewed as the Value.
-
-
Click Next.
-
Optionally, you can add automated approvals by selecting a value from Next Automated Approver Determined By.
- Select the Record Editability Properties. For example, select Administrators ONLY can edit records during the approval process to lock the record from edits outside of admins.
- Click Next.
- Search for then select a template from the Approval Assignment Email Template field. This notifies an approver that an approval request is assigned to them. This template is used for all steps in this process.
 Note You can also set up approvals in Chatter. See Let Users Respond to Approval Requests from Chatter in Salesforce Help.
 -
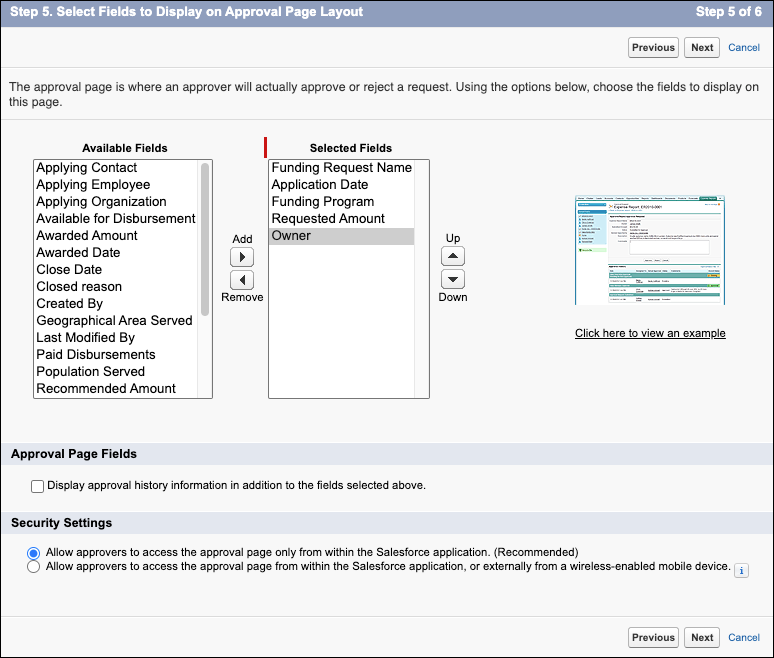
Configure the approval page layout by adding or removing Available Fields to Selected Fields. Fields added to the Selected Fields list display to the approver.
-
Click Next.
-
Select the users allowed to submit a Funding Request for approval. Refer to What Is Your Approval Process? to determine who should be allowed. In this example, the Funding Request Owner is selected by default.
-
Click Save.
-
With Yes, I’d like to create an approval step selected, click Go! to continue to Define Approval Steps.
Define Approval Steps
Approval steps are milestones within your process that determine where the record moves next.
In our example, a Funding Request always needs approval from the Funding Program Manager. Let’s create an approval step for that scenario.
-
Enter a Name, such as Funding Program Manager Approval.
-
Press tab to autofill the Unique Name field.
-
Enter a description in the Description field.
-
Enter a Step Number if you have more than one step in your process.
-
Click Next.
-
Specify the criteria for the record to enter this approval step. For example, “All records should enter this step” submits every record for approval. If there are exceptions, select Enter this step if the following.
-
Click Next.
-
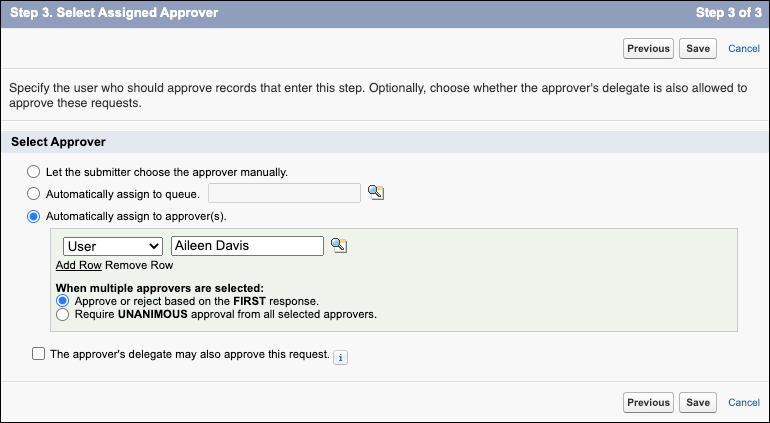
Select the approver based on the process you outlined. For example, select Automatically assign to approver(s) then search for and select a specific User to be the approver.
-
Click Save.
-
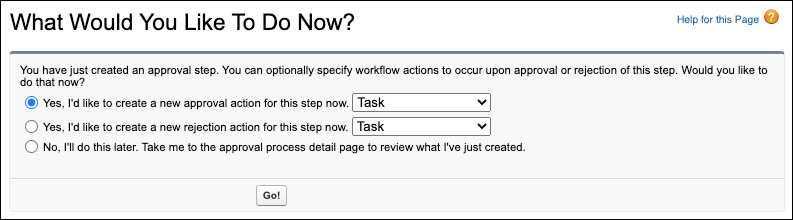
With Yes, I’d like to create a new approval action for this step now, click Go! to continue to Add Workflow Actions.
Add Workflow Actions
Adding a workflow action is the last step to create an approval process. You can create an action for approvals as well as rejections.
In this example, we'll create a new approval task.
-
Select Yes, I’d like to create a new approval action for this step now.
-
Select Task.
-
Click Go!
-
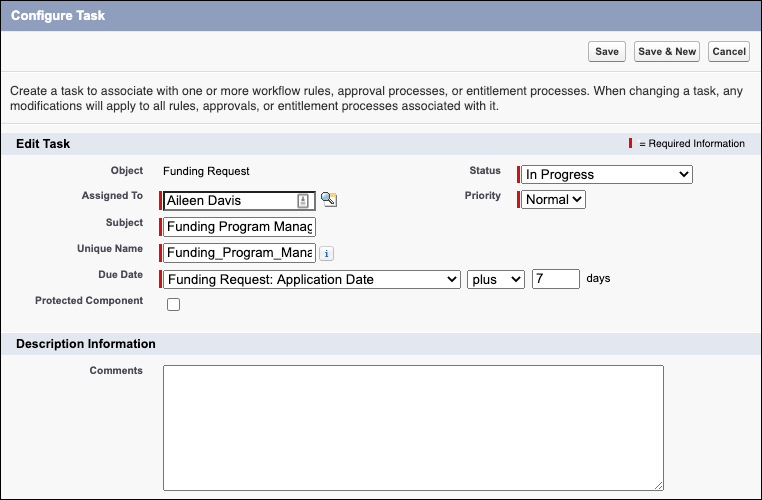
Search for then select a user in the Assigned To field. For example, Aileen Davis.
-
Enter an identifiable Subject name to reflect the task. For example, Funding Program Manager Approval.
-
Press Tab to autofill a Unique Name.
-
Select a Due Date. For example, Funding Request: Application Date plus 7 days requires Aileen to review this request 7 days after a user has submitted their application.
-
Optionally, select Protected Component.
-
Select a Status for the task.
-
Select a Priority.
-
Optionally, add additional information to the Comments field.
-
Click Save.