
You are here:
Set Up Alerts
Get Alerts up and running in your Student Success Hub org.
- Learn About Alerts
Alerts help support staff stay on top of concerns about grades, attendance, and other areas that impede student success. The Alert custom object is included with Student Success Hub. Every Alert is related to a Student Record Case and, of course, to the student Contact associated with that Case. - Alerts Release Information
The Alert custom object was released with Student Success Hub 1.1, and Alerts have been enhanced in subsequent releases. - Set or Verify Object and Field Permissions for Alerts
Learn about the required permissions for the Alert object and fields. - Configure Sharing Settings for Alerts
Verify your default organization-wide sharing settings for the Alert object. - Customize and Assign Alert Record Types
Alert record types determine the types of Alerts that support staff can create. - Assign the Compact Layout to the Alert Record Page
Student Success Hub provides the Alerts Compact Layout. Make it the primary layout so that it appears on the Alert Lightning record page. - Confirm or Customize the Alerts Related Lists on the Student Record Case Page
The Student Record Case Layout page layout included with Student Success Hub includes an Alerts tab with two Alerts related lists: one for Unresolved Alerts and one for Resolved Alerts. Review them now and customize them if desired. - Confirm or Customize Alerts List Views
In K-12 orgs, Student Success Hub includes a My Open Alerts list view that allows support staff to quickly and easily view pending Alerts. The list view includes all Alerts that are owned by the support staff User and are unresolved—that is, whose Status is not a Closed value. - Confirm or Customize the Lightning Record Page for Alert Records
To give support staff a detailed view of Alert records, Student Success Hub includes a Lightning record page layout called Support Alert. - Create Additional Alert Relationships
The Alert object is related to Course Connection and Program Enrollment through preconfigured Alert relationships. Do your support staff members want to receive Alerts for other reasons, such as for attendance or behavior issues? If so, create Alert relationships for other Contact-related objects using the Alert Relationship custom metadata type. Just remember, the Alert object can have only one relationship at a time. - Enable Status History Tracking
Field history tracking is enabled by default on the Alert custom object. We recommend that you also enable tracking for the Alert Status field, for comprehensive tracking of an Alert's status history. - Enable Mass Updating of Alert Statuses
Make it easy for support staff to update the statuses of multiple Alerts at once. For mass updating Alert statuses for multiple students, set up Alerts list views for that purpose. For mass updating Alert statuses for an individual student, you can enable an option in the Alert related lists on the Student Record Case. However, this option isn't recommended if you use different statuses for different Alert record types. - Control Alert Assignment Feed Updates
When an Alert is assigned to someone other than the User who updated the Alert—that is, when the Alert record is edited and results in assignment to another User—Student Success Hub posts an update to the Alert's Chatter feed. The post @mentions the assigned User, notifying the assignee and followers of the Alert about the assignment. To turn off these automatic posts, disable the trigger handler that creates them.
Learn About Alerts
Alerts help support staff stay on top of concerns about grades, attendance, and other areas that impede student success. The Alert custom object is included with Student Success Hub. Every Alert is related to a Student Record Case and, of course, to the student Contact associated with that Case.
Alerts can also be related to:
-
a Program Enrollment record,
-
a Course Connection record,
-
a Case record other than the Student Record Case, or
-
any other object that can be related to the Contact, such as a Term Grade record or even another Alert record.
However, the Alert object can only have one Alert Relationship at a time.
Student Success Hub provides triggers that enforce referential integrity when Alert records are created and updated, including automatically relating the Alert to the active Student Record Case for the specified student Contact, and the correct Program Enrollment, Course Connection, or another object, if one is specified. Student Success Hub also provides a preconfigured, customizable set of Alert record types that include the reasons for concern. For example, the Academic Alert record type offers reasons such as Grade Concern, Attendance Concern, and Academic Integrity (in higher ed orgs) or Grade Concern, Missing/Late Assignment, and Participation Concern (in K-12 orgs).
Alerts Release Information
The Alert custom object was released with Student Success Hub 1.1, and Alerts have been enhanced in subsequent releases.
To get Alerts up and running in your org, complete the tasks in this article. Unless otherwise noted at the beginning of the task, all setup tasks are required regardless of the version of Student Success Hub that you originally installed. If you don’t know which version you started with, see Keep Student Success Hub Up-to-Date.
Set or Verify Object and Field Permissions for Alerts
Learn about the required permissions for the Alert object and fields.
See Configure K-12 Support Staff Permissions, Configure Higher Ed Support Staff Permissions and Configure Student Permissions.
Configure Sharing Settings for Alerts
Verify your default organization-wide sharing settings for the Alert object.
Customize and Assign Alert Record Types
Alert record types determine the types of Alerts that support staff can create.
In higher ed orgs, Student Success Hub installs these Alert record types: Academic, Career, Financial Aid, Health, and Housing.
In K-12 orgs, Student Success Hub provides these default Alert record types: Academic, Attendance, Behavior, Career, Financial Aid, Health, and Housing.
Each record type has an associated set of default reasons for concern, defined in the Alert object's Reason picklist field. Some picklist values are shared across record types, while others are unique to one record type. For example, consider the default Reason value Missing/Late Application. It's shared by the Career, Financial Aid, and Housing record types. In contrast, Missing/Late Assignment is a Reason only for the Academic record type.
Customize the record types and their associated reasons as needed, and then assign the record types to the support staff profile. See Assign Alert and Success Plan Record Types to Profiles.
Assign the Compact Layout to the Alert Record Page
Student Success Hub provides the Alerts Compact Layout. Make it the primary layout so that it appears on the Alert Lightning record page.
-
From Setup, in Object Manager, click Alert.
-
On the Compact Layouts page, click Compact Layout Assignment and then click Edit Assignment.
-
Set Primary Contact Layout to Alerts Compact Layout.
-
Save your changes.
Confirm or Customize the Alerts Related Lists on the Student Record Case Page
The Student Record Case Layout page layout included with Student Success Hub includes an Alerts tab with two Alerts related lists: one for Unresolved Alerts and one for Resolved Alerts. Review them now and customize them if desired.
-
In Student Success Hub, go to a Student Record Case page.
-
Click the Alerts tab.
If desired, edit the component—for example, remove the Resolved Alerts related list or remove the Change Status button from the Resolved Alerts related list.
-
Click
 and choose Edit
Page.
and choose Edit
Page. -
Make your edits and save your changes.
If you're using a different Student Record Case layout, here's how to manually add the Alerts related lists to the page.
- On any Student Record Case record, click in the page header and select Edit Page.
- In the Lightning App Builder, click the Tabs component and in the Properties pane, click Add Tab.
-
Click the newly added tab in the Tabs list, change the Tab Label to Custom, and for the Custom Tab Label, enter Alerts.
-
Click Done.
-
If desired, drag the Alerts tab to a different position in the Tabs list. For example, make it appear first and make it the Default Tab for the page.
Now, add two instances of the Alerts Related List component to the page: one for unresolved Alerts and one for resolved Alerts.
-
Select the second Unresolved Alerts component and, in the Properties pane, set the Status field to Resolved. Also, verify whether to Hide or Show New Button on this component.
- Save your changes.
Now you have two Alerts related lists on the Student Record Case: one for Unresolved Alerts and one for Resolved Alerts.
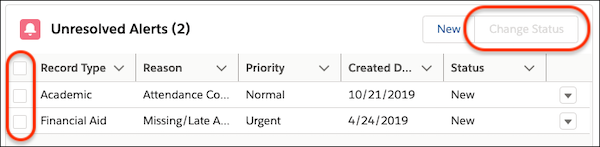
Confirm or Customize Alerts List Views
In K-12 orgs, Student Success Hub includes a My Open Alerts list view that allows support staff to quickly and easily view pending Alerts. The list view includes all Alerts that are owned by the support staff User and are unresolved—that is, whose Status is not a Closed value.
-
In the Student Success Hub app, choose Alerts from the app navigation menu and select the My Open Alerts list view. It includes these fields:
-
Student Contact
-
Alert #
-
Record Type
-
Priority
-
Reason
-
Status
-
Created Date
-
-
Customize the Visible Fields and create other list views as desired. Be sure to keep Record Type, because record types determine the reason for the Alert.
-
Save your changes.
If you need to, here's how create a similar Alerts list view to give support staff the information they need to process Alerts in their caseloads.
- In the Student Success Hub app, choose Alerts from the app navigation menu and select the All list view.
- Click
 and select Select Fields to
Display.
and select Select Fields to
Display. -
Make sure these fields are in the Visible Fields list: Student Contact, Alert #, Record Type, Student Record, Reason, Status, Created By, and Created Date.
- Save your changes.
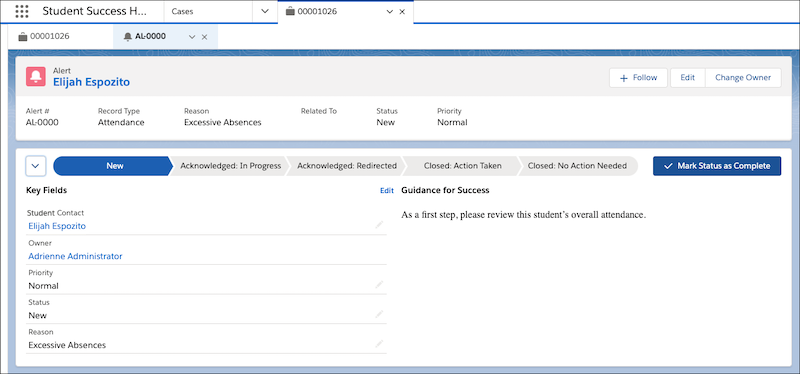
Confirm or Customize the Lightning Record Page for Alert Records
To give support staff a detailed view of Alert records, Student Success Hub includes a Lightning record page layout called Support Alert.
In K-12 orgs, the layout features a path to guide support staff through the Alert process. A sample Attendance Alert path is included. If your org doesn't include the path, you can add it, and you can customize the path to work with other Alert record types. You can customize the page layout in other ways, too. For example, add the Case field to the layout to give your support staff a way to quickly create a Case escalation from an Alert record. From Setup, search for and then select Lightning App Builder, then click Edit for the Support Alert page.
Create Additional Alert Relationships
The Alert object is related to Course Connection and Program Enrollment through preconfigured Alert relationships. Do your support staff members want to receive Alerts for other reasons, such as for attendance or behavior issues? If so, create Alert relationships for other Contact-related objects using the Alert Relationship custom metadata type. Just remember, the Alert object can have only one relationship at a time.
Create a Lookup Field for the Related Object
-
From Setup, in Object Manager, click Alert.
-
Click Fields & Relationships, then click New.
-
Select Lookup Relationship as the data type and click Next.
-
Choose an object to relate to the Alert. For example, choose Attendance Event. Click Next.
-
Enter a Field Label and Field Name. For example, enter Attendance Event Lookup for the Field Label, and then press Tab to populate Attendance_Event_Lookup for the Field Name. Click Next.
 Note Lookup filters make sure support staff get only the Alerts related to a specific student. For example, the filter criteria Alert: Student Contact ID EQUALS Program Enrollment: Contact ID filters out enrollments that aren't related to a student.
 -
Set the appropriate field-level security. Click Next.
-
Select the page layouts that should include the new field. Click Next.
Note Don't add the Related Record Name and Related Record ID fields to any page layouts. Otherwise, someone might update them manually. -
Name the related lists.
-
Save your changes.
Create an Alert Relationship Custom Metadata Type
-
From Setup, search for then select Custom Metadata Types.
-
Click Manage Records next to Alert Relationship.
-
Click New.
-
Enter a value for Label and Alert Relationship Name.
-
Enter a value for Relationship Field on Alert Object.
Make sure this value is the API name of the field, otherwise the configuration won't work. For example, if you created a field named Attendance_Event_Lookup when you created the lookup field earlier, enter Attendance_Event_Lookup__c here.
-
Save your changes.
On the Alert record, the Related To field might take a couple of minutes to populate. If you don't see it after a few minutes, check the permissions and field-level security on the object you're trying to relate.
Enable Status History Tracking
Field history tracking is enabled by default on the Alert custom object. We recommend that you also enable tracking for the Alert Status field, for comprehensive tracking of an Alert's status history.
- From Setup, in Object Manager, click Alert.
- On the Fields & Relationships page, click Set History Tracking.
-
Select the Status field.
- Save your changes.
Enable Mass Updating of Alert Statuses
Make it easy for support staff to update the statuses of multiple Alerts at once. For mass updating Alert statuses for multiple students, set up Alerts list views for that purpose. For mass updating Alert statuses for an individual student, you can enable an option in the Alert related lists on the Student Record Case. However, this option isn't recommended if you use different statuses for different Alert record types.
Enable Mass Updates from Alerts List Views
- Go to a custom Alerts list view or create a new one.
-
Filter the list view to show a single record type only. List views showing multiple record types can't be configured to allow mass editing.
- From the list view controls menu, select Edit List Filters.
- Click Add Filter.
-
Specify the Record Type field, the equals operator, and the record type value that you're filtering for, and then click Done.
- Save your changes.
-
Repeat the steps to create filtered list views for other Alert record types as needed.
Your filtered Alerts list views now show checkboxes that support staff can use to select multiple Alerts (of the specified record type) and mass update those Alert statuses.
Enable Mass Updates from the Alerts Related Lists on Student Record Cases
Student Success Hub enables mass updates on the Alerts related lists on the included Student Record Case Lightning page layout. If you're using a different Student Record Case layout or need to enable mass updates manually, here's how.
- From Setup, search for and then select Custom Settings.
- Next to SSH Hierarchy Settings, click Manage.
-
Click Edit and then select Allow Mass Status Update in Alert Related List.
-
Save your changes.
This change makes two items visible in the Alerts related lists on Student Record Cases: checkboxes for selecting multiple Alerts, and a Change Status button for applying a mass status update.
Control Alert Assignment Feed Updates
When an Alert is assigned to someone other than the User who updated the Alert—that is, when the Alert record is edited and results in assignment to another User—Student Success Hub posts an update to the Alert's Chatter feed. The post @mentions the assigned User, notifying the assignee and followers of the Alert about the assignment. To turn off these automatic posts, disable the trigger handler that creates them.
- Click
 and search for and then select Trigger Handlers.
 - Select a list view, such as All - Main Fields, that shows trigger handlers with their TDTM class names.
-
Click the action menu for the sfal.AlertNotification_TDTM class and select Edit.
-
Deselect the Active field.
-
If you're permanently disabling Alert assignment feed updates, also select the User Managed field to prevent the trigger handler from reactivating after future updates to the Student Success Hub.
- Save your changes.