
You are here:
Set Up Your Support Staff to Manage Their Availability
Complete these tasks to allow support staff to manage their appointment availability in Student Success Hub.
- Allow Support Staff to Manage Their Appointment Availability Settings
Add a component to the User record page that lets support staff specify their individual appointment availability settings. - Allow Support Staff to Customize Appointment Lengths by Topic
As an administrator, in custom settings, you set a default length for all appointments. (Student Success Hub sets it to 50 minutes, otherwise the default is 30 minutes. Either way, you can change it.) However, one size usually doesn't fit all, and your support staff might want their appointments to be different lengths depending on the topic of discussion. - Instruct Your Support Staff to Designate Their Availability
After you've configured the SSH Support Staff Appointment Settings component, your support staff can designate exactly when they're available for appointments—and equally important, when they're not.
Allow Support Staff to Manage Their Appointment Availability Settings
Add a component to the User record page that lets support staff specify their individual appointment availability settings.
-
In the Student Success Hub app, go to your User record: Click the View profile icon in the page header, and then click your name.
-
In the page header, click the gear icon and select Edit Page to open the Lightning App Builder.
-
From the menu of components, drag SSH Support Staff Appointment Settings to the page canvas. We recommend placing it under the User contact details for easy access.
- Save your changes.
- If you're ready to Activate the page now, you can assign it to the Student Success Hub app, the support staff profile, and other entities as appropriate.
- Click Back to exit Lightning App Builder.
- If you've activated the User Record page with your changes, back on the User record page, verify that the appointment availability component appears. If you've specified an organization-wide default or per-support staff member availability settings in Custom Settings, those values appear here. Remember that support staff can access their individual settings from both their User Record page and also from the gear icon in the Appointment Manager.
Allow Support Staff to Customize Appointment Lengths by Topic
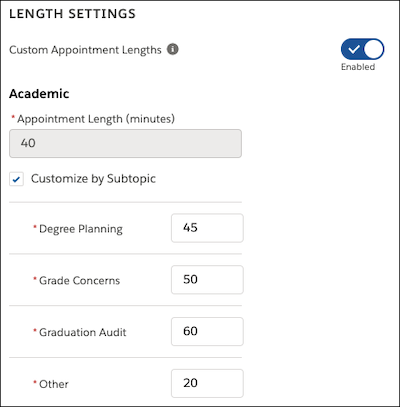
As an administrator, in custom settings, you set a default length for all appointments. (Student Success Hub sets it to 50 minutes, otherwise the default is 30 minutes. Either way, you can change it.) However, one size usually doesn't fit all, and your support staff might want their appointments to be different lengths depending on the topic of discussion.
For example, one staff member may want appointments about Academic topics to be 30 minutes and appointments about Career topics to be 45 minutes; someone else might want Academic appointments to be 20 minutes and Career appointments to be 30 minutes. A third person might also want appointments to be different lengths for different subtopics. For example, they might want Graduation Audits to be 60 minutes and Degree Planning appointments to be 45 minutes.
Student Success Hub offers a custom setting that gives support staff this flexibility and enables it by default. Here's how to enable it if you need to.
-
From Setup, search for and then select Custom Settings.
-
Click Manage next to SSH Hierarchy Settings and then click Edit.
-
Select Enable Custom Appointment Length.
-
Make sure Custom Appointment Length Opt-In is deselected.
The opt-in field only enables custom appointment lengths for the running user; you want to give all support staff the ability to use custom appointment lengths.
-
Save your changes.
After you save the custom setting, support staff can turn on Custom Appointment Lengths on their Availability Settings (Edit Appointment Availability) page. Support staff can create custom appointment lengths for up to 200 topics. If your institution uses more than 200 topics, use a Private sharing setting on Topic and create sharing rules to grant different groups of users Edit access to different groups of topics.
Instruct Your Support Staff to Designate Their Availability
After you've configured the SSH Support Staff Appointment Settings component, your support staff can designate exactly when they're available for appointments—and equally important, when they're not.
Make sure you review with your support staff how to manage their availability.
- Verify their individual time zones. Also, make sure that your students know to set their individual time zone settings in the portal, after you've set it up.
-
Verify their Appointment Buffer, which gives them time between back-to-back scheduled appointments to wrap up and prepare for the next.
-
Enable and specify Custom Appointment Lengths by topic and subtopic on their Availability Settings page, if you've enabled the custom setting. See Specify Your Scheduling Preferences and Recurring Availability. Encourage support staff to only enable custom appointment lengths when they're sure they want to use them. Turning custom appointment lengths on and off can potentially result in lost data.
- Create their recurring availability blocks in their individual Availability Settings for scheduled, walk-in, and group appointments. We recommend that support staff create availability for no more than a term at a time, to avoid exceeding the maximum number of occurrences allowed per recurrence. For a weekly series, the limit is 53. In other words, if someone schedules a recurring series for Monday, Wednesday, and Friday, every week, a series starting in late August can be scheduled out into approximately mid-December (three occurrences per week times 17 weeks, for a total of 51 occurrences).
- For exceptions to recurring availability, go to their Calendars and either edit or remove a specific recurrence of Support Time or schedule a non-support Event that overrides the recurrence (make sure the non-support Event is marked Busy), or make one-off updates to their walk-in availability from the Appointment Manager.
- Avoid marking the All-Day Event setting for any type of Event used to establish or remove availability. Student Success Hub ignores all-day Events and doesn't consider them when determining someone's availability. Always use start and end times instead. To indicate actual Events spanning an entire day or multiple days, such as a vacation, support staff can specify a 12 AM start time on the start date and a 12 AM end time on the end date, along with marking the Event Busy to override availability. For Events that occur on a specific date but are purely informational, such as a birthday reminder, support staff should mark the Event Free so that it doesn't affect availability.
To block availability for non-support Events, mark the event Busy. Out of Office doesn't block existing availability.
- If support staff have a non-support Event marked Busy that spans multiple days, any scheduled or group availability that conflicts with the multi-day Event is removed. Walk-in availability, however, is not removed. Remind support staff to delete their availability if they're not available because of a multi-day Event.
- Create one-off, date-specific availability on their Calendars. For details, see Keep Your Calendar Up-to-Date with Your Availability (Support Staff).