
You are here:
Set Up Group Availability
Complete these tasks to get Group availability up and running in your Student Success Hub org.
- Learn About Group Availability
You know what they say: There aren't enough hours in the day—unless your support staff start using Group availability. - Group Availability Release Information
Group availability was released with Student Success Hub 2.50 (Spring '21). - Group Availability Prerequisites
Group availability requires location- and topic-based availability. Make sure they're set up first. - Set or Verify Object and Field Permissions for Group Availability
Group availability requires access to the Attendee Limit and Discoverable fields on the Appointment object, and to the Attendee Limit field on the Availability object. - Configure Sharing Settings for Group Availability
Verify your default organization-wide sharing settings for the Availability object. - Configure the Group Availability Event Type in Custom Settings
At the org level, group availability uses a Custom Setting called Group Availability Event Type. This setting defines a type of Event and a type of Availability that indicate availability for group appointments that students can sign up for in the portal. - Configure the Event Group Type
Now that you have a group availability type defined for your org, add it to the objects that use it, starting with Event. - Configure the Availability Group Type
Next, add the group type to the Availability object. - Update the Appointment Detail Page Layout
Update the Appointment record detail page layout to include the Attendee Limit field.
Learn About Group Availability
You know what they say: There aren't enough hours in the day—unless your support staff start using Group availability.
Group availability is a third type of availability, along with Scheduled and Walk-In. It allows support staff to create recurring blocks of available time dedicated to appointments with groups of students. Support staff specify how many students can attend, the topic they're available to discuss, and, of course, when and where they're available. Then, students reserve a spot in the group appointment in the portal. Group availability is great for small workshops or clinics on frequently covered topics such as resume-writing, study abroad preparation, and other standard advising fare.
Group availability is different from the group appointment support that we introduced in Student Success Hub 2.40 (Summer '20). Starting with Student Success Hub 2.40, support staff can use the Scheduled availability type to invite multiple students (and other support staff ) to an appointment. With the Group availability type, however, students reserve spots in a group appointment in the portal. The net result for support staff and students alike is the same: a scheduled group appointment. The difference is the appointment's underlying availability type and who creates the appointment: the support staff member in Student Success Hub (using Scheduled availability) or students in the portal (using Group availability).
For example, every January and February, Ada Guzman is deluged by students who want to meet about summer internships. She doesn't have time to hold appointments with each student individually, and she knows that if she schedules students herself—individually or in groups—many will simply cancel or reschedule. She wants students to reserve a spot in a group appointment about summer internships at their convenience.
So Ada creates a recurring block of availability from 3 PM to 5 PM every day for those two months dedicated to virtual group appointments about summer internships. She sets the maximum number of students (Attendee Limit) at those appointments to 15. She also defines a separate recurring group availability block for in-person group appointments about summer internships, for which she defines a maximum of 5 attendees.
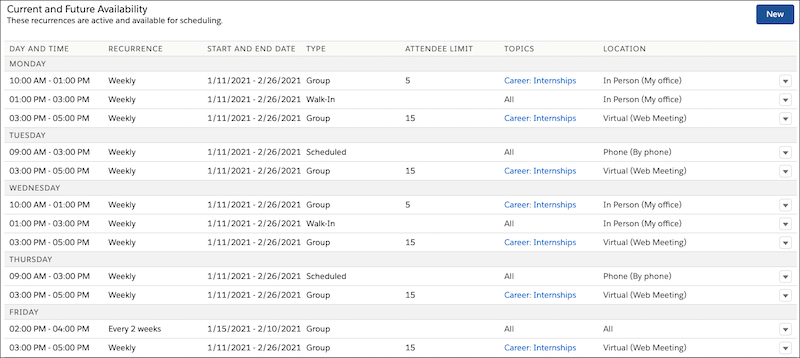
Now Ada's students can reserve a spot at any of several group appointments, some in-person and some virtual, about summer internships. Appointments during group availability blocks show in the Scheduling Wizard as long as at least one spot is open—that is, as long as the number of students with reserved attendance is below the Attendee Limit.
Group Availability Release Information
Group availability was released with Student Success Hub 2.50 (Spring '21).
To get group availability up and running in your org, complete the tasks in this article.
Unless otherwise noted at the beginning of the task, all setup tasks are required regardless of the version of Student Success Hub that you originally installed. If you don't know which version you started with, see Keep Student Success Hub Up-to-Date.
Group Availability Prerequisites
Group availability requires location- and topic-based availability. Make sure they're set up first.
See Set Up Location-Based Availability and Set Up Topic-Based Availability before continuing.
Set or Verify Object and Field Permissions for Group Availability
Group availability requires access to the Attendee Limit and Discoverable fields on the Appointment object, and to the Attendee Limit field on the Availability object.
Attendee Limit indicates the maximum number of students who can attend the appointment. The limit, which is 500, doesn't include the support staff member who owns the appointment. Attendee Limit is first defined on the Availability object, however, once an appointment in a group availability block is created, the Attendee Limit for the individual appointment is tracked on the Appointment record, independently of the Availability object.
Discoverable determines whether an appointment in a group availability block is visible to and can be reserved by students in the portal. Discoverable appointments appear in the Scheduling Wizard as long as the number of students who have reserved a spot at the group appointment is less than the Attendee Limit. Discoverable is a system field used by Student Success Hub. Do not edit it.
See Configure Higher Ed Support Staff Permissions and Configure Student Permissions for the necessary permissions.
Configure Sharing Settings for Group Availability
Verify your default organization-wide sharing settings for the Availability object.
Configure the Group Availability Event Type in Custom Settings
At the org level, group availability uses a Custom Setting called Group Availability Event Type. This setting defines a type of Event and a type of Availability that indicate availability for group appointments that students can sign up for in the portal.
The value in the Group Availability Event Type custom setting appears in all Event Type picklists in Student Success Hub, including support staff members' Availability Settings. Students also see the value in the Scheduling Wizard in the portal.
Student Success Hub provides the value Group for the Group Availability Event Type custom setting.
-
From Setup, search for and then select Custom Settings.
-
Click Manage next to SSH Hierarchy Settings and then click Edit.
-
In the Group Availability Event Type field, confirm the value Group or enter a value to represent group availability.
-
Save your changes.
Make note of the value you use for Group Availability Event Type. You'll need it to define the Event and Availability Type picklists next.
Configure the Event Group Type
Now that you have a group availability type defined for your org, add it to the objects that use it, starting with Event.
Student Success Hub provides a Group Event Type picklist value for you.
-
From Setup, in Object Manager, select Event.
-
On the Fields & Relationships page, click Type.
-
In the Values section, confirm there's a picklist value whose API Name corresponds to your Group Availability Event Type custom setting.
-
If necessary, click New and enter the value, such as Group, in the text box. Then select the Support Event record type and save your changes.
-
Alternatively, click Edit next to the Group value, change the Label and API Name to correspond to your custom Group Availability Event Type custom setting, and save your changes.
-
When you're done, you should have three values that correspond to your three availability types, for example, Walk-In, Scheduled, and Group.
Configure the Availability Group Type
Next, add the group type to the Availability object.
Student Success Hub provides a Group Availability Type picklist value for you.
-
From Setup, in Object Manager, select Availability.
-
On the Fields & Relationships page, click Type.
-
In the Values section, confirm there's a picklist value whose API Name corresponds to your Group Availability Event Type custom setting.
-
If necessary, click New, enter the value, such as Group, in the text box, and save your changes.
-
Alternatively, click Edit next to the Group value, change the Label and API Name to correspond to your custom Group Availability Event Type custom setting, and save your changes.
-
When you're done, you should have three values that correspond to your three availability types, for example, Walk-In, Scheduled, and Group.
After you've defined group availability in Custom Settings and on the Event and Availability objects, then support staff can create recurring availability blocks whose type is Group (or your custom value), and specify an Attendee Limit for appointments during the block.
Update the Appointment Detail Page Layout
Update the Appointment record detail page layout to include the Attendee Limit field.
Don't add the Discoverable field to the layout, because support staff shouldn't be able to edit it. Student Success Hub uses Discoverable under the hood to show appointments in Group availability blocks in the portal based on whether or not the Attendee Limit is reached.
And don't add either field to any Appointment page layout that students access through the portal.
Student Success Hub includes the Attendee Limit field on the Appointment Layout for you.
- From Setup, in Object Manager, click Appointment.
- On the Page Layouts page, click Appointment Layout (or whatever layout you're using).
- Drag the Attendee Limit field from the palette to the Information area of the Appointment Detail page.
- Save your changes.