
You are here:
Designate Your Availability (Support Staff)
Learn how to set up staff availability.
With Student Success Hub, students can schedule appointments with you from the student portal. If you're available to meet on Tuesdays from 9:30 AM to noon and you've designated 30-minute appointments, Student Success Hub allows up to five half-hour appointments. If you have walk-in availability, students can see those blocks of time and decide whether to schedule in advance or simply stop by. Spend more time engaging meaningfully with your students, and less time looking for daylight on your calendar.
- Verify Your Time Zone
Make sure that you and your calendar stay in sync with your students by verifying your time zone setting. - Specify Your Appointment Settings and Recurring Availability
Use your Availability Settings to define the blocks of recurring times and details associated with your availability for student appointments. For example, you can customize the length of the buffer between appointments and the amount of advance notice you require for scheduled appointments. Availability Settings is also where you define the in-person, phone, and virtual locations where you can meet with students, and the topics you're available to discuss. - Edit One-Off Availability from the Appointment Manager
Make a one-off change to a time slot that you've designated as being available for support appointments from the Appointment Manager. - Understand How Appointment Buffers Work
Appointment Buffers are applied between scheduled appointments, both support and non-support, within an availability block. While buffers don’t apply before the first appointment or after the last appointment in a block, buffers at the end of non-advising events can overlap with the beginning of an availability block. - Understand How Group Availability Works
Group availability is time on your Calendar that's dedicated to appointments with groups of students—specifically, for group appointments that students sign up for in your student portal. You set these parameters for Group Availability blocks: - Considerations and Best Practices for Availability Settings
Availability Settings are just one of the factors Student Success Hub uses to optimize your available appointment times. Student Success Hub also considers times on your Calendar that you've blocked as not available, times you've defined as one-off availability, and exceptions to your recurring availability.
Verify Your Time Zone
Make sure that you and your calendar stay in sync with your students by verifying your time zone setting.
- In the page header, click your User icon, and then click Settings.
- In the My Personal Information menu, click Language and Time Zone.
- If the default Time Zone setting that your school uses doesn't match your own, change it to the correct time zone.
- Save your changes.
Specify Your Appointment Settings and Recurring Availability
Use your Availability Settings to define the blocks of recurring times and details associated with your availability for student appointments. For example, you can customize the length of the buffer between appointments and the amount of advance notice you require for scheduled appointments. Availability Settings is also where you define the in-person, phone, and virtual locations where you can meet with students, and the topics you're available to discuss.
-
Open your Availability Settings by clicking Appointment Manager in the footer. Then click
 .
. -
Specify your General Settings.
- Appointment Buffer
- Enter the number of minutes between back-to-back scheduled appointments to wrap up and prepare for the next. For more information, see Designate Your Availability (Support Staff).
- Advance Notice
- Specify the lead time you require for scheduling an appointment, in hours.
-
Specify your Length Settings.
- Custom Appointment Lengths
-
When enabled, you can set custom appointment lengths for Topics and Subtopics.
- Default Appointment Length
- The default length, in minutes, of appointments, as set by your Student Success Hub admin. Change the default if you'd like. (You can schedule one-off appointments that run longer or shorter than the default by specifying a custom time slot when you create or edit an appointment.)
-
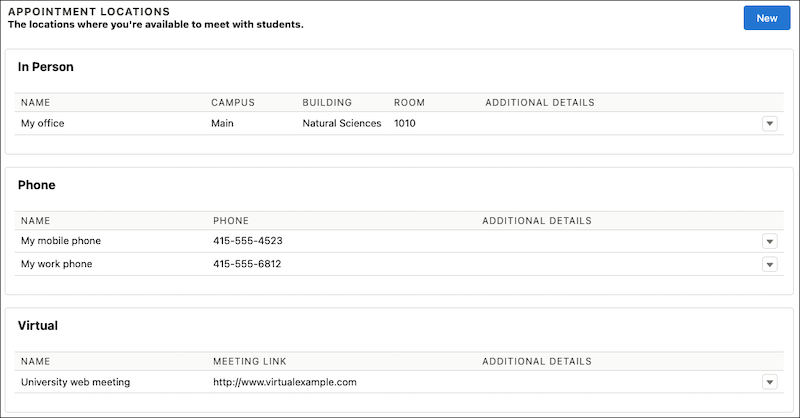
Create or edit your Appointment Locations.
Appointment Locations are where (or how) you're available to meet with students.
- In Person
-
In-person appointment locations are for on-campus meeting sites, such as conference rooms or faculty offices. You can provide these details for an in-person location: Campus, Building, Room, and Additional Details.
- Phone
-
For phone locations, you can provide the Phone (number) and Additional Details. Include your phone extension, if any, in either field.
- Virtual
-
For virtual locations, provide a Meeting Link (URL) and Additional Details. For example, enter your standing meeting room (a static link) for a third-party web-conferencing tool for the Meeting Link. Then provide manual, dial-in instructions in the Additional Details. Be sure to include the http:// or https:// prefix in the meeting URL.
 Note The Virtual Appointment Location Meeting Link has a limit of 255 characters. Shorten the URL to fit in the Meeting Link. Alternatively, add custom CSS in the Learner Portal:
- .meetingLink {
- overflow-wrap: break-word;
- }
- Other
-
For other locations, provide a descriptive Name and Additional Details.
At least one Appointment Location is required.
Click Edit for any Appointment Location record to change its details. To create additional Appointment Locations, click New. You can have multiple Appointment Locations of each type. For example, a Phone location for your mobile phone (for when you're working from home), and a Phone location for your office phone (for when you're on campus). Specify a unique, descriptive Name for each Appointment Location so you can distinguish locations of the same type. And enter phone numbers and web meeting links carefully; Student Success Hub doesn't perform validation on the text you enter in those fields. If desired, you can also leave the Meeting Link blank and add a URL to a scheduled virtual appointment later.
When you define your recurring availability blocks for appointments (in the next step), you'll associate each block with one or more Appointment Locations.
-
Save your Appointment Location and review it on the Availability Settings page.
-
Create or edit your recurring availability blocks.
In the Recurring Availability section, click New to create an availability block or Edit to edit an existing block. For example, if you're routinely available for scheduled appointments on Mondays and Tuesdays from 2:30 PM to 4:30 PM, schedule a recurring availability block for those days and times.
- Subject
- Enter a Subject that indicates your availability. For example, Open for Scheduled Support Appointments. This text appears on your Calendar and your students can see it if your Student Success Hub administrator has made it visible.
- Type
- Specify whether you're available for Scheduled, Walk-In, or Group appointments. For group availability, enter an Attendee Limit—the maximum number of students who can reserve a spot in a group appointment during the block.
- Topic
- If enabled, select one or more Topic-Subtopic combinations that you're available to discuss, and click Save. If you don't select any, your availability shows that you can meet about all Topics.
- Location
- Select one or more in-person, phone, or virtual locations for the availability block, and click Save. If you don't select any, your availability will show that you can meet at all of your Appointment Locations.
- Date and Time
- Enter the start and end dates and times for this recurring availability block.
- Recurrence
- Specify the cadence of the recurring block: how many weeks the block repeats (Repeat Every), and the days of the week it repeats on (Repeat On).
-
Save your recurring availability and review it in the Current and Future Availability table on the Availability Settings page.
 Tip If your record doesn't save, try choosing fewer days, a less frequent weekly pattern, or a shorter duration.
- Save your Availability Settings.
Edit One-Off Availability from the Appointment Manager
Make a one-off change to a time slot that you've designated as being available for support appointments from the Appointment Manager.
-
In the Appointment Manager, go to the day with the scheduled availability.
-
Click the action menu for the available time and select Delete Availability or Edit Availability.
-
Confirm your deletion or edit the details of the availability occurrence and save your changes.
If the deleted or edited occurrence was part of a recurring availability block, other occurrences are not affected. One-off exceptions don't show in the Recurring Availability section of your Availability Settings page.
Understand How Appointment Buffers Work
Appointment Buffers are applied between scheduled appointments, both support and non-support, within an availability block. While buffers don’t apply before the first appointment or after the last appointment in a block, buffers at the end of non-advising events can overlap with the beginning of an availability block.
For example, you have an availability block from 9:00 AM to 12:00 PM, with a non-support event for a staff meeting from 9:30 AM to 10:00 AM. Your default Appointment Length is 30 minutes and you set a 10-minute Appointment Buffer. That means two support appointments can take place during the block: one from 10:20 AM to 10:50 AM and one from 11:00 AM to 11:30 AM.
In this example, there isn't time to fit a 30-minute support appointment and the 10-minute buffer before the staff meeting at 9:30 AM.
The first available appointment starts at 10:20 AM because Student Success Hub first calculates the available appointment slots (accounting for buffers) and then removes the overlapping slots with scheduled events. The staff meeting overlaps with the 9:40 AM to 10:10 AM slot, followed by a 10-minute buffer, so the first available slot is 10:20 AM to 10:50 AM.
Also, buffers don't explicitly appear in the Appointment Manager, on your Calendar, or on the portal. When you or a student creates an appointment, the times offered for appointments account for your buffer.
Understand How Group Availability Works
Group availability is time on your Calendar that's dedicated to appointments with groups of students—specifically, for group appointments that students sign up for in your student portal. You set these parameters for Group Availability blocks:
-
The number of students that can attend (Attendee Limit).
-
The topic that you're available to discuss.
-
The time and place that you're available.
After you set up Group Availability, students can reserve a spot in a group appointment. For complete details on how students make group reservations and manage group appointments, see Review How Students Experience the Portal (Support Staff).
Considerations for Group Availability
-
You can't invite students to group appointments in Group availability blocks. If you want to host a group appointment, invite multiple students to an appointment during a recurring Scheduled availability block, or create a one-off appointment.
-
When you create an appointment, the days and times in the Predefined Availability tab on the New Appointment form show only Scheduled availability. Group availability isn't listed.
-
Keep each Group availability block to one topic and one location. Although nothing prevents you from selecting more than one topic or more than one location for the block, it's not a good idea. Here's why.
When you associate multiple topics or locations with a Group availability block, at first, students see all of the options in the Scheduling Wizard. When the first student reserves a spot in an appointment in the block, the appointment is assigned the selected topic and location. From then on, other students see only the selected topic and location for that group appointment in the wizard. If this happens for multiple appointments in the block, you might end up with several group appointments for a topic, but not at capacity. At the same time, students who want to meet to discuss other topics have fewer scheduling options to choose from.
If that first student cancels their attendance and no one else has reserved a spot in that appointment, the Scheduling Wizard restores the appointment slot. The restored appointment slot has all topics and locations available. However, if the first student cancels and other students have reservations, the appointment becomes available in the Scheduling Wizard for one more student to sign up. But it's only available for the originally selected topic and location.
It's all logical, but it can get messy quickly. It's better to associate Group availability blocks with just one topic and one location.
-
Keep your groups small. Although the Attendee Limit is 500, group availability isn't intended for large events. Consider using it for resume-writing workshops, study abroad prep sessions, and other topics that cover standard fare and have low risk of touching on privacy issues. Nothing prevents you from setting the Attendee Limit to 1. However, it doesn't make much sense to do so—that's not really a group appointment.
-
When you edit an existing Group availability block, Student Success Hub updates unreserved availability in the Scheduling Wizard, but preserves appointments that have already been created during the block. For example, say you create a Group availability block for 30-minute appointments on Fridays from 12 PM to 4 PM. Then, midway through the term, you want to scale back to 12 PM to 2 PM. Student Success Hub preserves both past and future appointments already created on those Fridays between 2 PM and 4 PM. However, SSH removes all unreserved availability on Fridays from 2 PM to 4 PM from the wizard. Students can continue to reserve available spots in any existing future appointments. If they cancel or reschedule, spots become available for other students to reserve.
-
Edit recurring group availability only through your Availability Settings. Don't change the Attendee Limit on an individual appointment in a Group availability block, and don't edit a one-off instance of group availability from the Appointment Manager.
-
Appointments created in the portal using group availability appear in the Appointment Manager in Student Success Hub just like scheduled group and individual appointments. You can view the appointment and attendee details, assign attendees Tasks and Success Plans, and so on. You can't, however, add or remove attendees from the appointment.
Considerations and Best Practices for Availability Settings
Availability Settings are just one of the factors Student Success Hub uses to optimize your available appointment times. Student Success Hub also considers times on your Calendar that you've blocked as not available, times you've defined as one-off availability, and exceptions to your recurring availability.
-
Be sure to cancel availability when you need to, and to Keep Your Calendar Up-to-Date with Your Availability (Support Staff).
-
Recurring availability blocks are subject to system limits on Event records. The more recurrences (Events) in the series, the shorter the date range you're able to schedule. In other words, if you're only available once a week, you're able to schedule farther out than if you're available several days and times per week. If possible, align your availability with your academic calendar by defining blocks that last no more than a term. You can schedule for a shorter duration (such as additional hours during registration periods), but try not to schedule a recurrence that lasts for more than a few months.
-
Try to not create overlapping blocks of availability. For example, say you create Scheduled availability on Mondays from 1 PM to 3 PM and Walk-In availability on Mondays from 2 PM to 4 PM. Students see both scheduled and walk-in appointments available with you between 2 PM and 3 PM. While Student Success Hub doesn't double-book you, too many concurrent or intersecting options for availability types, locations, or topics, creates a confusing experience for students in the Scheduling Wizard.
-
When you edit a recurring availability block or Appointment Location, the changes take effect immediately and apply to all future days in the recurrence. Anyone who schedules an appointment in Student Success Hub or in the portal sees the updated availability options.
-
You can't delete Appointment Locations that have upcoming appointments associated with them. Also, Student Success Hub requires at least one Appointment Location. So, if you only have one Appointment Location, you can't delete it.
-
When you cancel a recurring availability block:
-
If the recurrence has started, canceling it changes the end date to the current date. Any remaining future availability is removed from your Calendar, starting from the next day onward. The recurrence is moved to the Past Availability table, also from the next day onward.
-
If the recurrence hasn't started, canceling it removes all associated availability from your Calendar and deletes the entire recurrence. When you cancel a recurring availability block before it starts, the canceled recurrence isn't saved in Past Availability.
-
-
Additional Details in Appointment Locations aren't included in appointment email confirmations. However, students see the Additional Details on the appointment card in the portal and, if they have access to them, on Appointment record detail pages.
- View your Appointment Settings and current or future Scheduled Recurring Availability in the Appointment Availability component on your User page. View your current, future, and past recurring availability on the Availability Settings page.
-
Expired and canceled recurring availability blocks show for 90 days in the Past Availability section of the Availability Settings page, and then they're archived. To see older availability, look on your Calendar.
-
We saved the best (and most important) item for last: Update your availability early and often! As soon as you schedule a recurring availability block, it's almost inevitable that exceptions or conflicts will arise. Remember to update your availability when they do.