
You are here:
Manage Queues (Support and Front-Desk Staff)
Learn how to guide students through a queue while they wait to meet with a support staff member.
- Add a Student to a Queue
Whether you're working with a queue for one support staff member or for the waiting room of a support office, department, or one-stop center, you add people to a queue the same way—it's just your entry point that might be different. - Guide a Student Through a Queue
When you add a student to a queue or a student checks in to a queue waiting room, a Support Queue Case is created. This Case record tracks the student's request to meet with a support staff member.
Add a Student to a Queue
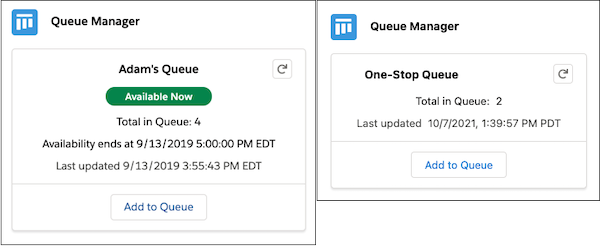
Whether you're working with a queue for one support staff member or for the waiting room of a support office, department, or one-stop center, you add people to a queue the same way—it's just your entry point that might be different.
-
In Student Success Hub, go to the User record or Support Pool record.
-
To work with a queue for a support staff member, open the support staff member's User record.
You can access a User record by searching for the support staff member's name in the app. Make sure to open the User record and not the Contact record. If you're a support staff member managing your own queue, simply click on your profile icon, then click your name.
 Tip To access queues quickly, pin the User or Support Pool records you access most frequently.
 -
To work with a queue for a department or one-stop waiting room, open the associated Support Pool record.
You can see a list of all the Support Pools records by selecting Support Pool in the app navigation menu.
-
-
In the Queue Manager component, click Add to Queue.
For support staff member walk-in queues, the Queue Manager component is dynamic. During walk-in hours, the component shows an Available Now badge and you can click the Add to Queue button. Outside of walk-in hours, the Add to Queue button doesn't work. Support Pool queues don't require this dynamic functionality, so you can always click the Add to Queue button. If a Support Pool doesn't support queue management (as in, for example, an office that doesn't accept walk-ins), a message shows in the component letting you know.
-
Search for and select a student, and specify a Topic and Subtopic.
If the person you're adding to the queue is there on a student's behalf, you can select Proxy.
-
Click Next.
-
Fill out the Case details.
For example, you can enter a priority and provide a Subject or Description to track more information about why the person wants to meet.
-
Save your changes.
Guide a Student Through a Queue
When you add a student to a queue or a student checks in to a queue waiting room, a Support Queue Case is created. This Case record tracks the student's request to meet with a support staff member.
Status—And Why It's So Important to Managing a Queue
The Support Queue Case's Status field tracks a student's progress through a queue. When you add someone to a queue, by default the case Status is set to Queued. This is the first stage in a queue. Here are all of the possible Status field values.
- Queued
The student has been added to the queue.
- Ready
The support staff member is ready to meet with the student. The student is notified or called in the waiting room.
- Abandoned
The student never showed after being notified that the support staff member was ready to meet. By default, this status is a Closed value.
- Referred
The queuing Case is closed and an appointment was created. The student and support staff member are now meeting, or a future appointment has been scheduled. By default, this status is a Closed value. Depending on how you want to implement queue management, you might not want to make this a Closed value.
- Fulfilled
The queuing Case is closed and the student's request is addressed. This value can be used when the Case doesn't result in an appointment—for example, when a student just wanted a copy of their transcript—or after an appointment when the support staff member confirms the student's issue is resolved. By default, this status is a Closed value.
If configured, the Status field value might be visually represented in a Path on the page. This lets you quickly see where a person is in the queue.
How Do I Update a Student's Status?
All the action happens on the Queue Actions component on the student record Case page.

You can interact with two sections of this component.
- Review & Update
- This section includes actions you'll take while the queuing case is still in an Open state: Queued or Ready. If the case status is Queued, enter a Location to Meet and then click Ready. If the case status is Ready but the student never shows, click Update to Abandoned.
- Review & Close
-
This section includes actions you'll take to close a queuing case. Keep in mind that there can be multiple Closed states. By default, the queuing case Status field values Referred and Fulfilled are both Closed states.
To move the queuing case to Referred, click Create Appointment. The Appointment Manager opens with the appointment in view. From here you can work with the appointment just like any other appointment, such as adding a Note or creating a Task.
To move the queuing case to Fulfilled, click Update to Fulfilled. Now you can review the next case in the queue.