
You are here:
Create a Campaign
The Campaign is the top level of your volunteer structure. You can either create a Campaign manually or use the wizard.
- Create a Campaign Using the Volunteers Wizard
The Volunteers Wizard speeds up creation of your Campaign, Job, and Shift structure in a couple of ways. When you create the Campaign, you can have the wizard automatically create some sample Jobs and Shifts that you can then tailor. Or, you can clone a Campaign. Cloning lets you base the new Campaign's Jobs, Shifts, and Volunteer Hours on an existing Campaign. - Create a Campaign Manually
You can manually create a volunteer Campaign if you want to start from scratch.
Create a Campaign Using the Volunteers Wizard
The Volunteers Wizard speeds up creation of your Campaign, Job, and Shift structure in a couple of ways. When you create the Campaign, you can have the wizard automatically create some sample Jobs and Shifts that you can then tailor. Or, you can clone a Campaign. Cloning lets you base the new Campaign's Jobs, Shifts, and Volunteer Hours on an existing Campaign.
- In Volunteers for Salesforce, click the Volunteers Wizard tab.
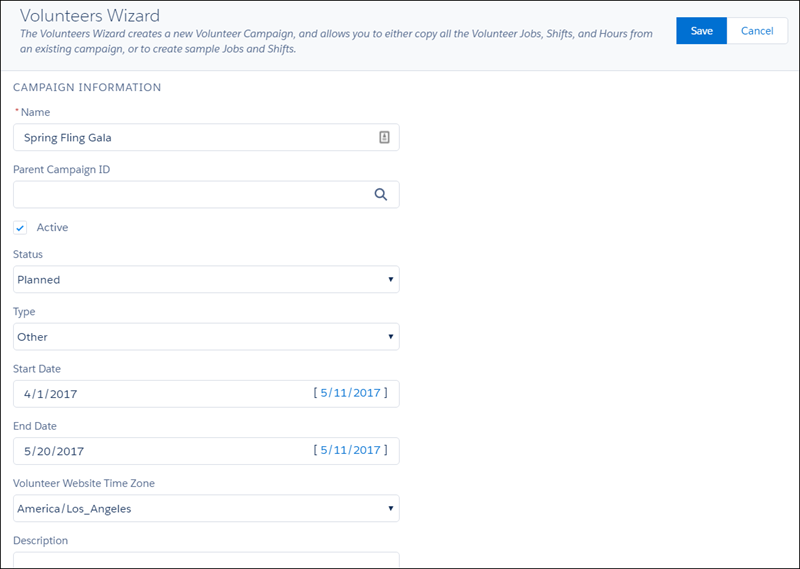
- Enter a name for the Campaign, typically the event name. For example, Spring Fling Gala.
- If this Campaign is related to another Campaign, select the related Campaign from the Parent Campaign ID drop-down menu.
- Select the Active option.
This ensures that the Campaign displays on the Shift Calendar on your website.
 Note We will go over how to set up website integration later.
 - Select the type of Campaign. Note Your Admin may have set up custom Campaign Types for you to use. Use the Campaign Type that best fits your needs.
- Choose a status. For example, if your event is a few months away, but you're starting to plan now, you would use the Planned status.
- Enter the start and end dates for your event. Note Although this is a one-time event, you may want to set the start date to when you will start planning for the event. The end date will typically be the date of the event itself.
- From the Volunteer Website Time Zone drop-down, select the time
zone where the event is occurring.
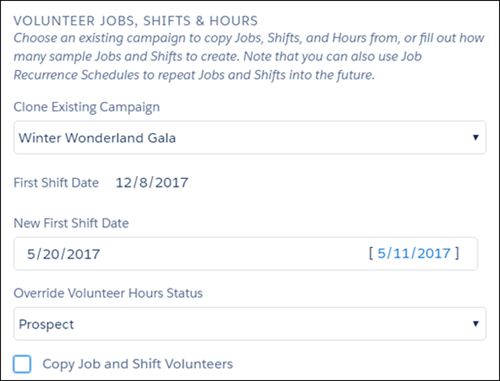
At this point you can choose to clone an existing Campaign. Cloning is useful if you plan the same event every year with the same Jobs and Shifts.
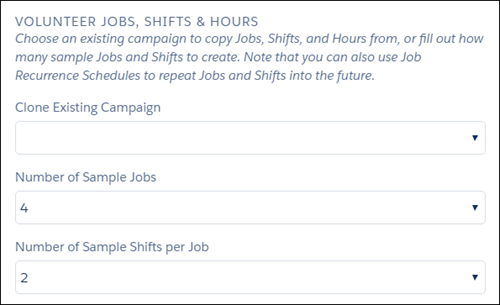
You can choose instead to have the wizard simply create a number of sample jobs and shifts, which you can then edit.
- To clone a Campaign:
- Select the existing Campaign from the Clone Campaign drop-down menu. Additional fields appear.
- Enter the New First Shift Date for your new Campaign. All subsequent Shifts will be created based on this date.
- To copy Volunteer Hours from the existing Campaign to your new Campaign, select Copy Job and Shift Volunteers.
- If you select Copy Job and Shift Volunteers, choose the
Status the Volunteer Hours should be copied over with. If you don't choose a
value, the Hours are copied with their existing Status values.
- Optionally, choose the number of sample Jobs and Shifts you
want to create.
- Click Save.
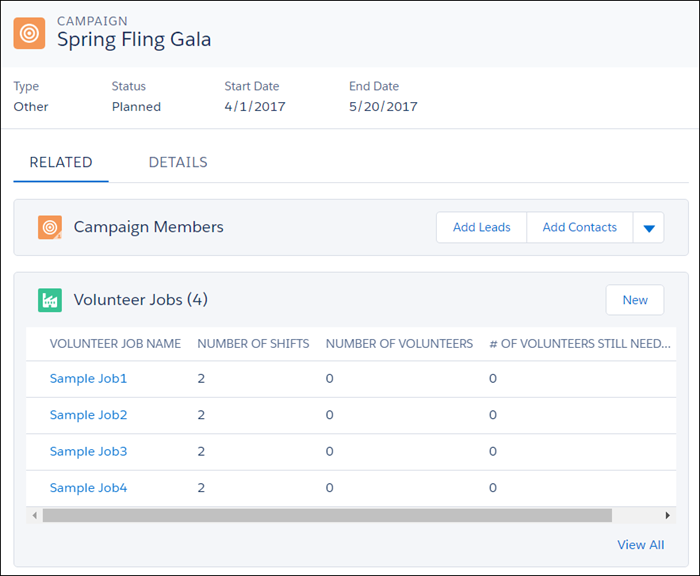
The detail page for the Campaign you created appears. If you chose to clone an existing Campaign, you see the Jobs and Shifts copied from that Campaign on the Related tab. If you chose to create sample Jobs or Shifts, they are listed as Sample Job1, Sample Job2, and so on (as shown below).
Create a Campaign Manually
You can manually create a volunteer Campaign if you want to start from scratch.
- In Volunteers for Salesforce, click the Campaigns tab.
- Click New.
- Select Volunteer
Campaign.
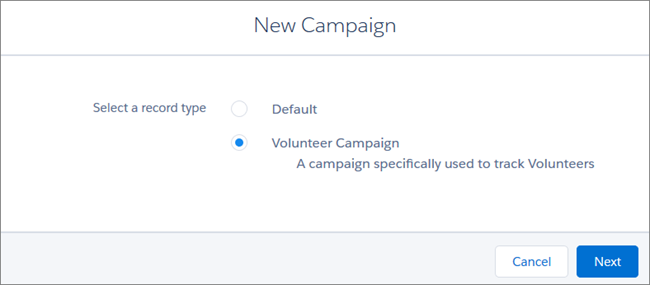
- Click Next.
- Enter your volunteer Campaign name. We recommend using the name of your event.
- Select the Active option. This ensures that the Campaign displays on the Shift Calendar on your website. To view an example of a Shift Calendar on the website, see Engage Volunteers on your Website.
- Select the type of Campaign. Note Your Admin may have set up custom Campaign Types for you to use. Use the Campaign Type that best fits your needs.
- Choose a status. For example, if your event is a few months away, but you're starting to plan now, you would use the Planned status.
- Enter the start and end dates for your event. Note Although this is a one-time event, you may want to set the start date to when you will start planning for the event. The end date will typically be the date of the event itself.
- From the Volunteer Website Time Zone drop-down, select the time
zone where the event is occurring.
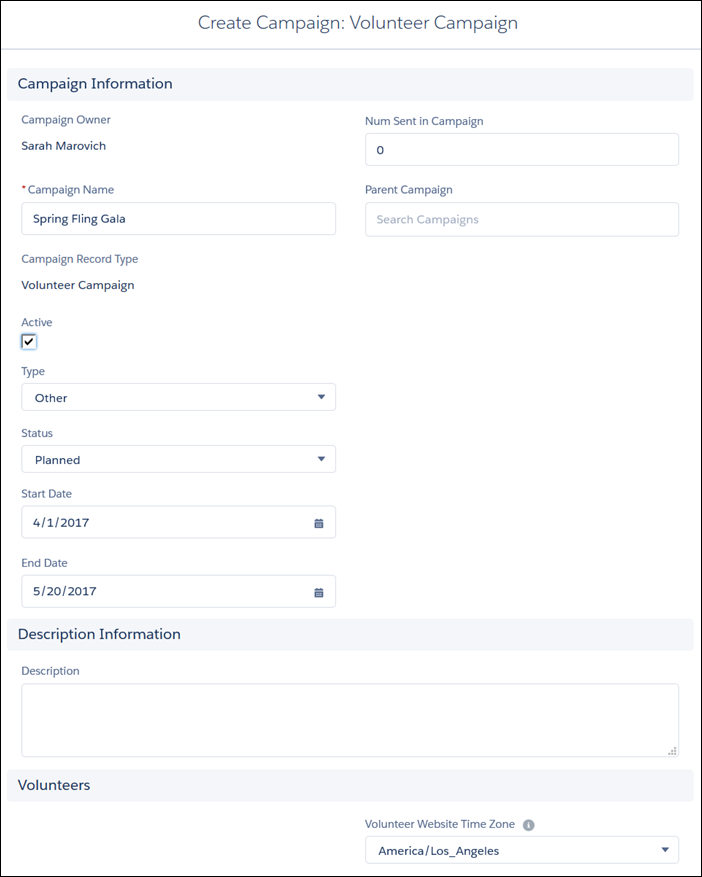
- Click Save. The Campaign Detail page appears.
Now that you have the top level of your structure, it's time to move on to creating Jobs for your Campaign.