
You are here:
Set Up Salesforce Channels in Your Org
Set up and configure Salesforce channels to let users collaborate on projects directly in a record and communicate with teammates in a unified channel across Salesforce and Slack.
Required Editions
| Available in: Lightning Experience |
| Available in: Essentials, Starter, Pro Suite, Professional, Enterprise, Unlimited, and Developer Editions |
| User Permissions Needed | |
|---|---|
| To connect Salesforce and Slack: | Salesforce admin and Slack Salesforce Admin system role |
| To create a Slack workspace: | Salesforce admin |
This topic covers the admin procedures for setting up Salesforce channels if you already use Slack. If you're new to Slack, check out Get Started with Slack in Salesforce.
- How Salesforce Channels Work
- Prerequisites and Considerations
- Step 1: Connect Slack and Salesforce
- Step 2: Choose Supported Objects
- Step 3: Add the Channel Component to Record Pages
- Remove Salesforce Channels from an Object
How Salesforce Channels Work
Each Salesforce channel is connected to a specific record, such as an account or opportunity record. To create that connection, you add the Slack component for Salesforce channels to any record page for standard or custom objects (just like any other standard component). And because the Slack component is located directly on its corresponding record, only users with permissions to access the record can access the channel in Salesforce.
Prerequisites and Considerations
Some things to consider when setting up Slack channels in Salesforce:
- Only users with these user license types can use Salesforce channels to collaborate internally on a record: Salesforce, Salesforce Platform Login, Lightning Platform - One App, Force.com - App Subscription, and Company Community User. External user licenses, such as Experience Cloud user license, are unsupported.
- You can add the Slack channel component to desktop record page configurations only.
- Access for Salesforce channels in Slack differs from Salesforce channels in Salesforce. In Salesforce, access to Slack channels is controlled by access to the corresponding record. In Slack, channel members have limited access to a Salesforce channel, even without access to the corresponding record. Learn more about access to Salesforce channels in Security for Salesforce channels in the Slack Help Center.
- Avoid adding the Slack channel component and the swarming component to the same record type.
Step 1: Connect Slack and Salesforce
Your org may be connected to Slack as part of previous integrations with Slack. If so, you can proceed to the next step.
- To begin the setup process, connect your Salesforce org and Slack. See Connect Salesforce and Slack in the Slack Help Center.
- If you choose to automatically map users using either Email or SAML NameID, people can automatically use Salesforce channels in Salesforce. If you choose not to automatically map users or if users can’t be mapped, users can manually sign in to Slack when prompted to connect their Salesforce and Slack accounts.
Step 2: Choose Supported Objects
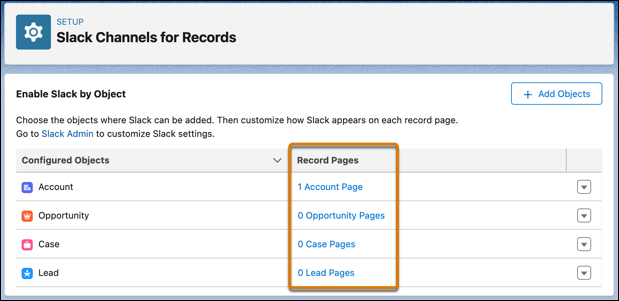
Choose which objects can use Slack channels in Salesforce. Users in Salesforce can view existing record channels or create new channels. If your Salesforce org previously used Salesforce channels in Slack, your existing supported objects are listed in the Slack Channels for Records page in Setup.
- From Setup, in the Quick Find box, enter Slack Channels for Records and select it.
- Click + Add Objects and select the objects that you want to use for Slack record channels.
- Click Add Objects to finish.
Step 3: Add the Channel Component to Record Pages
After you choose which objects to support, you can add the Slack channel component for those record pages in Lightning App Builder. When a record page contains a Slack channel component, users in Salesforce can view or create Slack channels for it.
-
In the Slack Channels for Records page in Setup, under Record Pages, click the relevant
page configuration.
- Click Edit to open the page in Lightning App Builder.
- In Lightning App Builder, drag the Slack component from the Components list to a location in the record page. You can move the component around the page to a location that suits your needs.
- Click Activation to activate the record page.
- Save your changes.
Remove Salesforce Channels from an Object
If you no longer need a Salesforce channel configuration for a specific object, you can remove it. First, remove the Slack channel component from the record page, and then delete the configuration for the object.
- From Setup, in the Quick Find box, enter Slack Channels for Records and select it.
- Under Record Pages, select an object type, then click Edit next to the record page you’d like to edit.
- Locate the Slack channel component, click the Delete icon, and save your changes.
- Repeat the previous step if you have more than one record page configuration listed for an object type.
- From the Slack Channels for Records page, click the drop-down icon next to the configured object type, then click Remove Object.
- Click Remove Slack to finish.